Kodak 3600 User Manual - Page 36
Setting Video Quality
 |
UPC - 070038311508
View all Kodak 3600 manuals
Add to My Manuals
Save this manual to your list of manuals |
Page 36 highlights
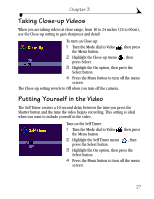
Chapter 3 Take the video: 1 Place the camera on a flat steady surface, or use a tripod. 2 Compose the picture, then press the Shutter button. See page 25 for two ways to record. Self Timer light The LCD turns off. The red Self Timer light, located on the front of the camera, turns on for 8 seconds, then blinks for 2 seconds until the video begins recording. While the camera is recording, the Self Timer light glows steady red, then goes off when recording stops. The Self Timer feature turns off after you take the video. Setting Video Quality Use the Video Quality setting to select a video resolution. 1 Turn the Mode dial to Video , then press the Menu button. 2 Highlight the Video Quality menu , then press the Select button. 3 Highlight the Quality setting you want to use. Best (320 x 240)-for more detail, good for display on a television or computer monitor. Produces higher resolution and larger file sizes (320 x 240 pixels). When Best Quality is set, two stars are displayed in the LCD status bar. Good (160 x 120)-for e-mailing, or LCD display. Produces lower resolution and smaller file sizes (160 x 120 pixels), good for conserving space in internal memory or on the Picture Card. 28
-
 1
1 -
2
-
3
-
4
-
5
-
6
-
7
-
8
-
9
-
10
-
11
-
12
-
13
-
14
-
15
-
16
-
17
-
18
-
19
-
20
-
21
-
22
-
23
-
24
-
25
-
26
-
27
-
28
-
29
-
30
-
 31
31 -
 32
32 -
 33
33 -
 34
34 -
 35
35 -
 36
36 -
 37
37 -
 38
38 -
 39
39 -
 40
40 -
 41
41 -
42
-
43
-
44
-
45
-
46
-
47
-
48
-
49
-
50
-
51
-
52
-
53
-
54
-
55
-
56
-
57
-
58
-
59
-
60
-
61
-
62
-
63
-
64
-
65
-
66
-
67
-
68
-
69
-
70
-
71
-
72
-
73
-
74
-
75
-
76
-
77
-
78
-
79
-
80
-
81
-
82
-
83
-
84
-
85
-
86
-
87
-
88
-
89
-
90
-
91
-
92
-
93
-
94
-
95
-
96
-
97
-
98
-
99
-
100
-
101
-
102
-
103
-
104
-
105
-
106
 |
 |
