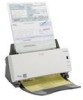
Kodak I1120 User Guide
Kodak I1120 - Document Scanner Manual
 |
UPC - 041778456927
View all Kodak I1120 manuals
Add to My Manuals
Save this manual to your list of manuals |
Kodak I1120 manual content summary:
- Kodak I1120 | User Guide - Page 1
- Kodak I1120 | User Guide - Page 2
" later in this guide for supplies and catalog numbers. Environmental information • The Kodak ScanMate i1120 Scanner is designed to meet worldwide environmental requirements. • Guidelines are available for the disposal of consumable items that are replaced during maintenance or service; follow local - Kodak I1120 | User Guide - Page 3
may cause radio interference. Install and use the equipment according to the instruction manual. Acoustic emission Maschinenlärminformationsverordnung noise emission value is - Kodak I1120 | User Guide - Page 4
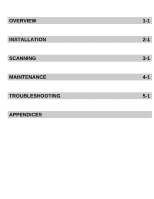
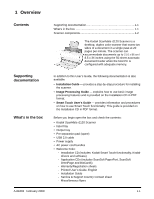
OVERVIEW 1-1 INSTALLATION 2-1 SCANNING 3-1 MAINTENANCE 4-1 TROUBLESHOOTING 5-1 APPENDICES - Kodak I1120 | User Guide - Page 5
and check the contents: • Kodak ScanMate i1120 Scanner • Input tray • Output tray • Pre-separation pad (spare) • USB 2.0 cable • Power supply • AC power cord bundles • Welcome Folio: - Installation CD (includes: Kodak Smart Touch functionality, Kodak drivers and software) - Application CDs (includes - Kodak I1120 | User Guide - Page 6
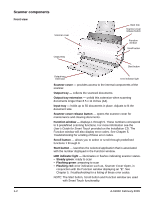
documents. Function window - displays 1 through 9. These numbers correspond to 9 predefined scanning functions. For more information see the User's Guide for Smart Touch provided on the Installation CD. The Function window will also display error codes. See Chapter 5, Troubleshooting for a listing - Kodak I1120 | User Guide - Page 7
off. Power port - connects the power cord to the scanner. USB port - connects the scanner to the PC. Calibration guide Pre-separation pad Rollers Calibration guide - for optimum image quality, keep the calibration guide clean. Pre-separation pad and rollers- provides smooth document feeding and - Kodak I1120 | User Guide - Page 8
Contents Installing the scanner 2-1 Install the Kodak Driver Software 2-1 Attach the input tray 2-2 Attach the output tray 2-4 Connect the power cord and USB cable 2-5 Turning on the scanner 2-6 Installing the scanner This section provides detailed information of the Installation Guide that - Kodak I1120 | User Guide - Page 9
have read and agreed with the terms of the Software License Agreement. The installation will start and several progress screens will be displayed. 5. Click Finish when the installation is complete. 6. Remove the Kodak ScanMate i1120 Scanner Installation CD from the CD-ROM drive. 1. Press the release - Kodak I1120 | User Guide - Page 10
3. Align the four tabs on the input tray with the slots on the scanner. 4. Roll the input tray toward the back of the scanner until it snaps into place. 5. Close the scanner cover. A-61602 February 2009 2-3 - Kodak I1120 | User Guide - Page 11
Attaching the output tray 1. Locate the output tray slots on the scanner. 2. Align the output tray pins with the slots and lower the output tray into place. NOTE: The output tray can be folded up when not in use for easy storage. 2-4 A-61602 February 2009 - Kodak I1120 | User Guide - Page 12
Connecting the power cord and USB cable When the drivers have been installed, connect the power supply, power cord and USB cable to the scanner. Refer to the illustration below for making proper connections. Make sure the power outlet is located within 1.52 metres (5 feet) of the scanner and is - Kodak I1120 | User Guide - Page 13
Please wait while the operating system synchronizes the scanner with the installed software. When the installation process is complete and ready to scan, the green LED indicator light will stop flashing and a number will be displayed in the Function window. NOTE: If the LED indicator light continues - Kodak I1120 | User Guide - Page 14
scanner is on and ready to scan (green indicator light is on and constant). 2. Adjust the side guides (by sliding them in or out) to accommodate the size of documents you are scanning. 3. If you are scanning documents longer than 8.5 x 11 inches (A4), open the extender on the input and output trays - Kodak I1120 | User Guide - Page 15
Getting your documents ready to scan 1. Standard paper size documents feed easily through the scanner. When organizing documents for scanning, stack the documents so the lead edges are aligned and centered in the input tray. This allows the feeder to introduce documents into the scanner one at a - Kodak I1120 | User Guide - Page 16
PDAs and PIMs. NOTE: Smart Touch was installed when you installed the Kodak Driver Software. The rest of the above scanning applications are provided on separate CDs that were included with your scanner. Refer to the application's User's Guide for instructions on how to install and use it. A-61602 - Kodak I1120 | User Guide - Page 17
Smart Touch, see the User's Guide for Smart Touch provided on the Installation CD. 1. Press the Scroll button until number "6" is displayed in the function window. 2. Press the Start button. The document will be scanned and the resulting image will be placed in the Output folder in the Smart Touch - Kodak I1120 | User Guide - Page 18
area 4-4 Replacement procedures 4-4 Replacing the pre-separation pad 4-4 Replacing the feed roller assembly 4-6 Supplies and consumables 4-8 Cleaning procedures Your scanner needs to be cleaned periodically. If your documents do not feed easily, if several documents feed at the same time or - Kodak I1120 | User Guide - Page 19
can remove the roller. See "Replacing the feed roller assembly" later in this chapter. 3. Wipe the NFR rollers from side to side. Rotate the NFR rollers to clean the entire surface. NOTE: For easier cleaning of the NFR rollers, you may want to order Kodak ScanMate i1120 Scanner Cleaning Swabs. For - Kodak I1120 | User Guide - Page 20
the release button to open the scanner cover. 2. Squeeze the plastic clamps that hold the pre-separation pad in place and lift it out of position. 3. Wipe the pre-separation pad from top to bottom with a roller cleaning pad. 4. Reinsert the pre-separation pad into position, aligning it into the - Kodak I1120 | User Guide - Page 21
not to bend the white tabs; bending the tabs may cause paper feeding problems. 4. When finished, close the scanner cover. Degradation of feeder performance, multiple feeds, stoppages, etc. indicate a need to change the pre-separation pad. Certain paper types such as carbonless paper or newsprint, or - Kodak I1120 | User Guide - Page 22
1. Press the release button to open the scanner cover. 2. Squeeze the plastic clamps that hold the pre-separation pad in place and lift it out of position. 3. Insert the new pre-separation pad into position, aligning it with the slots, and pushing it in until it snaps into place. 4. Close the - Kodak I1120 | User Guide - Page 23
open the scanner cover. 2. Remove the input tray by pulling it forward and lifting it out of position. Set it aside. 3. Rotate the orange tab upward to release the feed roller assembly and lift the feed roller assembly up and out of the scanner. 4. Install the new feed roller assembly by aligning - Kodak I1120 | User Guide - Page 24
tray toward the back of the scanner until it snaps into place. Contact your scanner supplier to order supplies. Description Kodak ScanMate i1120 Pre-separation pad Kodak ScanMate i1120 Feed Roller Assembly Kodak ScanMate i1120 Scanner Cleaning Swabs Kodak Digital Science Roller Cleaning Pads Kodak - Kodak I1120 | User Guide - Page 25
tray, output tray and side guides are adjusted for the width and length of the documents you are scanning. • all documents meet the specifications for size, weight and type. See Appendix A, Specifications for more information. • the scanner is clean. • the pre-separation pad is installed properly - Kodak I1120 | User Guide - Page 26
have clipped corners, the skew angle was too large for the scanner to handle. Be sure documents are placed in the input tray with the edges aligned and the side guides positioned correctly to accommodate the size documents you are feeding to avoid large skew angles. First image in a batch appears - Kodak I1120 | User Guide - Page 27
the error codes that may be displayed in the Function window. When an error occurs, the red indicator will blink and a number is displayed in the Function window. Code E 1 E 2 E 3 E 4 E 5 E 6 E 7 E 8 E 9 E 0 E 1 5 Problem Scanner failure Internal test Light check failure Command failure Document - Kodak I1120 | User Guide - Page 28
.75 in. (not including input and output trays) Depth: 15.9 cm / 6.25 in. Scanner Weight 2.6 kg / 5.72 lbs. Host Connection USB 2.0 Operating Temperature 10°C to 35°C Humidity 10 to 85% Environmental Factors Energy Star qualified scanners Power Consumption Standby: - Kodak I1120 | User Guide - Page 29
Following is the minimum recommended system configuration to run a Kodak ScanMate i1120 Scanner. • Recommended processor and memory: - For documents up to 356 mm (14 in.) long up to 300 dpi: 3.2 GHz Intel Pentium IV processor with 512 MB of RAM - For documents up to 660 mm (26 in.) long up to - Kodak I1120 | User Guide - Page 30
, or by visiting www.Kodak.com/go/disupport or by reviewing the Limited Warranty Summary Card enclosed with the Kodak Scanner. Proof of purchase is required to demonstrate eligibility for warranty service. Warranty exclusions Kodak's Limited Warranty does not apply to a Kodak Scanner that has been - Kodak I1120 | User Guide - Page 31
How to obtain limited warranty service Kodak Scanners are supplied with information on unpacking, setup, installation and operation. Careful reading of the User's Guide will answer most of the technical questions the end user might have regarding proper installation, operation and maintenance of the - Kodak I1120 | User Guide - Page 32
and accessories (which include power cord, documentation, etc.) not covered by the Limited Warranty. All products should be returned to Kodak in the original shipping container, or in a recommended packing box. The Kodak Scanner must have the shipping restraint installed before it is shipped. When - Kodak I1120 | User Guide - Page 33
• For Information on Kodak Scanners: www.Kodak.com/go/docimaging • For U.S. Service, Repair and Technical Assistance by Telephone: 5 a.m. to 5 p.m. Monday-Friday; (800) 822-1414 (excluding Kodak holidays) • For Technical Documentation and FAQ's available 24 hours a day: www.Kodak.com/go/disupport - Kodak I1120 | User Guide - Page 34
-
 1
1 -
 2
2 -
 3
3 -
 4
4 -
 5
5 -
 6
6 -
 7
7 -
8
-
9
-
10
-
11
-
12
-
13
-
14
-
15
-
16
-
17
-
18
-
19
-
20
-
21
-
22
-
23
-
24
-
25
-
26
-
27
-
28
-
29
-
30
-
31
-
32
-
33
-
34
 |
 |
