Kodak I1120 User Guide - Page 9
Attaching the input tray, i1120 Scanner Installation CD - scanmate
 |
UPC - 041778456927
View all Kodak I1120 manuals
Add to My Manuals
Save this manual to your list of manuals |
Page 9 highlights
Attaching the input tray 3. Click Next when the Welcome screen is displayed. 4. Click I Agree after you have read and agreed with the terms of the Software License Agreement. The installation will start and several progress screens will be displayed. 5. Click Finish when the installation is complete. 6. Remove the Kodak ScanMate i1120 Scanner Installation CD from the CD-ROM drive. 1. Press the release button to open the scanner cover. 2. Attach the two input tray pieces by aligning the slots and snapping them together. 2-2 A-61602 February 2009
-
 1
1 -
2
-
3
-
 4
4 -
 5
5 -
 6
6 -
 7
7 -
 8
8 -
 9
9 -
 10
10 -
 11
11 -
 12
12 -
 13
13 -
 14
14 -
15
-
16
-
17
-
18
-
19
-
20
-
21
-
22
-
23
-
24
-
25
-
26
-
27
-
28
-
29
-
30
-
31
-
32
-
33
-
34
 |
 |

2-2
A-61602
February 2009
3. Click
Next
when the Welcome screen is displayed.
4. Click
I Agree
after you have read and agreed with the terms of the
Software License Agreement. The installation will start and several
progress screens will be displayed.
5. Click
Finish
when the installation is complete.
6.
Remove the
Kodak ScanMate
i1120 Scanner Installation CD from
the CD-ROM drive.
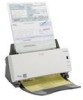
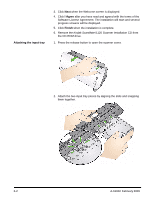
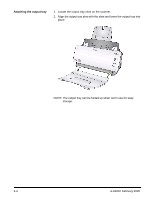
Attaching the input tray
1.
Press the release button to open the scanner cover.
2.
Attach the two input tray pieces by aligning the slots and snapping
them together.