Kodak MX1063 User Manual - Page 18
Taking panoramic pictures, Compensation, White Balance, AF Zone, AF Control
 |
UPC - 041778679036
View all Kodak MX1063 manuals
Add to My Manuals
Save this manual to your list of manuals |
Page 18 highlights
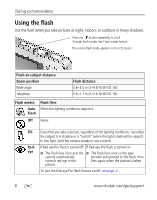
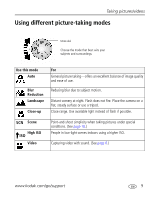
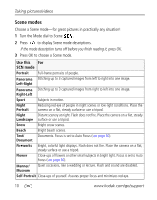
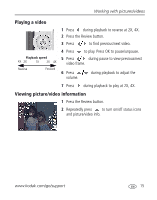
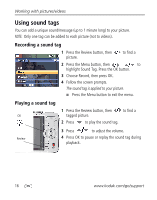
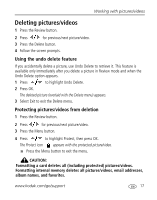
Taking pictures/videos Taking panoramic pictures Use panorama to "stitch" up to 3 pictures into a panoramic scene. NOTE: For best results, use a tripod. Individual pictures are not saved, even if panorama capture is cancelled before stitching occurs. (Picture size is set to 3.1 MP for each picture. Exposure Compensation, White Balance, AF Zone, AF Control, and Color Mode are set with the first picture. The flash is set to Off.) 1 Turn the Mode dial to SCN. 2 Press on the 4-way button to highlight Panorama Left-Right or Panorama Right-Left (depending on the direction you want to pan), then press the OK button. 3 Take the first picture. After a quickview, the LCD displays the liveview and an "overlay" from the first picture. 4 Compose the second picture. Make the overlay from the first picture cover the same portion in the new picture. (You can press the Delete button to re-take a picture.) 5 If you are taking only 2 pictures, press the OK button to stitch them together. After you take 3 pictures, the pictures are automatically stitched together. The LCD displays a quickview for approximately 5 seconds. Take 2 or 3 pictures. Get 1 panoramic picture. 12 www.kodak.com/go/support
-
 1
1 -
2
-
3
-
4
-
5
-
6
-
7
-
8
-
9
-
10
-
11
-
12
-
 13
13 -
 14
14 -
 15
15 -
 16
16 -
 17
17 -
 18
18 -
 19
19 -
 20
20 -
 21
21 -
 22
22 -
 23
23 -
24
-
25
-
26
-
27
-
28
-
29
-
30
-
31
-
32
-
33
-
34
-
35
-
36
-
37
-
38
-
39
-
40
-
41
-
42
-
43
-
44
-
45
-
46
-
47
-
48
-
49
-
50
-
51
-
52
-
53
-
54
-
55
-
56
-
57
-
58
-
59
-
60
-
61
-
62
-
63
-
64
-
65
-
66
-
67
-
68
-
69
-
70
-
71
-
72
-
73
-
74
-
75
 |
 |