Konica Minolta bizhub PRO 1200/1200P bizhub PRO 1051/1200/1200P PostScript 3 P - Page 33
Installable Options, After selecting [KONICA MINOLTA] in [Print Model], select [KONICA
 |
View all Konica Minolta bizhub PRO 1200/1200P manuals
Add to My Manuals
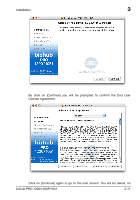
Save this manual to your list of manuals |
Page 33 highlights
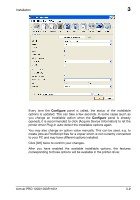
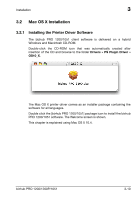
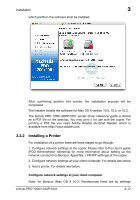
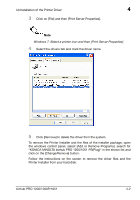
Installation 3 Adding a printer (Mac OS X 10.3) 1 In the "Apple" menu, select [System Preferences]. 2 Click [Print & Fax]. 3 Click [Setup printers]. When the [Printer list] appears, click [Add]. 4 AppleTalk/Rendezvous: Select AppleTalk or Rendezvous as connection method, and then the desired printer. LPR/IPP: Select IPP Printing as connection method, and select [LPD/LPR] or [Internet Printing Protocol] in [Printer Type]. Then enter the IP address of the copier in [Printer Address]. 5 After selecting [KONICA MINOLTA] in [Print Model], select [KONICA MINOLTA 1200/1051PS(Plug)] from the list, and click [Add]. The new printer is displayed in the printer list. 3.2.3 Installable Options The installable options tailor the user interface of the printer driver on your Mac and prevent the accidental selection of features which are not supported by the copier. The installable options determine which optional accessories are available at your engine (e.g. Paper Source Unit or stapler). To make the accessories available in the printer driver you must enable the corresponding installable options. To configure the installable options, open the print dialog of your document's application and click on [Copies & Pages]. From the scroll-down menu, select bizhub PRO 1200/1051. bizhub PRO 1200/1200P/1051 3-14
-
 1
1 -
2
-
3
-
4
-
5
-
6
-
7
-
8
-
9
-
10
-
11
-
12
-
13
-
14
-
15
-
16
-
17
-
18
-
19
-
20
-
21
-
22
-
23
-
24
-
25
-
26
-
27
-
 28
28 -
 29
29 -
 30
30 -
 31
31 -
 32
32 -
 33
33 -
 34
34 -
 35
35 -
 36
36 -
 37
37 -
 38
38 -
39
-
40
-
41
-
42
-
43
-
44
-
45
-
46
-
47
-
48
-
49
-
50
-
51
-
52
-
53
-
54
-
55
-
56
-
57
-
58
-
59
-
60
-
61
-
62
-
63
-
64
-
65
-
66
-
67
-
68
-
69
-
70
-
71
-
72
-
73
-
74
-
75
-
76
-
77
-
78
-
79
-
80
-
81
-
82
-
83
-
84
-
85
-
86
-
87
-
88
-
89
-
90
-
91
-
92
-
93
-
94
-
95
-
96
-
97
-
98
-
99
-
100
-
101
-
102
-
103
-
104
-
105
-
106
-
107
-
108
-
109
-
110
-
111
-
112
-
113
-
114
-
115
-
116
-
117
-
118
-
119
-
120
-
121
-
122
-
123
-
124
-
125
-
126
-
127
-
128
-
129
-
130
-
131
-
132
-
133
-
134
-
135
-
136
-
137
-
138
-
139
-
140
-
141
-
142
-
143
-
144
-
145
-
146
-
147
 |
 |
