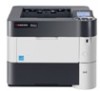
Kyocera ECOSYS FS-4100DN FS-2100DN/4100DN/4200DN/4300DN Operation Guide - Page 27
Network Settings, USB Memory, Counter, Exit ], Network, Restart Network
 |
View all Kyocera ECOSYS FS-4100DN manuals
Add to My Manuals
Save this manual to your list of manuals |
Page 27 highlights
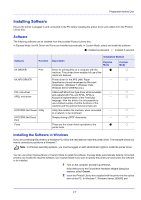
Preparation before Use Menu Security Submenu Network Security Setting WSD-PRINT On/Off Enhanced WSD On/Off EnhancedWSD(SSL) On/Off IPP On/Off SSL Setting SSL Off/On On/Off Encryption AES/DES/3DES IPP over SSL On/Off HTTPS On/Off IPSec On/Off Thin Print Off/On On/Off Thin Print over SSL On/Off LAN Interface Auto/10BASE-Half/ 10BASE-Full/ 100BASE-Half/ 100BASE-Full/ 1000BASE-T Note When the network settings have been changed, restart the network card of the device. This is mandatory to make the settings effective. For details, refer to Restart Network (Restarting the network card) on page 4-61. Network Settings This section explains the settings for when DHCP is used or when an IP Address is entered while TCP(IPv4) is selected. For details of the settings, refer to Network (Network settings) on page 4-54. Also, for how to use the Menu Selection System, refer to Using the Menu Selection System on page 4-7. Note When entering an IP Address manually, check the IP Address, Subnet Mask and Default Gateway with the system administrator. Menu: a b *1**R*e*p*o*r**t*P*r**i*n*t*****- 2 USB Memory 3 Counter [ Exit ] 1 While the printer displays Ready to print., Please wait. and Processing., press [Menu]. The mode selection menu is displayed. Network: a b *1**T*C*P*/*I**P*S*e**t*t*i*n*g*s**- 2 Restart Network 2 Press or to select Network. 3 Press [OK]. The Network menu screen appears. [ Exit ] 2-3
-
 1
1 -
2
-
3
-
4
-
5
-
6
-
7
-
8
-
9
-
10
-
11
-
12
-
13
-
14
-
15
-
16
-
17
-
18
-
19
-
20
-
21
-
 22
22 -
 23
23 -
 24
24 -
 25
25 -
 26
26 -
 27
27 -
 28
28 -
 29
29 -
 30
30 -
 31
31 -
 32
32 -
33
-
34
-
35
-
36
-
37
-
38
-
39
-
40
-
41
-
42
-
43
-
44
-
45
-
46
-
47
-
48
-
49
-
50
-
51
-
52
-
53
-
54
-
55
-
56
-
57
-
58
-
59
-
60
-
61
-
62
-
63
-
64
-
65
-
66
-
67
-
68
-
69
-
70
-
71
-
72
-
73
-
74
-
75
-
76
-
77
-
78
-
79
-
80
-
81
-
82
-
83
-
84
-
85
-
86
-
87
-
88
-
89
-
90
-
91
-
92
-
93
-
94
-
95
-
96
-
97
-
98
-
99
-
100
-
101
-
102
-
103
-
104
-
105
-
106
-
107
-
108
-
109
-
110
-
111
-
112
-
113
-
114
-
115
-
116
-
117
-
118
-
119
-
120
-
121
-
122
-
123
-
124
-
125
-
126
-
127
-
128
-
129
-
130
-
131
-
132
-
133
-
134
-
135
-
136
-
137
-
138
-
139
-
140
-
141
-
142
-
143
-
144
-
145
-
146
-
147
-
148
-
149
-
150
-
151
-
152
-
153
-
154
-
155
-
156
-
157
-
158
-
159
-
160
-
161
-
162
-
163
-
164
-
165
-
166
-
167
-
168
-
169
-
170
-
171
-
172
-
173
-
174
-
175
-
176
-
177
-
178
-
179
-
180
-
181
-
182
-
183
-
184
-
185
-
186
-
187
-
188
-
189
-
190
-
191
-
192
-
193
-
194
-
195
-
196
-
197
-
198
-
199
-
200
-
201
-
202
-
203
-
204
-
205
-
206
-
207
-
208
-
209
-
210
-
211
-
212
-
213
-
214
-
215
-
216
-
217
-
218
-
219
-
220
-
221
-
222
-
223
-
224
-
225
-
226
-
227
-
228
-
229
-
230
-
231
-
232
-
233
-
234
-
235
-
236
-
237
-
238
-
239
-
240
-
241
-
242
-
243
-
244
-
245
-
246
-
247
-
248
-
249
-
250
-
251
-
252
-
253
-
254
-
255
-
256
-
257
-
258
-
259
-
260
-
261
-
262
-
263
-
264
-
265
-
266
-
267
-
268
-
269
-
270
-
271
-
272
-
273
-
274
-
275
-
276
-
277
-
278
-
279
-
280
-
281
-
282
-
283
-
284
-
285
-
286
-
287
-
288
-
289
-
290
-
291
-
292
-
293
-
294
-
295
-
296
-
297
-
298
-
299
-
300
-
301
-
302
-
303
-
304
-
305
-
306
-
307
-
308
-
309
-
310
-
311
-
312
-
313
-
314
-
315
-
316
 |
 |
