Kyocera ECOSYS FS-4100DN FS-2100DN/4100DN/4200DN/4300DN Operation Guide - Page 31
Installing Software, Software, Installing the Software in Windows - kx driver
 |
View all Kyocera ECOSYS FS-4100DN manuals
Add to My Manuals
Save this manual to your list of manuals |
Page 31 highlights
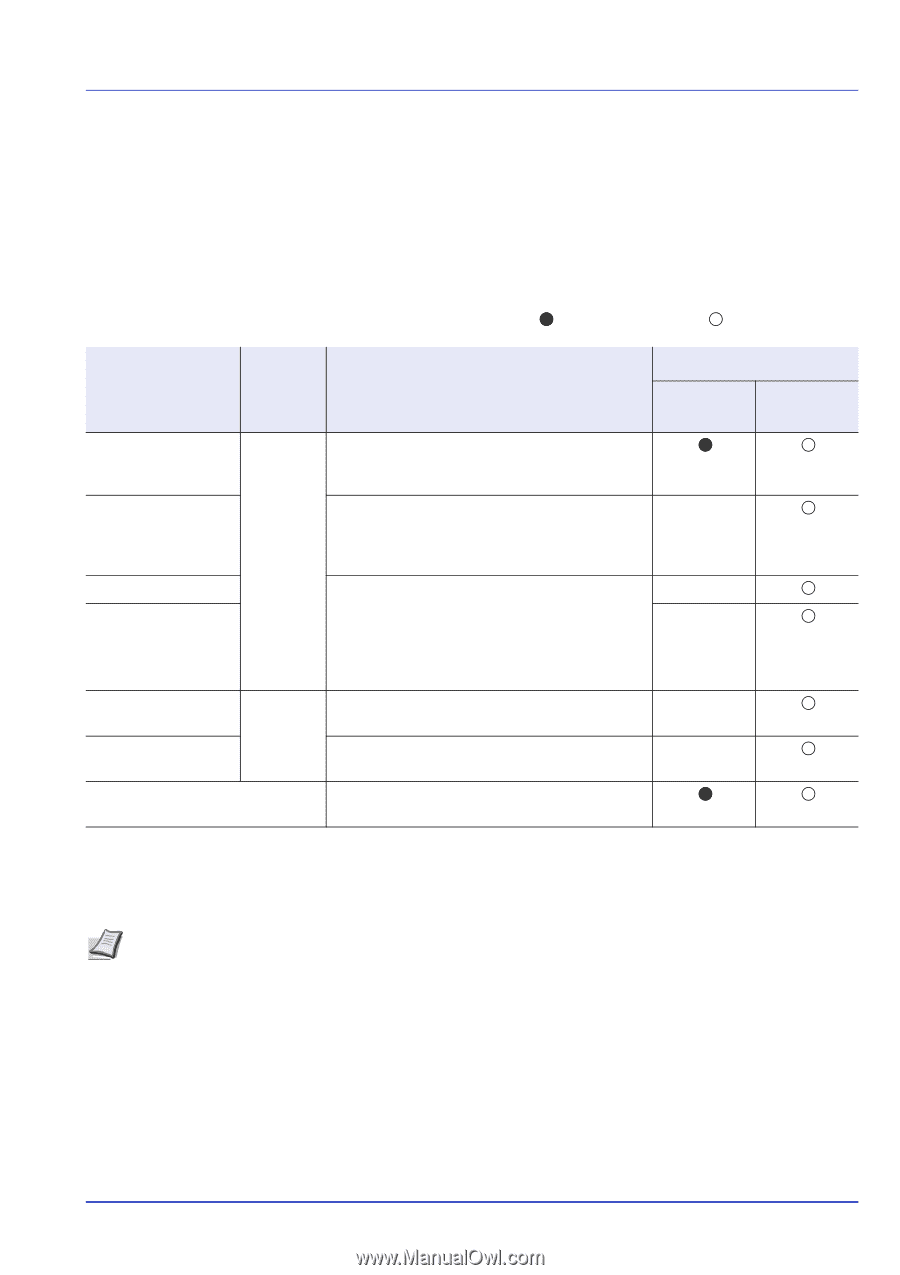
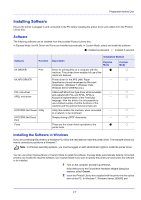
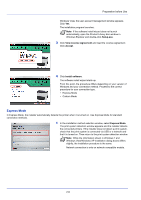
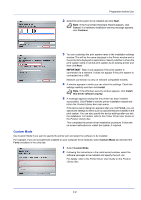
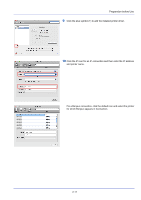
Preparation before Use Installing Software Ensure the printer is plugged in and connected to the PC before installing the printer driver and utilities from the Product Library disc. Software The following software can be installed from the provided Product Library disc. In Express Mode, the KX Driver and Fonts are installed automatically. In Custom Mode, select and install the software. : Installed as standard. : Installed if selected. Software KX DRIVER Function Print KX XPS DRIVER PCL mini-driver KPDL mini-driver KYOCERA Net Viewer Utility KYOCERA Net Direct Print Fonts Description Installation Method Express Mode Custom Mode Driver for printing files on a computer with the machine. This printer driver enables full use of the machine's features. Printer driver for the XPS (XML Paper - Specification) format developed by Microsoft Corporation. (Windows 7, Windows Vista, Windows Server 2008/R2 only.) A Microsoft Mini Driver type driver which emulates - and outputs both PCL and KPDL. KPDL is Kyocera's implementation of the PostScript - language. With this driver, it is only possible to use a limited number of all the functions of the machine and the optional functions there are. Utility that enables the machine, when connected - to a network, to be monitored. Simple printing of PDF documents. - These are the screen fonts equivalent to the printer fonts. Installing the Software in Windows If you are connecting this printer to a Windows PC, follow the next steps to install the printer driver. The example shows you how to connect your printer to a Windows 7. Note In Windows operating systems, you must be logged on with administrator rights to install the printer driver. You can use either Express Mode or Custom Mode to install the software. Express Mode automatically detects connected printers and installs the required software. Use Custom Mode if you want to specify the printer port and select the software to be installed. 1 Turn on the computer and start up Windows. If the Welcome to the Found New Hardware Wizard dialog box displays, select Cancel. 2 Insert the Product Library disc supplied with the printer into the optical drive of the PC. In Windows 7, Windows Server 2008/R2 and 2-7
-
 1
1 -
2
-
3
-
4
-
5
-
6
-
7
-
8
-
9
-
10
-
11
-
12
-
13
-
14
-
15
-
16
-
17
-
18
-
19
-
20
-
21
-
22
-
23
-
24
-
25
-
 26
26 -
 27
27 -
 28
28 -
 29
29 -
 30
30 -
 31
31 -
 32
32 -
 33
33 -
 34
34 -
 35
35 -
 36
36 -
37
-
38
-
39
-
40
-
41
-
42
-
43
-
44
-
45
-
46
-
47
-
48
-
49
-
50
-
51
-
52
-
53
-
54
-
55
-
56
-
57
-
58
-
59
-
60
-
61
-
62
-
63
-
64
-
65
-
66
-
67
-
68
-
69
-
70
-
71
-
72
-
73
-
74
-
75
-
76
-
77
-
78
-
79
-
80
-
81
-
82
-
83
-
84
-
85
-
86
-
87
-
88
-
89
-
90
-
91
-
92
-
93
-
94
-
95
-
96
-
97
-
98
-
99
-
100
-
101
-
102
-
103
-
104
-
105
-
106
-
107
-
108
-
109
-
110
-
111
-
112
-
113
-
114
-
115
-
116
-
117
-
118
-
119
-
120
-
121
-
122
-
123
-
124
-
125
-
126
-
127
-
128
-
129
-
130
-
131
-
132
-
133
-
134
-
135
-
136
-
137
-
138
-
139
-
140
-
141
-
142
-
143
-
144
-
145
-
146
-
147
-
148
-
149
-
150
-
151
-
152
-
153
-
154
-
155
-
156
-
157
-
158
-
159
-
160
-
161
-
162
-
163
-
164
-
165
-
166
-
167
-
168
-
169
-
170
-
171
-
172
-
173
-
174
-
175
-
176
-
177
-
178
-
179
-
180
-
181
-
182
-
183
-
184
-
185
-
186
-
187
-
188
-
189
-
190
-
191
-
192
-
193
-
194
-
195
-
196
-
197
-
198
-
199
-
200
-
201
-
202
-
203
-
204
-
205
-
206
-
207
-
208
-
209
-
210
-
211
-
212
-
213
-
214
-
215
-
216
-
217
-
218
-
219
-
220
-
221
-
222
-
223
-
224
-
225
-
226
-
227
-
228
-
229
-
230
-
231
-
232
-
233
-
234
-
235
-
236
-
237
-
238
-
239
-
240
-
241
-
242
-
243
-
244
-
245
-
246
-
247
-
248
-
249
-
250
-
251
-
252
-
253
-
254
-
255
-
256
-
257
-
258
-
259
-
260
-
261
-
262
-
263
-
264
-
265
-
266
-
267
-
268
-
269
-
270
-
271
-
272
-
273
-
274
-
275
-
276
-
277
-
278
-
279
-
280
-
281
-
282
-
283
-
284
-
285
-
286
-
287
-
288
-
289
-
290
-
291
-
292
-
293
-
294
-
295
-
296
-
297
-
298
-
299
-
300
-
301
-
302
-
303
-
304
-
305
-
306
-
307
-
308
-
309
-
310
-
311
-
312
-
313
-
314
-
315
-
316
 |
 |