Kyocera KM-1650 Scan System (F) Operation Guide (Setup Edition) - Page 15
Network TCP/IP settings - default pin
 |
View all Kyocera KM-1650 manuals
Add to My Manuals
Save this manual to your list of manuals |
Page 15 highlights
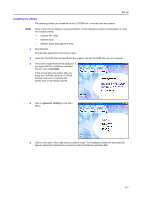
Set-up Network (TCP/IP) settings This section explains the procedures to set the network address for the scanner. Notes • The network address that should be set here will differ depending upon your network environment. Check with your network administrator BEFORE performing this setting. • If you are using a DHCP server to set the network addresses, you will not need to change the IP address and the subnet mask because the DHCP has been enabled (ON) as the factory default setting. 1 Press the System Menu/Counter key to display the Default setting screen. 2 Use the S and T keys to move D to select Scan default and then press the Enter key. The password entry screen will appear. Default setting / Counter Copy default Machine default Scan default 3 Enter the password with Numeric keys. The password at the factory default setting is 1600 for the 16 ppm Enter Pin Code using # key. model, 2000 for the 20 ppm model and 2500 for the 25 ppm model. Notes 4 5 • If the password matches, the screen will change to the Scanner setting screen. • Four-digit password can be changed. Refer to the Operetion Guide of machine. Use the S and T keys to move D to select DHCP and then press the Enter key. Screen will change to the DHCP/BOOTP setting screen. Scan Default: Subnet :255.255.255. 0 Gateway : 10.181. 12.11 DHCP/BOOTP : On Use the S and T keys to move D to select 1 Off and then press the Enter key. Screen will return to the Scanner setting screen of Step 4. DHCP/BOOTP Off > On Note 6 If you are using a DHCP server, select 2 On. In this case, even if you enter each IP address and subnet mask manually, the entered settings will be ignored. Use the S and T keys to move D to select IP address and then press the Enter key. Screen will change to the IP address setting screen. Scan Default: IP Address Subnet Gateway : 10. 181. 15. 11 : 255. 255.255. 0 : 10. 181. 12. 11 7 Enter the IP address by every three digits with Numeric keys. Press > key to move to the following three digits. IP Address Check the entered IP address and then press the Enter key if it is correct. Screen will return to the 10 . 181 . 15 . 11 Scanner setting screen of Step 6. 2-3
-
 1
1 -
2
-
3
-
4
-
5
-
6
-
7
-
8
-
9
-
 10
10 -
 11
11 -
 12
12 -
 13
13 -
 14
14 -
 15
15 -
 16
16 -
 17
17 -
 18
18 -
 19
19 -
 20
20 -
21
-
22
-
23
-
24
-
25
-
26
-
27
-
28
-
29
-
30
-
31
-
32
 |
 |
