Kyocera KM-5530 Print System Q Operators Guide (Setup)
Kyocera KM-5530 Manual
 |
View all Kyocera KM-5530 manuals
Add to My Manuals
Save this manual to your list of manuals |
Kyocera KM-5530 manual content summary:
- Kyocera KM-5530 | Print System Q Operators Guide (Setup) - Page 1
Operation Guide ALWAYS read this Operation Guide thoroughly before use. After reading, maintain it in good condition and keep it together with the Operation Guide for your copier. - Kyocera KM-5530 | Print System Q Operators Guide (Setup) - Page 2
or registered trademarks of their respective companies. The designations ™ and ® will not be used in this Operation Guide. All rights reserved. No part of this material may be reproduced or transmitted in any form or by any means, electronic or mechanical, including photocopying, recording - Kyocera KM-5530 | Print System Q Operators Guide (Setup) - Page 3
based on any third party claim. This limitation of remedies also applies to any developer of Programs supplied to IBM. IBM's and the developer's limitations of remedies are not cumulative. Such developer is an intended beneficiary of this Section. Some jurisdictions do not allow these limitations - Kyocera KM-5530 | Print System Q Operators Guide (Setup) - Page 4
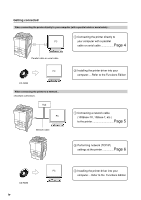
About this Operation Guide This Operation Guide is meant to be read when the Printer Board is installed in your copier and the copier is to be used as a local printer or network printer. It contains explanations on set-up procedures for using the copier as a printer. As the required - Kyocera KM-5530 | Print System Q Operators Guide (Setup) - Page 5
your computer .... Refer to the Functions Edition 1 Connecting a network cable (100Base-TX, 10Base-T, etc.) to the printer Page 5 2 Performing network (TCP/IP) settings at the printer Page 6 CD-ROM iv PC 3 Installing the printer driver into your computer ... Refer to the Functions Edition - Kyocera KM-5530 | Print System Q Operators Guide (Setup) - Page 6
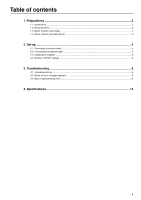
1-4 Name of parts (operation panel) ...3 2. Set-up ...4 2-1 Connecting the printer cable ...4 2-2 Connecting the network cable ...5 2-3 Installing the software ...5 2-4 Network (TCP/IP) settings ...6 3. Troubleshooting ...8 3-1 Canceling printing ...8 3-2 When an error message appears...9 3-3 Basic - Kyocera KM-5530 | Print System Q Operators Guide (Setup) - Page 7
serial cable • When connecting the printer to a network: Ethernet cable (100Base-TX or 10Base-T) *When you use a 10Base-T or 100Base-TX cable, make sure it is a shielded cable. *When you use a Parallel cable, make sure it is a shielded cable. 1-3 Name of parts (main body) 1 Memory Card (CompactFlash - Kyocera KM-5530 | Print System Q Operators Guide (Setup) - Page 8
4 Numeric keys Use to set enter settings directly. 5 G Touch panel in the printer mode 5 Printer Menu key Press to set printer defaults. 6 Cancel key Press to stop printing or to clear an error message. 7 GO key Press to restart printing as well as to initiate form feeding. This key is also used to - Kyocera KM-5530 | Print System Q Operators Guide (Setup) - Page 9
computer, use either a parallel cable or serial cable. CAUTION: ALWAYS turn the main switch to the printer OFF (O) BEFORE connecting the printer cable. 1 Turn the main switch located on the left side of the printer OFF (O) and then turn the power off to your computer as well. 3 Connect the other - Kyocera KM-5530 | Print System Q Operators Guide (Setup) - Page 10
cable To connect the printer to a network, use an Ethernet cable (100BaseTX or 10Base-T). 1 Turn the main switch located on the left side of the printer OFF (O). 2-3 Installing the software Perform the following procedure to install into your computer the printer driver and other software that - Kyocera KM-5530 | Print System Q Operators Guide (Setup) - Page 11
(TCP/IP) settings To use the printer as a network printer, it is necessary to set an IP address for the printer. Notes • The IP address that should be registered here will differ depending upon your network environment. Check with your network administrator BEFORE performing this setting. • If - Kyocera KM-5530 | Print System Q Operators Guide (Setup) - Page 12
the same way you entered the IP address in steps 8 to 10. 15 When you are finished making all of the network settings, touch the "Close" key. 11 Use the "L" and "M" cursor keys to select "Subnet Mask" and touch address in steps 8 to 10. 17 Touch the "Close" key. The printer will switch back to the - Kyocera KM-5530 | Print System Q Operators Guide (Setup) - Page 13
3. Troubleshooting 3-1 Canceling printing Perform the following procedure when you want to stop printing or you want to clear data. 1 Press the "Cancel" key. Inch specification While data is being processed, printing can be canceled on the printer screen. 1 Touch the "Cancel" key. Metric - Kyocera KM-5530 | Print System Q Operators Guide (Setup) - Page 14
Call service. Department code mismatch Exceeded print quantity limit. Exceeded pre-registered printing quantity. Error in printer mode RAM Disk error Press GO The finisher (option) has run out of staples. Refer to the Operation Guide for the finisher and replenish the staples. Trouble has occurred - Kyocera KM-5530 | Print System Q Operators Guide (Setup) - Page 15
Troubleshooting Display message Memory card error Press GO Hard disk error Press GO KPDL error Press GO Memory Card error Insert again Procedure Code:## Check the error code displayed in place of ## and refer to the following. 01: Format error. Reformat the memory card. 02: Memory card load error - Kyocera KM-5530 | Print System Q Operators Guide (Setup) - Page 16
. Initialization of the Memory Card (CompactFlash) currently inserted is necessary. Code:10 The optional interface board is loaded in the wrong slot. Turn power OFF and load the board in the correct slot. File error. Touch the "GO" key. The printer failed to read the font data. Try to read the font - Kyocera KM-5530 | Print System Q Operators Guide (Setup) - Page 17
3. Troubleshooting Display message Option ROM error Press GO Format error Hard Disk Check the waste punch box. (Check Punch Hole box.) Procedure An error occurred when reading the optional ROM. Press the Printer key to switch to the printer mode and then touch the "GO" key to clear the error. - Kyocera KM-5530 | Print System Q Operators Guide (Setup) - Page 18
trouble persists, contact your service representative or an authorized service center. * For information in regard to general mechanical trouble with the machine, refer to the Operation Guide for your copier. Problem Nothing is printed out Text is not printed correctly Print the printer driver as - Kyocera KM-5530 | Print System Q Operators Guide (Setup) - Page 19
Printing Size A3 (11" x 17") RAM Memory Capacity Installed: 32 MB Maximum: 256 MB (with an additional 256 MB of optional memory installed) Interface Parallel interface (IEEE 1284 compliant) x 1 RS-232C serial interface x 1 Network interface x 1 Installed Fonts PCL: 80 KPDL: 136 * Specifications - Kyocera KM-5530 | Print System Q Operators Guide (Setup) - Page 20
Guide de fonctionnement TOUJOURS lire entièrement ce Guide de fonctionnement avant d'utiliser l'appareil. Après l'avoir lu, conservez ce guide dans de bonnes conditions avec le Guide de fonctionnement de votre copieur. - Kyocera KM-5530 | Print System Q Operators Guide (Setup) - Page 21
sujet du Manuel d'assistance interactif Le Manuel d'assistance interactif de ce Guide de fonctionnement est enregistré sous forme de fichier FDC (format de légales relatives à la copie • Il peut être interdit de copier des documents protégés par des droits d'auteur sans l'autorisation préalable - Kyocera KM-5530 | Print System Q Operators Guide (Setup) - Page 22
Les connexions Pour raccorder directement l'imprimante à votre ordinateur (avec un câble parallèle ou un câble sériel)... 1 Raccordez directement l'imprimante à PC votre ordinateur avec un câble parallèle ou un câble sériel Page 4 Câble parallèle ou un câble sériel PC CD-ROM Pour raccorder l' - Kyocera KM-5530 | Print System Q Operators Guide (Setup) - Page 23
Table des matières 1. Préparatifs ...2 1-1 Accessoires ...2 1-2 Pièces nécessaires ...2 1-3 Nomenclature (corps principal) ...2 1-4 Nomenclature (panneau de commande 3 2. Installation ...4 2-1 Raccordement du câble d'imprimante ...4 2-2 Raccordement du câble de réseau ...5 2-3 Installation du - Kyocera KM-5530 | Print System Q Operators Guide (Setup) - Page 24
• Guide de référence rapide (Pour les réseaux) 1-2 Pièces nécessaires • Lorsque vous raccordez directement l'imprimante à votre ordinateur: câble parallèle (conforme à IEEE1284, long de 1,5 m ou moins) ou câble sériel • Lorsque vous raccordez l'imprimante à un réseau: câble Ethernet (100Base - Kyocera KM-5530 | Print System Q Operators Guide (Setup) - Page 25
1-4 Nomenclature (panneau de commande) 1. Préparatifs 1 Touche d'imprimante (témoin) Appuyez sur cette touche pour commuter au mode d'imprimante. Le témoin s'allume lorsque le mode est activé. 2 Témoin d'état S'allume/clignote pour indiquer l'état de l'imprimante. S'allume en vert pendant la ré - Kyocera KM-5530 | Print System Q Operators Guide (Setup) - Page 26
2. Installation 2-1 Raccordement du câble d'imprimante Pour raccorder directement le câble d'imprimante à votre ordinateur, utilisez un câble parallèle ou un câble sériel. ATTENTION: TOUJOURS mettre l'interrupteur principal de l'imprimante sur arrêt (O) AVANT de raccorder le câble d'imprimante. 1 - Kyocera KM-5530 | Print System Q Operators Guide (Setup) - Page 27
de renseignements concernant l'installation du logiciel requis, reportez-vous à "Functions Edition (Édition Fonctions)". 2 Raccordez le câble de réseau au connecteur Ethernet situé à l'arrière du côté droit de l'imprimante. 3 Raccordez l'autre extrémité du câble de réseau à votre noyau. 4 Remettez - Kyocera KM-5530 | Print System Q Operators Guide (Setup) - Page 28
2. Installation 2-4 Réglages de réseau (protocole TCP/IP) Pour utiliser l'imprimante comme imprimante de réseau, il est nécessaire de régler une adresse IP pour l'imprimante. Remarques • L'adresse IP devant être enregistrée ici est différente en fonction de l'environnement de votre réseau. - Kyocera KM-5530 | Print System Q Operators Guide (Setup) - Page 29
7 Utilisez les touche de curseur "L" et "M" pour sélectionner "IP Address", puis effleurez la touche "Change (CHANGER)". (Pouces) 2. Installation 9 Entrez les 3 chiffres suivants et appuyez sur la touche dièse (#). • Pour changer une adresse entrée, appuyez sur la touche dièse (#) pour sélectionner - Kyocera KM-5530 | Print System Q Operators Guide (Setup) - Page 30
2. Installation 11 Utilisez les touches de curseur "L" et "M" pour sélectionner "Subnet Mask" et effleurez la touche "Change (CHANGER)". (Pouces) 14 Entrez l'adresse de Gateway de la façon dont vous avez entré l'adresse IP dans les étapes 8 à 10. (Métrique) 15 Lorsque vous avez fini d'effectuer - Kyocera KM-5530 | Print System Q Operators Guide (Setup) - Page 31
17 Effleurez la touche "Fermer". L'imprimante retourne au mode d'imprimante. (Pouces) (Métrique) 2. Installation 9 - Kyocera KM-5530 | Print System Q Operators Guide (Setup) - Page 32
3. Dépannage 3-1 Annuler une impression Exécutez la procédure suivante lorsque vous désirez arrêter l'impression ou lorsque vous désirez libérer les données. 1 Appuyer sur la touche "Annulez (Annuler)". L'impression sera annulée. (Pouces) Pendant que les données sont traitées, il est possible d' - Kyocera KM-5530 | Print System Q Operators Guide (Setup) - Page 33
finisseur (en option) sont épuisées. Reportez-vous au Guide de fonctionnement du finisseur et réapprovisionnez-le en agrafes. Un problème s'est produit dans l'imprimante. Contactez votre technicien de service ou un centre de service agréé. Le code de département entré ne correspond pas à celui qui - Kyocera KM-5530 | Print System Q Operators Guide (Setup) - Page 34
se trouve ou non sur la carte mémoire. Disque dur Err/Appuyez ACTION. Code: ## Vérifier le code d'erreur affiché à la place de ## et reportez-vous à ce qui s'est écoulée. Pour plus de renseignements, reportez-vous à "KPDL Error Report print out (Impression du rapport d'erreur KPDL) (page 4-10)" et - Kyocera KM-5530 | Print System Q Operators Guide (Setup) - Page 35
la carte mémoire. Initialisez la carte mémoire (CompactFlash) actuellement insérée. Code: 10 La carte d'interface en option est chargée dans la mauvaise fente concernant l'ajout de mémoire, contactez votre technicien de service ou un centre de service agréé. • Si la durée de recouvrement automatique - Kyocera KM-5530 | Print System Q Operators Guide (Setup) - Page 36
3. Dépannage Message affiché Erreur ROM opt. /Appuyer sur CONT Erreur de format du disque dur Vider le bac de perforation Procédure Une erreur s'est produite lors de la lecture du ROM en option. Appuyez sur la touche d'imprimante pour passer au mode d'imprimante, puis effleurez la touche "Action" - Kyocera KM-5530 | Print System Q Operators Guide (Setup) - Page 37
des ajustements mineurs. Si le problème persiste, contactez votre technicien de service ou un centre de service agréé. * Pour les informations concernant les problèmes mécaniques généraux de l'appareil, reportez-vous au Guide de fonctionnement de votre copieur. Problème Point à vérifier Procédure - Kyocera KM-5530 | Print System Q Operators Guide (Setup) - Page 38
4. Spécifications Unité centrale de traitement PowerPC 750 (400 MHz) Vitesse d'impression Copieur 45 ppm: 45 pages/minute (A4 [8-1/2 po. x 11 po.]) Copieur 55 ppm: 55 pages/minute (A4 [8-1/2 po. x 11 po.]) Résolution d'impression Mode Fast 1200 Avec lissage sur arrêt: 600 dpi x 600 dpi Avec - Kyocera KM-5530 | Print System Q Operators Guide (Setup) - Page 39
Guía de operación Lea SIEMPRE completamente esta guía de operación antes de utilizar este aparato. Una vez leída, manténgala en buen estado y guárdela junto con la guía de operación para su copiadora. - Kyocera KM-5530 | Print System Q Operators Guide (Setup) - Page 40
de ciertos ajustes y configuraciones, y los procedimientos necesarios para su computadora. Acerca del manual en línea El manual en línea para esta guía de operación es un archivo PDF (Portable Document Format o formato de documentos portátil) que se encuentra en el CD-ROM incluido con este producto - Kyocera KM-5530 | Print System Q Operators Guide (Setup) - Page 41
Conexión Cuando conecte la impresora directamente a su computadora (con un cable paralelo o un cable serial)... Computadora 1 Conexión de la impresora directamente a su computadora con un cable paralelo o cable serial Página 4 Cable paralelo o cable serial Computadora CD-ROM Cuando conecte la - Kyocera KM-5530 | Print System Q Operators Guide (Setup) - Page 42
cable de red ...5 2-3 Instalación de los programas ...5 2-4 Ajustes de red (TCP/IP) ...6 3. Localización de averías 9 3-1 Cancelación de la impresión ...9 3-2 Cuando aparece un mensaje de error 10 3-3 Tabla de localización de averías básicas 14 4. Especificaciones ...15 1 - Kyocera KM-5530 | Print System Q Operators Guide (Setup) - Page 43
a su computadora: Cable paralelo (que cumpla con la norma IEEE 1284, de 1,5 m o menos) o cable serial • Cuando conecte la impresora a una red: Cable Ethernet (100Base-TX o 10Base-T) * Cuando utilice un cable 100Base-TX o 10Base-T, asegúrese de que sea un cable blindado. * Cuando utilice un cable - Kyocera KM-5530 | Print System Q Operators Guide (Setup) - Page 44
para establecer los ajustes predeterminados de la impresora. 6 Tecla Cancelar (Cancela) Pulse esta tecla para detener la impresión o borrar un mensaje de error. 7 Tecla GO Pulse esta tecla para reiniciar la impresión y para iniciar la alimentación de formularios. Esta tecla también se utiliza para - Kyocera KM-5530 | Print System Q Operators Guide (Setup) - Page 45
principal de la impresora. 2 Conecte el cable de impresora al conector de interfaz paralela o al conector de interfaz serial ubicado en la parte trasera del costado derecho de la impresora. * Para conocer detalles sobre la instalación de la interfaz de impresora, consulte "Functions Edition (Edici - Kyocera KM-5530 | Print System Q Operators Guide (Setup) - Page 46
sobre la instalación del programa necesario, consulte "Functions Edition (Edición de funciones)". 2 Conecte el cable de red al conector Ethernet ubicado en la parte trasera del costado derecho de la impresora. 3 Conecte el otro extremo del cable de red a su conexión de terminales. 4 Conecte - Kyocera KM-5530 | Print System Q Operators Guide (Setup) - Page 47
2. Instalación 2-4 Ajustes de red (TCP/IP) Para utilizar la impresora como una impresora de red se necesita establecer una dirección IP para la impresora. Notas • La dirección IP que deba registrarse aquí será diferente depend- iendo de la configuración de su red. Confirme con su administrador de - Kyocera KM-5530 | Print System Q Operators Guide (Setup) - Page 48
6 Seleccione "Encendido (ON)" bajo el ajuste "TCP/IP" y "Apagado (OFF)" bajo el ajuste "DHCP". (Pulgadas) 2. Instalación 9 Introduzca los 3 dígitos siguientes y pulse la tecla de número (#). • Para cambiar una dirección introducida, pulse la tecla de número (#) para seleccionar un bloque de 3 dí - Kyocera KM-5530 | Print System Q Operators Guide (Setup) - Page 49
2. Instalación 12 Introduzca la dirección de máscara subnet de igual forma que introdujo la dirección IP en los pasos 8 a 10. 15 Cuando termine de hacer todos los ajustes de red, toque la tecla "Cerrar". (Pulgadas) 13 Utilice las teclas del cursor "L" y "M" para seleccionar "Gateway" y toque la - Kyocera KM-5530 | Print System Q Operators Guide (Setup) - Page 50
3. Localización de averías 3-1 Cancelación de la impresión Realice el procedimiento indicado a continuación cuando quiera detener la impresión o cancelar los datos. 1 Presione la tecla "Cancelar (CANCELAR)". Se cancelará la impresión. Cuando se están procesando los datos, se cancelará la impresión - Kyocera KM-5530 | Print System Q Operators Guide (Setup) - Page 51
la administración de copias. Para imprimir más, cambie el ajuste de la administración de copias en la impresora. Este mensaje aparecerá cuando se produzca un error de impresora y el aparato esté en un modo diferente del modo de la impresora. Pulse la tecla de impresora para cambiar a la pantalla del - Kyocera KM-5530 | Print System Q Operators Guide (Setup) - Page 52
, la impresión se reanudará automáticamente cuando transcurra el tiempo establecido. Para obtener más información, consulte "KPDL Error Report print out (Impresión del informe de error KPDL)" (página 4-10) y "Auto Continue ON/OFF and Recovery Time (Activación/Desactivación de continuación automática - Kyocera KM-5530 | Print System Q Operators Guide (Setup) - Page 53
Error formato TARJ.MEMORIA Error Opcional interfaz No hay archivo Pulse GO Leer fuentes: Error Leer macro: Error Atención poca memoria Advertencia adapt imagen Printer Los datos que ya han sido procesados se imprimirán y la parte restante del trabajo de impresión se imprimirá en la página siguiente - Kyocera KM-5530 | Print System Q Operators Guide (Setup) - Page 54
cinta de perforaciones. 3. Localización de averías Procedimiento Se produjo un error al leer la ROM opcional. Pulse la tecla de impresora para cambiar al modo de impresora y luego toque la tecla "GO" para cancelar el error. Inicialice el disco duro. La caja de restos de papel perforado no - Kyocera KM-5530 | Print System Q Operators Guide (Setup) - Page 55
3. Localización de averías 3-3 Tabla de localización de averías básicas Si tiene problemas durante la utilización de este aparato como impresora, consulte la tabla siguiente antes de realizar pequeños ajustes. Si el problema no desaparece, póngase en contacto con su representante de servicio o con - Kyocera KM-5530 | Print System Q Operators Guide (Setup) - Page 56
4. Especificaciones CPU PowerPC 750 (400 MHz) Velocidad de impresión Copiadora de 45 ppm: 245 páginas/min. [A4 (8 1/2" x 11")] Copiadora de 55 ppm: 55 páginas/min. [A4 (8 1/2" x 11")] Resolución de impresión Modo Fast 1200 Con suavización DESACTIVADA: 600 ppp x 600 ppp Con suavización ACTIVADA:
-
 1
1 -
 2
2 -
 3
3 -
 4
4 -
 5
5 -
 6
6 -
 7
7 -
8
-
9
-
10
-
11
-
12
-
13
-
14
-
15
-
16
-
17
-
18
-
19
-
20
-
21
-
22
-
23
-
24
-
25
-
26
-
27
-
28
-
29
-
30
-
31
-
32
-
33
-
34
-
35
-
36
-
37
-
38
-
39
-
40
-
41
-
42
-
43
-
44
-
45
-
46
-
47
-
48
-
49
-
50
-
51
-
52
-
53
-
54
-
55
-
56
 |
 |
Operation Guide
<Set-up Edition>
ALWAYS read this Operation Guide thoroughly before use. After reading, maintain it in good condition and
keep it together with the Operation Guide for your copier.