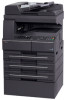
Kyocera TASKalfa 180 Operation Guide
Kyocera TASKalfa 180 Manual
 |
View all Kyocera TASKalfa 180 manuals
Add to My Manuals
Save this manual to your list of manuals |
Kyocera TASKalfa 180 manual content summary:
- Kyocera TASKalfa 180 | Operation Guide - Page 1
OPERATION GUIDE FTSA-1SK1a0lf0a 180/220 FS-1300D - Kyocera TASKalfa 180 | Operation Guide - Page 2
Introduction Thank you for your purchase of Taskalfa 180/220. This Operation Guide is intended to help you operate the machine correctly, perform routine maintenance and take a simple troubleshooting action as necessary, so that you can always use the machine in good condition. Please read this - Kyocera TASKalfa 180 | Operation Guide - Page 3
2-11 Originals Not Supported by the Document Processor 2-11 Part Names of the Document Processor 2-11 How to Load Originals ...2-12 Turning Power On ...2-13 User Interface language ...2-14 3 Basic Operation 3-1 Basic Copying Procedure ...3-1 Zoom Copying ...3-3 ...3-3 Auto Zoom ...3-3 Manual Zoom - Kyocera TASKalfa 180 | Operation Guide - Page 4
Processor ...5-1 Paper Feeder ...5-2 Duplex Unit ...5-2 Key Counter ...5-3 Printer Kit / Printer Server ...5-3 Additional Memory ...5-3 6 Maintenance 6-1 Cleaning the Machine ...6-1 Replacing the Toner Container and the Waste Toner Box 6-5 7 Troubleshooting 7-1 If Trouble Occurs ...7-1 Notes - Kyocera TASKalfa 180 | Operation Guide - Page 5
any technical inaccuracies or typographical errors in the present edition. No responsibility is assumed if accidents occur while the user is following the instructions in this guide. This guide, any copyrightable subject matter sold or provided with or in connection with the sale of the machine, are - Kyocera TASKalfa 180 | Operation Guide - Page 6
as a Sleep Mode where printer and fax functions remain with the device within a set amount of time. If paper used. Paper Recycling This device supports the recycled paper which reduces the load on the environment. Your sales or service representative can provide information about recommended paper - Kyocera TASKalfa 180 | Operation Guide - Page 7
. The sections of this guide and parts of the machine marked with symbols are safety warnings meant to protect the user, other individuals and surrounding The symbol indicates that the related section includes safety warnings. Specific points of attention are indicated inside the symbol. .... - Kyocera TASKalfa 180 | Operation Guide - Page 8
related section includes information on actions which must be performed. Specifics of the required action are indicated inside the symbol. Please contact your service representative to order a replacement if the safety warnings in this Operation Guide are illegible or if the guide itself is missing - Kyocera TASKalfa 180 | Operation Guide - Page 9
following locations for safety purposes. Be sufficiently careful to avoid fire or electric shock when removing a paper jam or when replacing toner. Label 2 High temperature inside. Do not touch parts in this area, because there is a danger of getting burned. Label 3 Do not attempt to incinerate - Kyocera TASKalfa 180 | Operation Guide - Page 10
keep the machine cool and facilitate changing of parts and maintenance, allow access space as shown below safe operation and performance of the machine. Install in an air-conditioned room (recommended room temperature the machine. • Avoid locations near a window or with exposure to direct sunlight. - Kyocera TASKalfa 180 | Operation Guide - Page 11
short. If an earth connection is not possible, contact your service representative. Other precautions Connect the power plug to the closest disconnect device. Ensure that the socket/outlet is located/installed near the equipment and is easily accessible. Handling of plastic parts inside the machine. ix - Kyocera TASKalfa 180 | Operation Guide - Page 12
power plug from the outlet and then contact your service representative. If anything harmful (paper clips, water, other fluids, etc.) falls into the fire or other trouble. It is therefore recommended that you consult with your service representative in regard to cleaning of internal parts. This is - Kyocera TASKalfa 180 | Operation Guide - Page 13
Do not touch electrical parts, such as connec tors or printed toner container and the waste toner box in accordance with Federal, State and Local rules and regulations. Store all consumables in a cool, dark location. If you will not be using the copier for a prolonged period of time, remove all paper - Kyocera TASKalfa 180 | Operation Guide - Page 14
invisible. Shown at below is the label located on the cover of the optical unit. 4. Maintenance For safety of the service personnel, follow the maintenance instructions in the other section of this manual. 5. Safety switch The power to the laser unit is cut off when the front cover is opened. Safety - Kyocera TASKalfa 180 | Operation Guide - Page 15
, pursuant to Part 15 of the FCC Rules. These limits are designed to provide reasonable protection against harmful interference in a residential installation. This equipment generates, uses and can radiate radio frequency energy and, if not installed and used in accordance with the instructions, may - Kyocera TASKalfa 180 | Operation Guide - Page 16
product to which this declaration relates is in conformity with the following specifications. Limits and methods of measurement for immunity characteristics of information technology Radiation Safety of laser products, equipment classification, requirements and user's guide EN60825-1 xiv - Kyocera TASKalfa 180 | Operation Guide - Page 17
of the toner container and the waste toner box and maintenance of this product. 7 Troubleshooting This chapter contains explanations on handling problems that may occur, for example, when an error message appears or if a paper jam occurs. Appendix The appendix explains the specifications of this - Kyocera TASKalfa 180 | Operation Guide - Page 18
Conventions in This Guide The following conventions are used depending on the nature of the or operations for reference. NOTE: Indicates items that are required or prohibited so as to avoid problems. IMPORTANT: Indicates what must be observed to prevent injury or machine breakdown and how to - Kyocera TASKalfa 180 | Operation Guide - Page 19
the notation used in this guide when referring to sizes of originals or paper sizes. As with A4, Paper For the originals/paper, dimension A is shorter than B. * The size of the original/paper that can be used depends on the function and source tray. For further details, refer to the page detailing - Kyocera TASKalfa 180 | Operation Guide - Page 20
tab - Adjust this tab to adjust the paper length guide to fit to the length of the paper to be loaded in the cassette. 7 Left cover handle - Pull this handle up to open the left cover. 8 Multi-purpose tray - When using small paper or special paper, set the paper here. 9 MP tray extension - Pull this - Kyocera TASKalfa 180 | Operation Guide - Page 21
corner of the platen. 12 Original size indicator plates - Be sure to set an original along these plates when setting it on the platen. 13 Left cover - Open this cover if a paper jam occurs inside the machine. 14 Waste toner box 15 Toner container release lever - Operate this lever when replacing the - Kyocera TASKalfa 180 | Operation Guide - Page 22
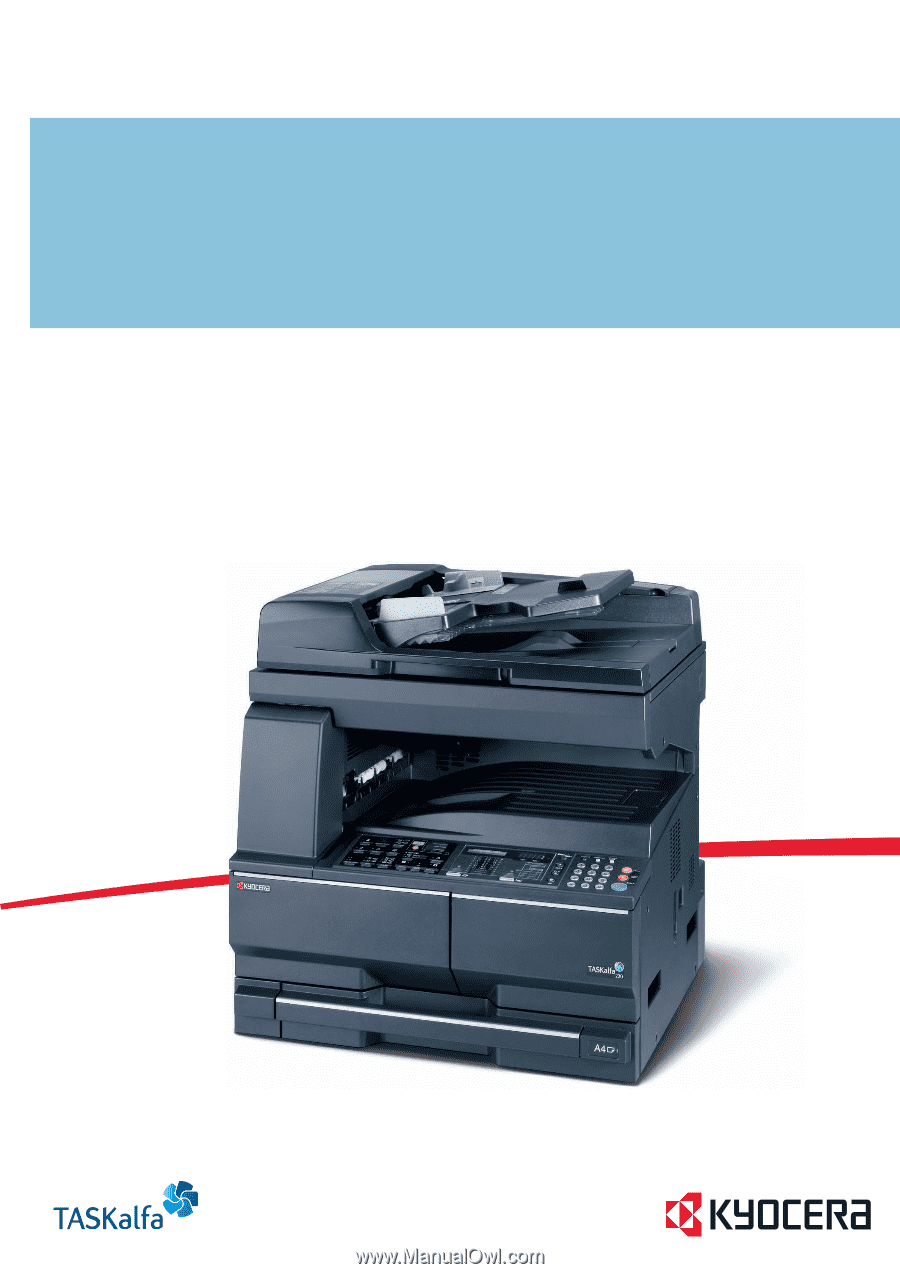
Names of Parts 21 21 19 20 19 Main power switch - Turn this switch on ( | ) before using this machine. 20 Main power switch cover - Open to operate the main power switch. 21 Handles for transport - Hold the four recessed portions at the right and left when transporting this machine. 1-3 - Kyocera TASKalfa 180 | Operation Guide - Page 23
Start Key (Indicator) 2 Stop/Clear Key 3 Reset Key 4 Energy Saver Key 5 Numeric keys 6 Interrupt Key 7 Logout Key 8 Key 9 Key 10 OK Key 11 /Auto%100% Key 12 Paper Supply Indicator 13 Paper Selection Key 14 Paper Supply Level Indicator 15 Paper Misfeed Indicator 16 MP Indicator 17 No. of - Kyocera TASKalfa 180 | Operation Guide - Page 24
10 23 Attention Indicator 24 Error Indicator 25 Add Toner Indicator 26 Maintenance Indicator 27 Image Quality Selection Key 28 Printer Key (Indicator) Press this to switch the message display between copier mode and printer mode, when the optional printer kit is installed. 29 2-sided Key 30 Mixed - Kyocera TASKalfa 180 | Operation Guide - Page 25
is ready to copy. Error codes Refer to chapter „Troubleshooting". System Menu (the mode after warm-up processing has been completed or Reset key was pressed) The copier has been set at the factory to automatically select a magnification ratio of 1:1 for the same size of paper as the original in - Kyocera TASKalfa 180 | Operation Guide - Page 26
Names of Parts Automatic Cassette Switching Function If multiple cassettes contain the same size paper and the paper in one cassette runs out during copying, the automatic cassette switching function will switch paper feed from the empty cassette to the other cassette that still contains paper. NOTE - Kyocera TASKalfa 180 | Operation Guide - Page 27
Names of Parts 1-8 - Kyocera TASKalfa 180 | Operation Guide - Page 28
high humidity conditions may lead to problems caused by ambient moisture. After loading paper into the cassette, store the remaining paper sealed in the paper storage bag. Also if any paper remains in the multi-purpose tray, store the paper sealed in the paper storage bag. Before leaving the machine - Kyocera TASKalfa 180 | Operation Guide - Page 29
and secure it. 3 Grasp the paper width adjusting tab and adjust the width guides to the paper size. Important! Make sure that the width guides are flush against the paper. If there is space between the guides and the paper, set the width guides again. Note The paper sizes are marked in the cassette - Kyocera TASKalfa 180 | Operation Guide - Page 30
the guide and the paper, set the length guide again. • When setting 11 × 17" (Ledger) paper, move the paper length guide to the right end and push it down as shown in the illustration. Note 5 The paper sizes are impressed in the cassette. Set the paper straight from the upper part. Preparations - Kyocera TASKalfa 180 | Operation Guide - Page 31
panel to match the size of the paper loaded in the cassette. The copier has been set at the time of shipping for automatic detection in inch units for inch specifications, or in centimeter units (A-B columns) for metric specifications. 1 Press the Paper Selection key for 3 seconds. The System Menu - Kyocera TASKalfa 180 | Operation Guide - Page 32
1 Open the multi-purpose tray. Note Pull out the multipurpose tray extension to match the paper size. Preparations 2 Adjust the sliders to the width of the paper to be set. 3 Set the paper along the sliders and put it in until it stops. 2-5 - Kyocera TASKalfa 180 | Operation Guide - Page 33
side which faced the top of its packaging facing down. If the front end of the paper is curled, straighten it out before setting it. • Make sure there are no creases, etc. in the paper. Creases in the paper may lead to paper jams. • Make sure that the slider is flush against the edge of - Kyocera TASKalfa 180 | Operation Guide - Page 34
postcards or envelopes in the MP tray 1 When loading a postcard or envelope, open the paper stopper shown in the figure. For landscape envelopes, close the flap. Insert the envelope all the way along the width guides, keeping the printing side face-down and the edge with the flap facing towards you - Kyocera TASKalfa 180 | Operation Guide - Page 35
paper size, and press the OK key. 4 Press or to select the media type, and press the OK key. The display will blink and the copier will return to the System menu. 5 Press or to select 00.Setting the paper size, and press the OK key. The paper size displayed are as shown below. Inch specifications: A3 - Kyocera TASKalfa 180 | Operation Guide - Page 36
Size. 5.88 to 17.00(")/148 to 432(mm): The range in which setting is possible, and press Non-std size W the OK key. 148mm 4 Proceed to paper such as thick paper (1) and vellum paper (2). When the media type has been selected, the copier will change the fixing temperature to match the paper - Kyocera TASKalfa 180 | Operation Guide - Page 37
, When copying from an original which cannot be set in the document processor, open the document processor and set the original directly on the platen. 1 Open the original cover. Note 2 If the optional document processor is installed, open the document processor. Before opening the document - Kyocera TASKalfa 180 | Operation Guide - Page 38
. Originals Supported by the Document Processor The document processor supports the following types of originals. • Sheet originals only • Paper weight One cause the originals to jam). Part Names of the Document Processor 1Original table 2Original insert guides 3Left cover 4Original eject table - Kyocera TASKalfa 180 | Operation Guide - Page 39
eject table. Originals left on the original eject table may cause the new originals to jam. 1 Adjust the original width guides to fit the originals. Note Before setting originals, make sure that there are no originals remaining on the original eject table. Originals left on the eject table may - Kyocera TASKalfa 180 | Operation Guide - Page 40
Turning Power On To turn machine power on: 1 Open the main power switch cover located on the right side of the machine and turn the main power switch on ( | ). The machine starts to warm up. Preparations 2 Once warm-up is completed, the Start indicator lights up green. 2-13 - Kyocera TASKalfa 180 | Operation Guide - Page 41
Preparations User Interface language You can select the language that is used in the message display. 1 Display the System Menu. 2 Press the key or the key to select 02.Language. Press the OK key. 3 Press the key or the key to select the language. Press the OK key. 2-14 - Kyocera TASKalfa 180 | Operation Guide - Page 42
original size indicator plates. Note 3 4 For the method of setting originals in the optional document processor, see Loading Originals in the Document Processor on page 2-11. Select the paper size. If Auto is lit on the message display, the paper of the same size as the original is automatically - Kyocera TASKalfa 180 | Operation Guide - Page 43
5 Adjust the copy density either manually (manual density mode) or automatically (auto set the desired number of copies (Up to 999). 7 Press the Start key to start copying. 8 Finished copies are delivered into the output tray. Note The capacity of the output tray is 250 sheets of standard paper - Kyocera TASKalfa 180 | Operation Guide - Page 44
-clockwise prior to copying. Auto Zoom The original image is reduced or enlarged according to the selected paper size. 8 1/2 × 11" A4 11 × 17": 129 % A3: 141 % 5 1/2 × 8 1/2": 64 % A5: 70 % 1 Set the original. 2 Press the Auto%/100% key. Auto % Indicator lits on the message display. 3 Press the - Kyocera TASKalfa 180 | Operation Guide - Page 45
Zoom The zoom ratio can be manually set between 25 % and 25 % 400 % in 1 % increments. 400 % 1 Set the original. 2 Press the key or the key. The zoom ratio will be displayed in the No. of Copies display. 3 Press the OK key to - Kyocera TASKalfa 180 | Operation Guide - Page 46
Operation Original Copy Note The optional duplex unit must be installed. The following modes are available for paper. If the number of originals is odd, the back side of the last copy page is blank. originals) Original Copy Note In the 1-sided to 2-sided mode, select the following setting - Kyocera TASKalfa 180 | Operation Guide - Page 47
sizes are limited to 11 × 8 1/2" and 16K in the inch specifications and A4, B5, and 16K in the metric specifications.The paper size can be changed and the zoom ratio adjusted to fit the size of the paper. 1 Set the original. 2 Press [2-sided], select the type of original and select , or to - Kyocera TASKalfa 180 | Operation Guide - Page 48
sided key for 3 seconds. 42.Duplex 2nd Rotation On 2 The System Menu for the reverse side setting of 2-Sided Copies will be displayed. Press or to select Rotation On in the case where the key. The display will blink and the copier will return to the state where copying can be continued. 3-7 - Kyocera TASKalfa 180 | Operation Guide - Page 49
. with two facing pages of an open-faced original onto separate sheets of paper. Two-sided to One-sided Copies each side of a two-sided original onto If the originals have been set in the optional document processor, copying starts automatically. If the original has been set on the platen, a message - Kyocera TASKalfa 180 | Operation Guide - Page 50
can be produced. Basic Operation ! ! ! ! Original Copy Note 1 2 3 4 5 If the optional document processor is installed, you can select whether or not to turn on the sort mode at a default setting. Set the original. Press the Collate key. Input the number of copies and press the Start - Kyocera TASKalfa 180 | Operation Guide - Page 51
or dotted lines. Press the Combine key to light up the or indicator. 2 1 Original 12 Copy Note Both the original size and the copy paper size must be standard size. The following modes are available for combine copying. Mode Description Use this mode to copy two originals onto one sheet - Kyocera TASKalfa 180 | Operation Guide - Page 52
2-in-1 Basic Operation The orientations of the originals and the finished copy are shown below. Using the platen: Original Copy Original Using the document processor: Copy Original Copy Original Copy 3-11 - Kyocera TASKalfa 180 | Operation Guide - Page 53
Basic Operation 4-in-1 (horizontal) The orientations of the originals and the finished copy are shown below. Using the platen: Original Copy Original Using the document processor: Copy Original Copy Original Copy 3-12 - Kyocera TASKalfa 180 | Operation Guide - Page 54
4-in-1 (vertical) The orientations of the originals and the finished copy are shown below. Using the platen: Basic Operation Original Copy Original Using the document processor: Copy Original Copy Original Copy 3-13 - Kyocera TASKalfa 180 | Operation Guide - Page 55
job will be automatically resumed. 1 During a copy job press the Interrupt key. The Interrupt indicator will blink 2 Remove the originals of the ongoing copy job. 3 Set the original for interrupt copying and perform copying. 4 After the interrupt copying is complete, press the Interrupt key. The - Kyocera TASKalfa 180 | Operation Guide - Page 56
puts this machine into the lower power mode if no operation has been performed on the machine for a preset period of time. The factory default setting time is one minutes. 3-15 - Kyocera TASKalfa 180 | Operation Guide - Page 57
setting time is one minute. Press the Energy Saver key again to resume copying operations. The recovery time 17.2 seconds. Copiers and printers are generally in a standby mode more than they are in actual operation, so power consumption in the standby mode occupies a large part - Kyocera TASKalfa 180 | Operation Guide - Page 58
department. This copier has the following features available through the Department ID Code. • A maximum of 100 Sections can be managed. • ID Codes can be set from 0 to 99999999 for a maximum of 8 digits. • The accumulated totals of pages copied according to ID Code can be printed out on paper. The - Kyocera TASKalfa 180 | Operation Guide - Page 59
can be selected by pressing the numeric keys. 3 After completing each setting, press or to select 00.Set Completed, and then press the OK key. Job Accounting: 00.Set Completed Department ID Code Registration A Department ID Code of up to 8 digits can be entered. 1 Display Job Accounting. (Refer - Kyocera TASKalfa 180 | Operation Guide - Page 60
cleared by pressing the Stop/Clear key and the value reentered. 4 Confirm the code to be deleted, and then press the OK key. 5 Press or to select Printing the Job Accounting List The Total No. of Copies by department can be printed. NOTE: Check to make sure that Letter/A4 size paper is loaded in - Kyocera TASKalfa 180 | Operation Guide - Page 61
Job Accounting How to set Job Accounting Set Job Accounting to enable or error has been made in input, press [Stop/Clear] and input the data again. When the Department ID Code that is input does not match any of the Department ID Codes registered, Illegal Account. is displayed and the copier - Kyocera TASKalfa 180 | Operation Guide - Page 62
5 Optional Equipment The following options are available for this machine. • Document Processor • Paper Feeder • Duplex Unit • Key Counter • Printer Kit / Printer Server • Additional Memory Document Processor This equipment automatically feeds and scans multiple-sheet originals one by one. Two-sided - Kyocera TASKalfa 180 | Operation Guide - Page 63
8 1/2" (Statement), 8 1/2 × 13" (Oficio II), 8K, and 16K Copy paper can be set in the same way as the standard cassette provided with the main body. (See page paper feeder in advance. Note Up to three cassettes can be added. Duplex Unit Two-sided copies can be made if the duplex unit is installed - Kyocera TASKalfa 180 | Operation Guide - Page 64
displayed when the key counter has not been securely inserted. Printer Kit / Printer Server A printer kit can be installed to use the copier as a printer as well. Ask you local dealer for more information. In some countries a printer server is available as well. Additional Memory A memory can be - Kyocera TASKalfa 180 | Operation Guide - Page 65
Optional Equipment Optional Equipment Overview of Optional Equipment The following optional equipment is available for the machine. Duplex Unit Document Processor Additional Memory Printer Kit Paper Feeder Key Counter Print server (not in all countries) 5-4 - Kyocera TASKalfa 180 | Operation Guide - Page 66
6 Maintenance Cleaning the Machine Caution For safety purposes, always remove the power plug from the outlet when performing cleaning operations. Cleaning the Original Cover Open the original cover and wipe the back side of the cover with a soft cloth dampened with alcohol or mild neutral detergent. - Kyocera TASKalfa 180 | Operation Guide - Page 67
A Important! Never use water, thinner, organic solvents or alcohol. Note For cleaning the inside of the main body, see Replacing the Toner Container and the Waste Toner Box on page 6-5. Cleaning the Separation Needle 1 Open the front cover. 2 Remove the cleaning brush. 3 Pull the left cover handle - Kyocera TASKalfa 180 | Operation Guide - Page 68
4 Move the brush from the left side to the right side along the separation needle as shown in the illustration to remove any dirt or dust. 5 Close the left cover. Cleaning the Transfer Roller 1 Open the front cover. 2 Remove the cleaning brush. 3 Pull the left cover handle up to open the cover. - Kyocera TASKalfa 180 | Operation Guide - Page 69
Maintenance 4 While turning the left transfer roller gear to turn the roller as shown in the illustration, move the brush from the left side to the right side along the roller to remove any dirt or dust. 5 Close the left cover. 6-4 - Kyocera TASKalfa 180 | Operation Guide - Page 70
is displayed on the message display the machine stops. Replace the toner container together with the waste toner box. Notes Add toner only when Add Toner is displayed on the message display. Whenever the toner container is changed, be sure to carry out the procedure described from step 7 on page - Kyocera TASKalfa 180 | Operation Guide - Page 71
cap attached to the center of the old waste toner box to cover the opening. 4 Turn the toner container release lever A to the left to pull out the toner container. A Caution Do not attempt to incinerate the toner container or the waste toner box. Dangerous sparks may cause burns. Caution Do not - Kyocera TASKalfa 180 | Operation Guide - Page 72
cap. Fit the grid cleaner to the notch and install it into the main body. 9 While holding gently back until the portion B does not touch the white pad of the grid cleaner. Repeat this operation several all the way into the main body. Copying trouble may occur. When the electrical charge section is - Kyocera TASKalfa 180 | Operation Guide - Page 73
or more. Turn the toner container upside down and shake it five times or more. 13 Hold the toner container horizontally and shake it from side to side five times or more. 14 Insert the new toner container. Press it with both hands C until it is locked. 15 Install the new waste toner box. 6-8 - Kyocera TASKalfa 180 | Operation Guide - Page 74
16 Close the front cover. Maintenance After use, always dispose of the toner container and the waste toner box in accordance with Federal, State and Local rules and regulations. 6-9 - Kyocera TASKalfa 180 | Operation Guide - Page 75
Maintenance 6-10 - Kyocera TASKalfa 180 | Operation Guide - Page 76
container? approximately 10 times. Is the EcoPrint mode set? Do not set the EcoPrint mode. - Is Adding Toner requested? Replace the toner container. 6-5 Is the copy paper wet? Replace the copy paper with new paper. 2-1 Is the electrical charge section dirty? Open the front cover and use - Kyocera TASKalfa 180 | Operation Guide - Page 77
guides securely before setting the originals. Was the paper set correctly? Check the width guide plate position in 2-1 the cassette. Paper jams occur often. Is the paper loaded properly in the Load the paper the separation needle. 6-2 Black or white vertical lines Is the electrical charge - Kyocera TASKalfa 180 | Operation Guide - Page 78
Troubleshooting Symptom Copies are blurred. The copies are curled. Items to check Corrective procedure Reference page Is this machine used at high humidity? Perform drum refresh. - Is the copy paper wet? Replace the copy paper with dry, new 2-1 paper. Is Middle 2 set at the Paper type Set - Kyocera TASKalfa 180 | Operation Guide - Page 79
is no toner. Replace the toner container with a new one. Cannot copy this orig. size. Cannot duplex this paper size Call service. C#### Close document processor. Close document processor cover. Close front cover. Close left cover #. An original size that cannot be copied has been set. Check the - Kyocera TASKalfa 180 | Operation Guide - Page 80
full. Press OK. MP tray empty. Add paper. Paper jam Place orig on doc processor Replace waste toner box. Remove paper on top tray; Start. Troubleshooting Corrective Procedure Check the key counter and make sure it is set properly. No Letter/A4 size paper was available in either the cassette or the - Kyocera TASKalfa 180 | Operation Guide - Page 81
. Check the paper cassette that corresponds to the lighting indicator. Set the cassette. Shake the toner container. Tap and shake the new toner container without spilling the toner, and install it again. Set toner container. The Toner Container has not been set. Set the Toner Container. The - Kyocera TASKalfa 180 | Operation Guide - Page 82
10 7-12 7-9 After you remove the jam, the machine will warm up again and the error message will be cleared. The machine resumes with the page which jam has occurred. Precautions with Paper Jams • Do not reuse jammed papers. • If the paper tears during removal, be sure to remove any loose scraps of - Kyocera TASKalfa 180 | Operation Guide - Page 83
to do so may cause another paper jam later. • Once all jammed paper has been removed, warm-up will begin. The error message will disappear and the machine will return to the same settings as prior to the paper jam. Removal Procedures J11, J21: Paper Jam inside Cassette 1 Perform the following - Kyocera TASKalfa 180 | Operation Guide - Page 84
Troubleshooting Notes • Check to see if paper is out of position in the cassette. If the paper is out of position, set the paper properly. • If JAM21 is displayed, remove the jammed paper referring to J20 to J50, J52 to J57, J60, J61: Paper Jam in the Left Cover on page 7-10. J12 to J16, J22 to J24 - Kyocera TASKalfa 180 | Operation Guide - Page 85
Jam in the Multi-Purpose Tray Perform the following procedure to remove the jammed paper. 1 Remove all of the paper remaining in the multi-purpose tray. 2 Reset the paper in the multi-purpose tray. The error message disappears. Paper Jam in the Multi-Purpose Tray (except J10) Important! • If J20 is - Kyocera TASKalfa 180 | Operation Guide - Page 86
unit is installed, raise the duplex unit and remove any paper. Note If the paper does happen to tear, remove any loose scraps from inside the machine. 4 Close the left cover. J50: Paper Jam in the Paper Output Slot Perform the following procedure to remove the jammed paper. Important! The drum - Kyocera TASKalfa 180 | Operation Guide - Page 87
Troubleshooting 1 If jammed paper is seen through the paper output slot, pull it out to remove it. Note If the paper does happen to tear, remove any loose scraps from inside the machine. 2 Pull the left cover handle up to open the left cover. 3 Remove any jammed paper without tearing it. Note If the - Kyocera TASKalfa 180 | Operation Guide - Page 88
Open the left cover. Troubleshooting 3 Remove any jammed original without tearing it. Note 4 If the original does happen to tear, remove any loose scraps from inside the document processor. Failure to do so may cause another paper jam later. Raise the paper feed unit A. A 5 Remove any jammed - Kyocera TASKalfa 180 | Operation Guide - Page 89
Troubleshooting 7-14 - Kyocera TASKalfa 180 | Operation Guide - Page 90
Specifications Note Specifications that cannot be copied 0.5 to 5.5 mm Paper feed source capacity Cassette 300 sheets (80 g/m²), humidity: around 60 %) Memory For copier 64 MB Additional memory 16 MB AC, 60 Hz, 9.5 A 220 to 240 V AC, 50/60 Hz, 5.0 A Dimensions (main unit) (W) × (D) × (H) 23 - Kyocera TASKalfa 180 | Operation Guide - Page 91
Appendix Copier Functions Copying speed Platen (1:1) First copy time Resolution Continuous x 4 47/64 552 × 483 × 120 mm Approx. 13.2 lb./6 kg Paper Feeder (optional) Paper feed system Paper sizes Acceptable paper Dimensions (W) × (D) × (H) Weight Automatic feeding from cassettes (300-sheet [80 - Kyocera TASKalfa 180 | Operation Guide - Page 92
Appendix Duplex Unit (optional) System Paper sizes Acceptable paper Dimensions (W) × (D) × (H) Weight paper, recycled paper 14 19/64 x 2 9/64 x 7 9/64 368 × 54 × 181 mm Approx. 0.5 kg Environmental Specifications Paper feed 10 seconds 17,2 seconds or less 1 minute 1 minute Option Recycled paper - Kyocera TASKalfa 180 | Operation Guide - Page 93
.Density steps 07.Auto Density 08.Text+Ph Dens. 09.Photo Density Sets the manuscript image quality that will be selected at the time the copier is turned on. Sets the copy exposure at the time the copier is turned on to Manual or Automatic. There will be no display when Photo Density has been - Kyocera TASKalfa 180 | Operation Guide - Page 94
type when the copier automatically selects the paper. Selects the cassette that is automatically given priority for use. Manual paper feeding cannot be set using the Selected cassette function. Cassettes 2 to 4 will be displayed only when the optional Paper Feeder is installed. Switches feeding - Kyocera TASKalfa 180 | Operation Guide - Page 95
be displayed only when the optional Paper Feeder is installed. Sets the size of paper to be manually fed in. Available settings Auto Detect mm (*Metric specifications) AutoDetect inch (*Inch specifications) Oficio 2 8K 16K Paper Size [Inch specifications] Universal size* Ledger R Legal R Letter - Kyocera TASKalfa 180 | Operation Guide - Page 96
29.Casst4MedType Specifies the media type to the cassettes (1 to 4). Cassette 2, 3 and 4 will be displayed only when the optional Paper Feeder is installed. Available settings [Inch specifications] A3 R A4 R A4 A5 R B4 R B5R B5 B6 R A6 R Hagaki 11 × 15" R Folio R Oficio 2 8K 16K 16KR Customized - Kyocera TASKalfa 180 | Operation Guide - Page 97
that can be made at one time. Rotates the paper 180 degrees and copies it when both sides of a sheet are to be copied. This will not be displayed when the optional Duplex Unit is not installed. Sets the initial value for the Binding Margin. Sets the initial value for the border width that will be - Kyocera TASKalfa 180 | Operation Guide - Page 98
made and the average amount of toner used (blackness ratio %) for each paper size. Available settings 0, 5, 10, 15, 30 (seconds) (*10) On: Enabled* Off: Disabled On: Enabled* Off: Disabled 10 to 270 (10-second units) (*120) 1, 5, 15, 30, 45, 60, 90, 120, 180, 240 (minutes) (*1) 1, 5, 15, 30, 45, 60 - Kyocera TASKalfa 180 | Operation Guide - Page 99
Procedures Follow the procedures listed below to operate in the Setting done 3 After completing each operation, press or to display 00.Setting done, and then press the OK key. NOTE: The message display will return to the Ready to copy. by pressing the Reset key. You can cancel the setting - Kyocera TASKalfa 180 | Operation Guide - Page 100
ID code registration 4-2 Document Processor How to load originals ...2-12 Loading Originals ...2-11 Not Supported Originals 2-12 Part Names ...2-11 Document processor 5-1, Appendix-2 Duplex copying ...3-5 Duplex unit ...5-2, Appendix-3 E Environmental specifications Appendix-3 Error messages - Kyocera TASKalfa 180 | Operation Guide - Page 101
ii-ix H How to set job accounting ...4-4 I If trouble occurs ...7-1 Image quality mode ...3-1 Interrupt Copying ...3-14 J Job accounting ...4-1 Operation procedures ...4-2 K Key counter ...5-3 L Language setting ...2-14 Left cover ...1-2 Loading paper ...2-1 Loading paper into the cassette 2-2 Low - Kyocera TASKalfa 180 | Operation Guide - Page 102
2-2 Photo ...3-2 Platen ...1-2, 3-1 Placing Originals ...2-10 Printer kit ...5-3 Printing the job accounting list 4-3 R Resolution ...Appendix-2 S Setting paper in the multi-bypass tray 2-4 Slider ...1-1, 2-5 Sort copying ...3-9 Specifications ...Appendix-1 System Menu ...1-6 System menu Items - Kyocera TASKalfa 180 | Operation Guide - Page 103
Index Index-4 - Kyocera TASKalfa 180 | Operation Guide - Page 104
MEMO - Kyocera TASKalfa 180 | Operation Guide - Page 105
MEMO - Kyocera TASKalfa 180 | Operation Guide - Page 106
MEMO - Kyocera TASKalfa 180 | Operation Guide - Page 107
For best print results and machine performance, we recommend that you use only KYOCERA original supplies for your KYOCERA products. E1 - Kyocera TASKalfa 180 | Operation Guide - Page 108
- Kyocera TASKalfa 180 | Operation Guide - Page 109
First Edition 2009.6
-
 1
1 -
 2
2 -
 3
3 -
 4
4 -
 5
5 -
 6
6 -
 7
7 -
8
-
9
-
10
-
11
-
12
-
13
-
14
-
15
-
16
-
17
-
18
-
19
-
20
-
21
-
22
-
23
-
24
-
25
-
26
-
27
-
28
-
29
-
30
-
31
-
32
-
33
-
34
-
35
-
36
-
37
-
38
-
39
-
40
-
41
-
42
-
43
-
44
-
45
-
46
-
47
-
48
-
49
-
50
-
51
-
52
-
53
-
54
-
55
-
56
-
57
-
58
-
59
-
60
-
61
-
62
-
63
-
64
-
65
-
66
-
67
-
68
-
69
-
70
-
71
-
72
-
73
-
74
-
75
-
76
-
77
-
78
-
79
-
80
-
81
-
82
-
83
-
84
-
85
-
86
-
87
-
88
-
89
-
90
-
91
-
92
-
93
-
94
-
95
-
96
-
97
-
98
-
99
-
100
-
101
-
102
-
103
-
104
-
105
-
106
-
107
-
108
-
109
 |
 |
OPERATION GUIDE
TASKalfa 180/220