LG 37LD325H Owners Manual - Page 13
Stand Instructions, Installation
 |
View all LG 37LD325H manuals
Add to My Manuals
Save this manual to your list of manuals |
Page 13 highlights
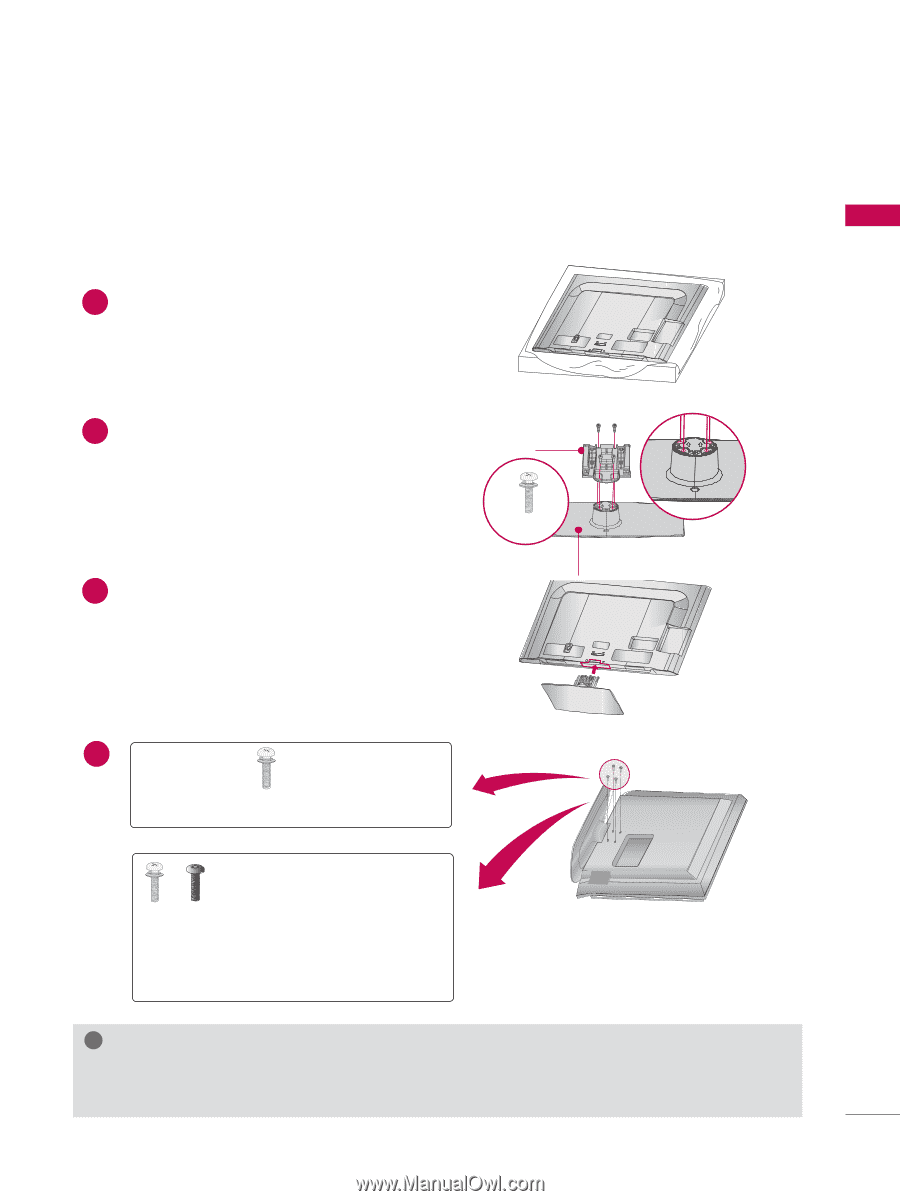
STAND INSTRUCTIONS ꔛ Image shown may differ from your TV. INSTALLATION 1 Carefully place the TV screen side down on a cushioned surface to protect the screen from damage. AC IN CABLE MANAGEMENT Assemble the parts of the STAND BODY 2 with the STAND BASE of the TV. STAND BODY (Except 32/37LD310H) M4X20 3 Assemble the TV as shown. AC IN CABLE MANAGEMENT M4 x 24 STAND BASE AC IN CABLE MANAGEMENT PREPARATION AC IN CABLE MANAGEMENT AC IN CABLE MANAGEMENT 4 x 4 Tighten the stand with the four screws (provided as parts of the TV). or Tighten the two of these four x 2 x 2 screws and the two Torx plus star head screws (provided as parts of the TV) to secure the TV. Tighten the two Torx plus star head screws with a star head driver bit (not provided as parts of the TV). ! ! NOTE ►When assembling the desk type stand, make sure the screws are fully tightened (If not tightened fully, the TV can tilt forward after the product installation). Do not over tighten. ?? 13
-
 1
1 -
2
-
3
-
4
-
5
-
6
-
7
-
 8
8 -
 9
9 -
 10
10 -
 11
11 -
 12
12 -
 13
13 -
 14
14 -
 15
15 -
 16
16 -
 17
17 -
 18
18 -
19
-
20
-
21
-
22
-
23
-
24
-
25
-
26
-
27
-
28
-
29
-
30
-
31
-
32
-
33
-
34
-
35
-
36
-
37
-
38
-
39
-
40
-
41
-
42
-
43
-
44
-
45
-
46
-
47
-
48
-
49
-
50
-
51
-
52
-
53
-
54
-
55
-
56
-
57
-
58
-
59
-
60
-
61
-
62
-
63
-
64
-
65
-
66
-
67
-
68
-
69
-
70
-
71
-
72
-
73
-
74
-
75
-
76
-
77
-
78
-
79
-
80
-
81
-
82
-
83
-
84
-
85
-
86
-
87
-
88
-
89
-
90
-
91
-
92
-
93
-
94
-
95
-
96
-
97
-
98
-
99
-
100
-
101
-
102
-
103
-
104
-
105
-
106
-
107
-
108
-
109
-
110
-
111
-
112
-
113
-
114
-
115
-
116
-
117
-
118
-
119
-
120
-
121
-
122
-
123
-
124
-
125
-
126
-
127
-
128
-
129
-
130
-
131
-
132
-
133
-
134
-
135
-
136
-
137
-
138
-
139
-
140
-
141
-
142
-
143
-
144
-
145
-
146
-
147
-
148
-
149
-
150
-
151
-
152
-
153
-
154
-
155
-
156
-
157
-
158
-
159
-
160
-
161
-
162
-
163
-
164
-
165
-
166
-
167
-
168
-
169
-
170
-
171
-
172
-
173
-
174
-
175
-
176
-
177
-
178
-
179
-
180
-
181
-
182
-
183
-
184
-
185
-
186
-
187
-
188
-
189
-
190
-
191
-
192
-
193
-
194
-
195
-
196
-
197
-
198
-
199
-
200
-
201
-
202
-
203
-
204
-
205
-
206
-
207
-
208
-
209
-
210
-
211
-
212
 |
 |