LG 37LD325H Owners Manual - Page 196
Optional Manual Configuration / Setup for a TV, Set Installer Menu Items, ENTER, FACT DEFAULT
 |
View all LG 37LD325H manuals
Add to My Manuals
Save this manual to your list of manuals |
Page 196 highlights
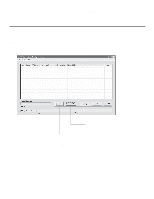
FTG Mode of Operation (Cont.) Optional Manual Configuration / Setup for a TV The manual configuration procedures below should only be performed if you do not know the RF channels at the site and need to Learn the FMA Configuration file from an LD310H TV. Set Installer Menu Items These steps provide specific instruction only on the Installer Menu items that should be set on an LD310H TV. Refer to pages 14 to 20 for detailed information on all Installer Menu items. 1. Make sure the TV is ON. Then, use the Installer Remote to enter the TV Installer Menu: Press MENU repeatedly until the on-screen setup menus lock up, and then press 9-8-7-6 + ENTER. 2. Set Installer Menu item 117 FACT DEFAULT to 001 and press ENTER on the Installer Remote. This clears all Installer Menu custom settings, the channel lineup, etc. and reloads the factory default settings. The value will change back to 0 after the internal TV controller (PTC) has been restored to factory default condition. This step ensures that the TV Channel Memory will be the active channel lineup. 3. Set Installer Menu item 003 BAND/AFC, as appropriate. • Broadcast: Set to 000. • HRC: Set to 002. • CATV: Set to 001 (default). • IRC: Set to 003. 4. Set any other Installer Menu items that affect your TV programming network to the required configuration. For example, enable/disable Aux sources, set a Start Channel, etc. 5. After you have adjusted all required Installer Menu item settings, press ENTER once on the Installer Remote to save your changes; then, press ENTER again to exit the menu. Run Auto Tuning (Channel Search) Note: In the FMA Configuration file, Logical Channel numbers will automatically be assigned in ascending order, starting with 0 (zero), to the Physical Channels from the TV Channel Map. Note: Pro:Idiom decryption for encrypted channels will not be enabled unless you use the FTG Configuration Application to set the channel attributes. 1. Search for all available analog and digital channels: Use the Installer Remote to go to the Channel Menu, select the Auto Tuning option, and follow the on-screen instructions. 2. Use the Channel Edit option in the Channel Menu to edit the channel lineup, as necessary, to include free to guest channels only. Add/delete channels per your system requirements. Note that physical channel numbers are used to identify virtual channels. Also, channel numbers cannot be higher than 255. xxLD310H PTC INSTALLER MENU 000 INSTALLER SEQ 000 UPN 000-000-000-000 ASIC 20E7 PTC V1.00.001 CPU V3.25.00 Typical TV Installer Menu Note: The Installer Menu header will vary depending on the TV you are setting up. 117 FACT DEFAULT 001 003 BAND/AFC 00X Adjust the settings for these Installer Menu items. CHANNEL Auto Tuning Manual Tuning Channel Edit Channel Label Move Enter Run Auto Tuning and edit the channel lineup, as necessary. 32 206-4177
-
 1
1 -
2
-
3
-
4
-
5
-
6
-
7
-
8
-
9
-
10
-
11
-
12
-
13
-
14
-
15
-
16
-
17
-
18
-
19
-
20
-
21
-
22
-
23
-
24
-
25
-
26
-
27
-
28
-
29
-
30
-
31
-
32
-
33
-
34
-
35
-
36
-
37
-
38
-
39
-
40
-
41
-
42
-
43
-
44
-
45
-
46
-
47
-
48
-
49
-
50
-
51
-
52
-
53
-
54
-
55
-
56
-
57
-
58
-
59
-
60
-
61
-
62
-
63
-
64
-
65
-
66
-
67
-
68
-
69
-
70
-
71
-
72
-
73
-
74
-
75
-
76
-
77
-
78
-
79
-
80
-
81
-
82
-
83
-
84
-
85
-
86
-
87
-
88
-
89
-
90
-
91
-
92
-
93
-
94
-
95
-
96
-
97
-
98
-
99
-
100
-
101
-
102
-
103
-
104
-
105
-
106
-
107
-
108
-
109
-
110
-
111
-
112
-
113
-
114
-
115
-
116
-
117
-
118
-
119
-
120
-
121
-
122
-
123
-
124
-
125
-
126
-
127
-
128
-
129
-
130
-
131
-
132
-
133
-
134
-
135
-
136
-
137
-
138
-
139
-
140
-
141
-
142
-
143
-
144
-
145
-
146
-
147
-
148
-
149
-
150
-
151
-
152
-
153
-
154
-
155
-
156
-
157
-
158
-
159
-
160
-
161
-
162
-
163
-
164
-
165
-
166
-
167
-
168
-
169
-
170
-
171
-
172
-
173
-
174
-
175
-
176
-
177
-
178
-
179
-
180
-
181
-
182
-
183
-
184
-
185
-
186
-
187
-
188
-
189
-
190
-
 191
191 -
 192
192 -
 193
193 -
 194
194 -
 195
195 -
 196
196 -
 197
197 -
 198
198 -
 199
199 -
 200
200 -
 201
201 -
202
-
203
-
204
-
205
-
206
-
207
-
208
-
209
-
210
-
211
-
212
 |
 |
