LG LUWD1CW Owners Manual - Page 14
Stacking the Mini Washer
 |
View all LG LUWD1CW manuals
Add to My Manuals
Save this manual to your list of manuals |
Page 14 highlights
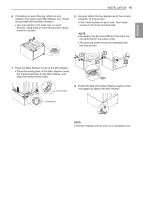
14 INSTALLATION Stacking the Mini Washer Stacking switch Brackets (front) 3 Remove and save the foam block for future use. ••If the Mini Washer must be moved in the future, the foam block will help prevent damage to the Mini Washer during transportation. Brackets (back) Brackets (front) Brackets (back) Stacking switch (2 EA) (2 EA) 1 Tilt and hold the Main Washer. NOTE ••To prevent damage, do not remove the foam block until the Mini Washer is at the final location. 4 Turn the top cover about 180 degrees. ••Cover the opening in the top with the top cover and install 4 short screws to fix it in place. 2 Attach the two front brackets and the stacking switch to the bottom of the Main Washer. ••First assemble each bracket using 7 screws, then the stacking switch using 2 screws. 1 5 Attach the two back brackets on the rear top of the Mini Washer by inserting 4 screws in each bracket. 2 3
-
 1
1 -
2
-
3
-
4
-
5
-
6
-
7
-
8
-
 9
9 -
 10
10 -
 11
11 -
 12
12 -
 13
13 -
 14
14 -
 15
15 -
 16
16 -
 17
17 -
 18
18 -
 19
19 -
20
-
21
-
22
-
23
-
24
-
25
-
26
-
27
-
28
-
29
-
30
-
31
-
32
-
33
-
34
-
35
-
36
-
37
-
38
-
39
-
40
-
41
-
42
-
43
-
44
-
45
-
46
-
47
-
48
-
49
-
50
-
51
-
52
-
53
-
54
-
55
-
56
-
57
-
58
-
59
-
60
-
61
-
62
-
63
-
64
-
65
-
66
-
67
-
68
-
69
-
70
-
71
-
72
-
73
-
74
-
75
-
76
-
77
-
78
-
79
-
80
-
81
-
82
-
83
-
84
-
85
-
86
-
87
-
88
-
89
-
90
-
91
-
92
-
93
-
94
-
95
-
96
 |
 |
