LG LUWD1CW Owners Manual - Page 17
Connecting the Drain Hose
 |
View all LG LUWD1CW manuals
Add to My Manuals
Save this manual to your list of manuals |
Page 17 highlights
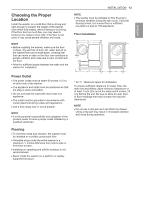
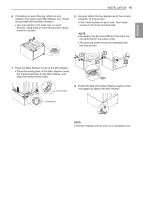
ENGLISH Connecting the Drain Hose NOTE ••The drain hose should always be properly secured. Failure to properly secure the drain hose can result in flooding and property damage. ••The drain must be installed in accordance with any applicable local codes and regulations. ••Make sure that the drain hose is not stretched, pinched, crushed, or kinked. ••Do not install the drain hose with the end lower than 29.5 inches (0.7 m) or higher than 96 inches (2.4 m) above the bottom of the washer or more than 60 inches (1.5 m) away from the washer. ••Never create an airtight seal between the hose and the drain with tape or other means. If no air gap is present, water can be siphoned out of the tub resulting in poor wash/rinse performance or clothing damage. INSTALLATION 17 Using the Drain Hose Connector 1 Connect the drain hoses of the Main Washer and the Mini Washer to the drain connector. 2 Insert the included band clamps onto the ends of the two drain hoses. 3 Push the drain hoses firmly onto the drain connector and adjust the band clamps to secure the hoses. Drain hose Band clamp Drain connector 1 Insert the band clamp (included in packing box) onto the drain hose elbow. Band clamp CAUTION ••Adjust the band clamps to prevent the hoses from coming loose or leaking. Failure to do so could result in flooding. Use of the drain connector helps avoid siphoning, odors, or improper draining. 2 With the hose leading up from the elbow, insert the elbow onto the drain outlet on the back of the Mini Washer. 3 Adjust the band clamp with pliers to keep the hose securely in place and prevent leaking. Option 1: Standpipe 1 Clip the hoses above the drain hose connector into the elbow bracket. Connect the elbow bracket within 4 inches (10 cm) of the end of the drain hose. If the drain hose is extended more than 4 inches (10 cm) beyond the end of the elbow bracket, mold or microorganisms could spread to the inside of the washer. Elbow bracket No more than 4 inches (10 cm) Band clamp
-
 1
1 -
2
-
3
-
4
-
5
-
6
-
7
-
8
-
9
-
10
-
11
-
 12
12 -
 13
13 -
 14
14 -
 15
15 -
 16
16 -
 17
17 -
 18
18 -
 19
19 -
 20
20 -
 21
21 -
 22
22 -
23
-
24
-
25
-
26
-
27
-
28
-
29
-
30
-
31
-
32
-
33
-
34
-
35
-
36
-
37
-
38
-
39
-
40
-
41
-
42
-
43
-
44
-
45
-
46
-
47
-
48
-
49
-
50
-
51
-
52
-
53
-
54
-
55
-
56
-
57
-
58
-
59
-
60
-
61
-
62
-
63
-
64
-
65
-
66
-
67
-
68
-
69
-
70
-
71
-
72
-
73
-
74
-
75
-
76
-
77
-
78
-
79
-
80
-
81
-
82
-
83
-
84
-
85
-
86
-
87
-
88
-
89
-
90
-
91
-
92
-
93
-
94
-
95
-
96
 |
 |
