LG RC897T Owner's Manual (English) - Page 56
Recording Settings
 |
UPC - 719192173231
View all LG RC897T manuals
Add to My Manuals
Save this manual to your list of manuals |
Page 56 highlights
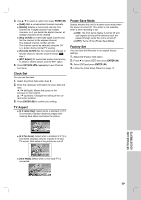
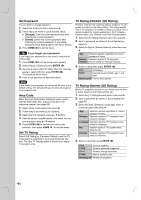
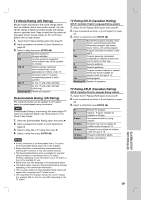
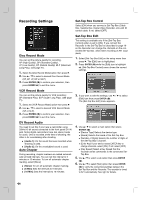
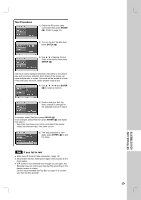
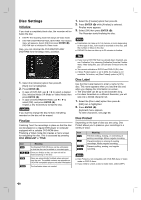
Recording Settings Set-Top Box Control Select [ON] when you connect a Set-Top Box (Cable Box, Satellite Box, Digital Video Recorder, etc) with IR control cable. If not, select [OFF]. Disc Record Mode You can set the picture quality for recording; XP (High Quality), SP (Standard Quality), LP (Low Quality), EP (Extend Quality) MLP (Maximum Long Play). (see page 71). 1. Select the [Disc Record Mode] option then press B. 2. Use v / V to select a desired Disc Record Mode (XP, SP, LP, EP or MLP). 3. Press ENTER ( ) to confirm your selection, then press HOME ( ) to exit the menu. Set-Top Box Edit This setting is available only if the [Set-Top Box Control] option is set to [ON]. If you connect the Recorder to the Set-Top Box as described in page 16 so the Recorder can change the channels on the connected Set-Top Box when timer recording of AV1 input starts. 1. Select [Set-Top Box Edit] on the setup menu then press B. The [Edit] icon is highlighted. 2. Press ENTER ( ) while the [Edit] icon is highlight- ed. [Set-Top Box Control] menu shows the current settings. VCR Record Mode You can set the picture quality for VCR recording; SP (Standard Play), SLP (Super Long Play). (see page 71). 1. Select the [VCR Record Mode] option then press B. 2. Use v / V to select a desired VCR Record Mode (SP or SLP). 3. Press ENTER ( ) to confirm your selection, then press HOME ( ) to exit the menu. 3. If you want to edit the settings, use b / B to select [Edit] icon then press ENTER ( ). The [Set-Top Box Edit] menu appears. DV Record Audio You need to set this if you have a camcorder using 32kHz/12-bit sound connected to the front panel DV IN jack. Some digital camcorders have two stereo tracks for audio. One is recorded at the time of shooting; the other is for overdubbing after shooting. [Audio 1]: On the sound that was recorded while shooting is used. [Audio 2]: On the overdubbed sound is used. Auto Chapter During recording, chapter markers are added automatically at fixed intervals. You can set this interval to 5 minutes or 10 minutes. To turn off automatic chapter marking, select [None]. [None]: To turn off automatic chapter marking. [5 Min]: Sets the intervals to 5 minutes. [10 Min]: Sets the intervals to 10 minutes. 4. Use v / V to select a main option then press ENTER ( ). [Device Type] Selects the device type. [Brand] Selects the brand of the Set-Top Box. [Number of Digits] Selects the number of digits of the Set-Top Box's channel. [Enter Key] If your device needs ENTER key to change channels, select [ON]. If not, select [OFF]. [Key Speed] Select a Key Speed that the recorder sends commands to the connected SetTop Box. 5. Use v / V to select a sub option then press ENTER ( ). 6. Use v / V to select [Test] option then press ENTER ( ) to verify the connections/settings between the Set-Top Box and the Recorder. The recorder is tuned to AV1 automatically. See right for details. 56
-
 1
1 -
2
-
3
-
4
-
5
-
6
-
7
-
8
-
9
-
10
-
11
-
12
-
13
-
14
-
15
-
16
-
17
-
18
-
19
-
20
-
21
-
22
-
23
-
24
-
25
-
26
-
27
-
28
-
29
-
30
-
31
-
32
-
33
-
34
-
35
-
36
-
37
-
38
-
39
-
40
-
41
-
42
-
43
-
44
-
45
-
46
-
47
-
48
-
49
-
50
-
 51
51 -
 52
52 -
 53
53 -
 54
54 -
 55
55 -
 56
56 -
 57
57 -
 58
58 -
 59
59 -
 60
60 -
 61
61 -
62
-
63
-
64
-
65
-
66
-
67
-
68
-
69
-
70
-
71
-
72
-
73
-
74
-
75
 |
 |
