Lenovo ThinkCentre M50 User Manual - Page 105
Lenovo ThinkCentre M50 Manual
 |
View all Lenovo ThinkCentre M50 manuals
Add to My Manuals
Save this manual to your list of manuals |
Page 105 highlights
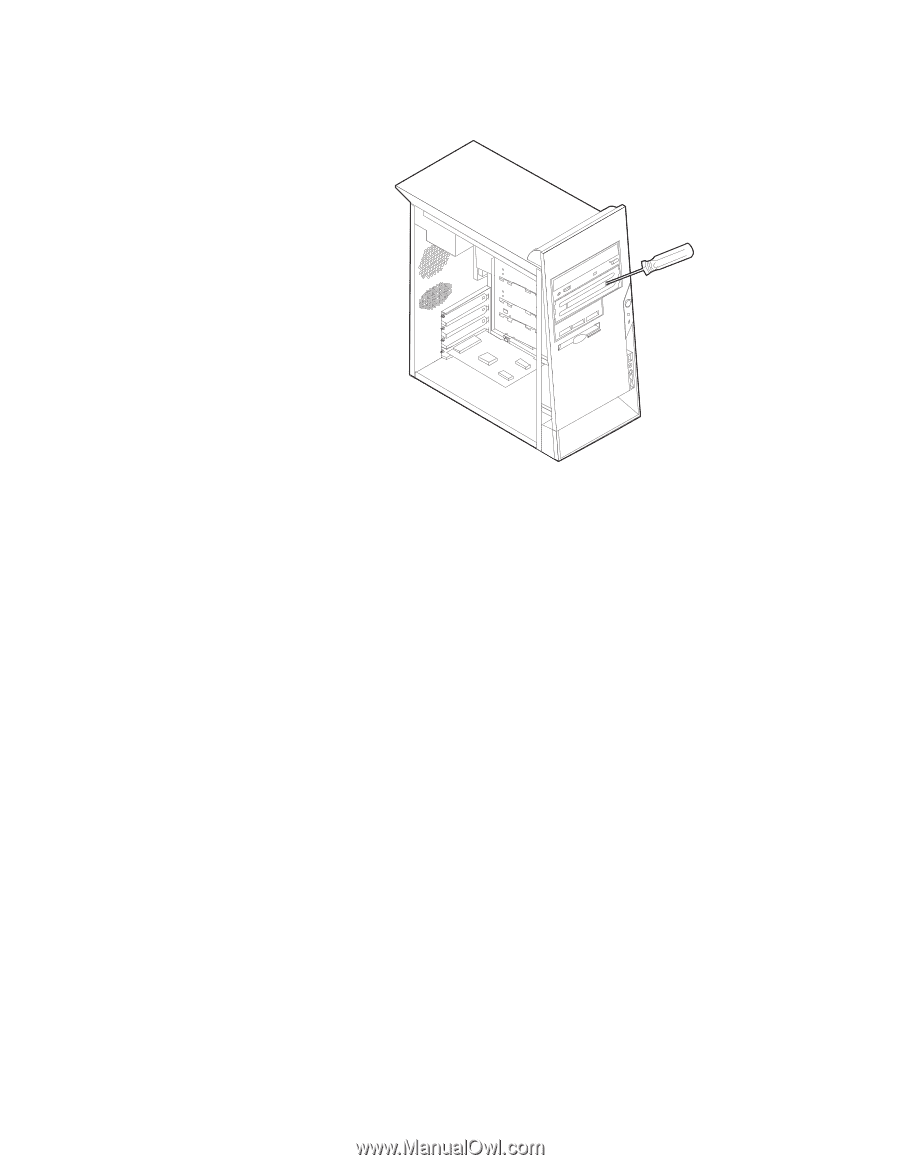
4. Remove the metal shield from the drive bay by inserting a flat-blade screwdriver into one of the slots and gently prying it loose. 5. Make sure the drive that you are installing is set correctly as either a master or a slave device. Note: A serial ATA hard disk drive does not need to be set as either a master or a slave device. v If it is the first CD drive or DVD drive, set it as a master device. v If it is an additional CD drive or DVD drive, set it as a slave device. v If it is an additional parallel ATA hard disk drive, set it as a slave device. Refer to the documentation that comes with your drive for master/slave jumper information. 6. You might have to remove the bezel to install some drives. Remove the front bezel by pushing in on the blue plastic tab at the rear of the computer. Chapter 4. Types 8189, 8190, 8194, 8195, 8415, 8432, and 8433 89
-
 1
1 -
2
-
3
-
4
-
5
-
6
-
7
-
8
-
9
-
10
-
11
-
12
-
13
-
14
-
15
-
16
-
17
-
18
-
19
-
20
-
21
-
22
-
23
-
24
-
25
-
26
-
27
-
28
-
29
-
30
-
31
-
32
-
33
-
34
-
35
-
36
-
37
-
38
-
39
-
40
-
41
-
42
-
43
-
44
-
45
-
46
-
47
-
48
-
49
-
50
-
51
-
52
-
53
-
54
-
55
-
56
-
57
-
58
-
59
-
60
-
61
-
62
-
63
-
64
-
65
-
66
-
67
-
68
-
69
-
70
-
71
-
72
-
73
-
74
-
75
-
76
-
77
-
78
-
79
-
80
-
81
-
82
-
83
-
84
-
85
-
86
-
87
-
88
-
89
-
90
-
91
-
92
-
93
-
94
-
95
-
96
-
97
-
98
-
99
-
 100
100 -
 101
101 -
 102
102 -
 103
103 -
 104
104 -
 105
105 -
 106
106 -
 107
107 -
 108
108 -
 109
109 -
 110
110 -
111
-
112
-
113
-
114
-
115
-
116
-
117
-
118
-
119
-
120
-
121
-
122
-
123
-
124
-
125
-
126
-
127
-
128
-
129
-
130
-
131
-
132
-
133
-
134
-
135
-
136
-
137
-
138
 |
 |