Lenovo ThinkCentre M50 User Manual - Page 32
Identifying
 |
View all Lenovo ThinkCentre M50 manuals
Add to My Manuals
Save this manual to your list of manuals |
Page 32 highlights
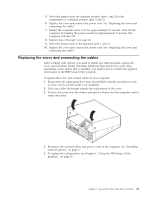
5. Pivot the drive bay latch handle toward the front of the computer and then pivot the drive bay cage upward, as shown, until it is latched in the up position. 6. Install the drive into the bay. Align the screw holes and insert the two screws. 7. Each integrated drive electronics (IDE) drive requires two cables; a four-wire power cable that connects to the power supply, and a signal cable that connects to the system board. For a CD-ROM drive, you might also have an audio cable. To connect a CD-ROM drive or DVD-ROM drive to your computer, follow these steps: a. Locate the signal cable that comes with your computer or with the new drive. b. Locate the PATA secondary IDE connector on the system board. See "Identifying parts on the system board" on page 10. c. Connect one end of the signal cable to the PATA secondary IDE connector on the system board and the other to the CD-ROM drive or DVD-ROM drive. 16 User Guide
-
 1
1 -
2
-
3
-
4
-
5
-
6
-
7
-
8
-
9
-
10
-
11
-
12
-
13
-
14
-
15
-
16
-
17
-
18
-
19
-
20
-
21
-
22
-
23
-
24
-
25
-
26
-
 27
27 -
 28
28 -
 29
29 -
 30
30 -
 31
31 -
 32
32 -
 33
33 -
 34
34 -
 35
35 -
 36
36 -
 37
37 -
38
-
39
-
40
-
41
-
42
-
43
-
44
-
45
-
46
-
47
-
48
-
49
-
50
-
51
-
52
-
53
-
54
-
55
-
56
-
57
-
58
-
59
-
60
-
61
-
62
-
63
-
64
-
65
-
66
-
67
-
68
-
69
-
70
-
71
-
72
-
73
-
74
-
75
-
76
-
77
-
78
-
79
-
80
-
81
-
82
-
83
-
84
-
85
-
86
-
87
-
88
-
89
-
90
-
91
-
92
-
93
-
94
-
95
-
96
-
97
-
98
-
99
-
100
-
101
-
102
-
103
-
104
-
105
-
106
-
107
-
108
-
109
-
110
-
111
-
112
-
113
-
114
-
115
-
116
-
117
-
118
-
119
-
120
-
121
-
122
-
123
-
124
-
125
-
126
-
127
-
128
-
129
-
130
-
131
-
132
-
133
-
134
-
135
-
136
-
137
-
138
 |
 |
