Lenovo ThinkPad W530 Hardware Maintenance Manual - Page 107
PCI Express Mini Card for wireless LAN on Platform Controller Hub PCH - fan control
 |
View all Lenovo ThinkPad W530 manuals
Add to My Manuals
Save this manual to your list of manuals |
Page 107 highlights
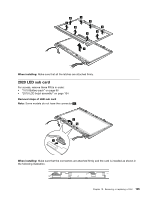
• "1070 Memory module (upper slot)" on page 75 • "1080 PCI Express Mini Card for wireless LAN" on page 76 • "1090 PCI Express Mini Card for wireless WAN or mSATA solid state drive" on page 78 • "1100 ExpressCard blank bezel or ExpressCard" on page 82 • "1120 Bluetooth daughter card" on page 86 • "1130 Backup battery" on page 87 • "1140 Smart card, dummy smart card and spacer" on page 88 • "1150 Speaker assembly" on page 89 • "1160 Thermal fan assembly" on page 90 • "1170 Microprocessor" on page 93 • "1180 LCD unit" on page 94 • "1190 Base cover assembly" on page 97 • "1200 I/O sub card" on page 99 Important notices for RAID setting: Before you replace the system board, ensure that you have read Chapter 5 "Installing and configuring RAID" on page 45, and have obtained the necessary information. After you replace the system board, RAID mode is recovered to default. To verify the RAID mode setting, check the ThinkPad Setup setting by selecting Config ➙ Serial ATA (SATA) ➙ SATA Controller Mode Option ➙ RAID/Compatibility/AHCI. Then, you will see that the RAID option is enabled. Important notices for handling the system board: When handling the system board, bear the following in mind: • The system board has an accelerometer, which can be broken if several thousands of G-forces are applied. Note: Dropping a system board from a height of as little as 6 inches so that it falls flat on a hard bench can subject the accelerometer to as much as 6,000 G's of shock. • Be careful not to drop the system board on a bench top that has a hard surface, such as metal, wood, or composite. • If a system board is dropped, be sure to document the drop in any reject report, and replace the system board. • Avoid rough handling of any kind. • At every point in the process, be sure not to drop or stack the system board. • If you put a system board down, be sure to put it only on a padded surface such as an ESD mat or conductive corrugated material. Location of major sensitive components on the system board Attention: The following components soldered on the top side of the system board are extremely sensitive. When you service the system board, avoid any kind of rough handling. a Microprocessor b Platform Controller Hub (PCH) c Accelerometer chip for the hard disk drive Active Protection System™ d Graphics chip Note: The graphics chip d is only for the switchable graphics models and workstation models. The system board in integrated graphics models does not have this chip. For Integrated Graphics models: Chapter 10. Removing or replacing a FRU 101
-
 1
1 -
2
-
3
-
4
-
5
-
6
-
7
-
8
-
9
-
10
-
11
-
12
-
13
-
14
-
15
-
16
-
17
-
18
-
19
-
20
-
21
-
22
-
23
-
24
-
25
-
26
-
27
-
28
-
29
-
30
-
31
-
32
-
33
-
34
-
35
-
36
-
37
-
38
-
39
-
40
-
41
-
42
-
43
-
44
-
45
-
46
-
47
-
48
-
49
-
50
-
51
-
52
-
53
-
54
-
55
-
56
-
57
-
58
-
59
-
60
-
61
-
62
-
63
-
64
-
65
-
66
-
67
-
68
-
69
-
70
-
71
-
72
-
73
-
74
-
75
-
76
-
77
-
78
-
79
-
80
-
81
-
82
-
83
-
84
-
85
-
86
-
87
-
88
-
89
-
90
-
91
-
92
-
93
-
94
-
95
-
96
-
97
-
98
-
99
-
100
-
101
-
 102
102 -
 103
103 -
 104
104 -
 105
105 -
 106
106 -
 107
107 -
 108
108 -
 109
109 -
 110
110 -
 111
111 -
 112
112 -
113
-
114
-
115
-
116
-
117
-
118
-
119
-
120
-
121
-
122
 |
 |
