Lexmark 352dn Quick Reference - Page 18
Continue, CAUTION - cartridge
 |
UPC - 734646013352
View all Lexmark 352dn manuals
Add to My Manuals
Save this manual to your list of manuals |
Page 18 highlights
7 Lift the green flap at the front of the printer, and remove the jammed pages from behind the flap. CAUTION:The fuser or fuser area may be hot. 8 Open the rear exit door, and remove the jammed pages. 9 After you have cleared the jammed pages, reinstall the print cartridge assembly, and securely close all the printer doors. 10 Press Continue to resume printing. Note: Jam recovery is set to Auto by default. When jam recovery is set to Auto, the memory that holds the image of a page may be reused after the page is printed but before it has successfully exited the printer if that memory is needed for another use. Therefore, a jammed page may or may not be reprinted, depending on the overall memory usage of the printer. Clearing jams 18
-
 1
1 -
2
-
3
-
4
-
5
-
6
-
7
-
8
-
9
-
10
-
11
-
12
-
 13
13 -
 14
14 -
 15
15 -
 16
16 -
 17
17 -
 18
18
 |
 |

Clearing jams
18
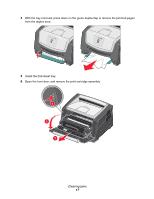
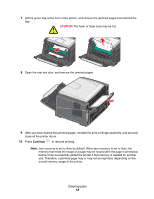
7
Lift the green flap at the front of the printer, and remove the jammed pages from behind the
flap.
8
Open the rear exit door, and remove the jammed pages.
9
After you have cleared the jammed pages, reinstall the print cartridge assembly, and securely
close all the printer doors.
10
Press
Continue
to resume printing.
Note:
Jam recovery is set to Auto by default. When jam recovery is set to Auto, the
memory that holds the image of a page may be reused after the page is printed but
before it has successfully exited the printer if that memory is needed for another
use. Therefore, a jammed page may or may not be reprinted, depending on the
overall memory usage of the printer.
CAUTION:
The fuser or fuser area may be hot.