Lexmark C530DN User's Guide - Page 36
Tray linking, Ready, Paper Menu, Paper Size/Type, Submitting Selection
 |
UPC - 734646030908
View all Lexmark C530DN manuals
Add to My Manuals
Save this manual to your list of manuals |
Page 36 highlights
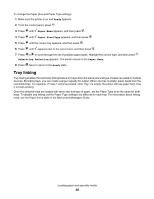
To change the Paper Size and Paper Type settings: 1 Make sure the printer is on and Ready appears. 2 From the control panel, press . 3 Press until Paper Menu appears, and then press . 4 Press until Paper Size/Type appears, and then press . 5 Press until the correct tray appears, and then press . 6 Press until appears next to the correct size, and then press . 7 Press or to scroll through the list of possible paper types. Highlight the correct type, and then press . Submitting Selection appears. The printer returns to the Paper Menu. 8 Press twice to return to the Ready state. Tray linking Tray linking enables the automatic linking feature for trays when the same size and type of paper is loaded in multiple sources. By linking trays, you can create a larger capacity for output. When one tray is empty, paper feeds from the next linked tray. For example, if Trays 1 and 2 are linked, once Tray 1 is empty, the printer will use paper from Tray 2 to finish printing. Once the selected trays are loaded with same size and type of paper, set the Paper Type to be the same for both trays. To disable tray linking, set the Paper Type setting to be different for each tray. For information about linking trays, see the Paper menu table in the Menus and Messages Guide. Loading paper and specialty media 36
-
 1
1 -
2
-
3
-
4
-
5
-
6
-
7
-
8
-
9
-
10
-
11
-
12
-
13
-
14
-
15
-
16
-
17
-
18
-
19
-
20
-
21
-
22
-
23
-
24
-
25
-
26
-
27
-
28
-
29
-
30
-
 31
31 -
 32
32 -
 33
33 -
 34
34 -
 35
35 -
 36
36 -
 37
37 -
 38
38 -
 39
39 -
 40
40 -
 41
41 -
42
-
43
-
44
-
45
-
46
-
47
-
48
-
49
-
50
-
51
-
52
-
53
-
54
-
55
-
56
-
57
-
58
-
59
-
60
-
61
-
62
-
63
-
64
-
65
-
66
-
67
-
68
-
69
-
70
-
71
-
72
-
73
-
74
-
75
-
76
-
77
-
78
-
79
-
80
-
81
-
82
-
83
-
84
-
85
-
86
-
87
-
88
-
89
-
90
-
91
-
92
-
93
-
94
-
95
-
96
-
97
-
98
-
99
-
100
-
101
-
102
-
103
-
104
-
105
-
106
-
107
-
108
-
109
-
110
 |
 |