Lexmark Forms Printer 2581 Quick Reference - Page 29
Left paper guide, Move the left paper guide so that the print start position you want aligns with
 |
View all Lexmark Forms Printer 2581 manuals
Add to My Manuals
Save this manual to your list of manuals |
Page 29 highlights
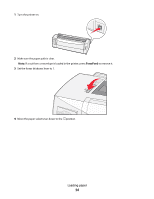
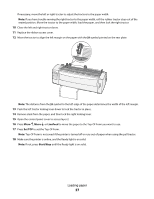
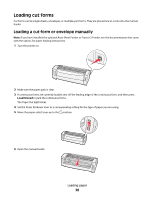
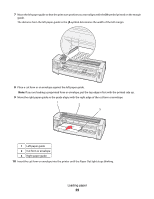
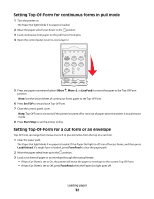
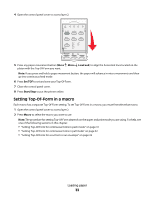
7 Move the left paper guide so that the print start position you want aligns with the [A symbol printed on the margin guide. The distance from the left paper guide to the [A symbol determines the width of the left margin. A 8 Place a cut form or an envelope against the left paper guide. Note: If you are loading a preprinted form or envelope, put the top edge in first with the printed side up. 9 Move the right paper guide so the guide aligns with the right edge of the cut form or envelope. 1 2 3 A 1 Left paper guide 2 Cut form or envelope 3 Right paper guide 10 Insert the cut form or envelope into the printer until the Paper Out light stops blinking. Loading paper 29
-
 1
1 -
2
-
3
-
4
-
5
-
6
-
7
-
8
-
9
-
10
-
11
-
12
-
13
-
14
-
15
-
16
-
17
-
18
-
19
-
20
-
21
-
22
-
23
-
 24
24 -
 25
25 -
 26
26 -
 27
27 -
 28
28 -
 29
29 -
 30
30 -
 31
31 -
 32
32 -
 33
33 -
 34
34 -
35
-
36
-
37
-
38
-
39
-
40
-
41
-
42
-
43
-
44
-
45
-
46
-
47
-
48
-
49
 |
 |
7
Move the left paper guide so that the print start position you want aligns with the
[A
symbol printed on the margin
guide.
The distance from the left paper guide to the
[A
symbol determines the width of the left margin.
A
8
Place a cut form or an envelope against the left paper guide.
Note:
If you are loading a preprinted form or envelope, put the top edge in first with the printed side up.
9
Move the right paper guide so the guide aligns with the right edge of the cut form or envelope.
A
1
3
2
1
Left paper guide
2
Cut form or envelope
3
Right paper guide
10
Insert the cut form or envelope into the printer until the Paper Out light stops blinking.
Loading paper
29