Lexmark MS711 Quick Reference - Page 19
Warning-Potential Damage, Clear the jam, press OK, surface. This could damage the cartridge.
 |
View all Lexmark MS711 manuals
Add to My Manuals
Save this manual to your list of manuals |
Page 19 highlights
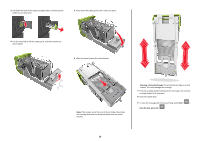
3 Pull down the latch of the staple cartridge holder, and then pull the holder out of the printer. 5 Press down the staple guard until it clicks into place. 4 Use the metal tab to lift the staple guard, and then remove any loose staples. 6 Slide the staples toward the metal bracket. Note: If the staples are at the rear of the cartridge, then shake the cartridge downward to bring the staples near the metal bracket. Warning-Potential Damage: Do not tap the cartridge on a hard surface. This could damage the cartridge. 7 Push the cartridge holder firmly back into the stapler unit until the cartridge holder clicks into place. 8 Close the stapler door. 9 To clear the message and continue printing, select Next > > Clear the jam, press OK > . 19
-
 1
1 -
2
-
3
-
4
-
5
-
6
-
7
-
8
-
9
-
10
-
11
-
12
-
13
-
 14
14 -
 15
15 -
 16
16 -
 17
17 -
 18
18 -
 19
19 -
 20
20 -
 21
21
 |
 |

3
Pull down the latch of the staple cartridge holder, and then pull the
holder out of the printer.
4
Use the metal tab to lift the staple guard, and then remove any
loose staples.
5
Press down the staple guard until it
clicks
into place.
6
Slide the staples toward the metal bracket.
Note:
If the staples are at the rear of the cartridge, then shake
the cartridge downward to bring the staples near the metal
bracket.
Warning—Potential Damage:
Do not tap the cartridge on a hard
surface. This could damage the cartridge.
7
Push the cartridge holder firmly back into the stapler unit until the
cartridge holder
clicks
into place.
8
Close the stapler door.
9
To clear the message and continue printing, select
Next
>
>
Clear the jam, press OK
>
.
19