Lexmark T630n Setting up the printer - Page 8
Vertiefungen an der Oberseite der Duplexeinheit jeweils
 |
UPC - 734646532211
View all Lexmark T630n manuals
Add to My Manuals
Save this manual to your list of manuals |
Page 8 highlights
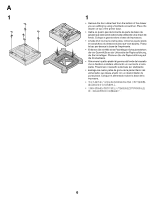
3 • Repeat steps 1- 2 until you have installed the number of drawers you want. • Repita os passos 1 e 2 até instalar o número de gavetas desejado. • Répétez les étapes 1 et 2 jusqu'à ce que vous ayez installé le nombre de bacs souhaité. • Wiederholen Sie die Schritte 1- 2, bis Sie die gewünschte Anzahl der Papierzuführungen installiert haben. • Ripetere i punti 1 e 2 fino ad installare il numero di cassetti desiderato. • Repita los pasos del 1 al 2 hasta que haya instalado todos los alimentadores que desee 1 - 步骤 2 1- 2 4 4 • To add an optional duplex unit, remove the four rubber feet from the bottom using a flat-blade screwdriver. Place the duplex unit on top of the last drawer installed. In the square holes on top of the duplex unit, insert and tighten one stabilizer post (3) in two opposite corners. • Para acrescentar uma unidade de frente e verso, remova os quatro pés de borracha da parte de baixo da unidade utilizando uma chave de fenda. Coloque a unidade de frente e verso sobre a última gaveta instalada. Nas aberturas quadradas na parte de cima da unidade de frente e verso, insira e aperte uma haste estabilizadora (3) em dois cantos opostos. • Pour ajouter une unité recto verso optionnelle, retirez les quatre pieds en caoutchouc du dessous à l'aide d'un tournevis à lame plate. Posez l'unité recto verso sur le dessus du dernier bac installé. Dans les trous carrés du dessus de l'unité recto verso, insérez et serrez une tige de stabilisation (3) dans deux coins opposés. • Zum Hinzufügen einer optionalen Duplexeinheit entfernen Sie mit Hilfe eines Flachklingen-Schraubendrehers die vier Gummifüße an der Unterseite. Plazieren Sie die Duplexeinheit auf die zuletzt installierte Papierzuführung. Setzen Sie in zwei gegenüberliegenden rechteckigen Vertiefungen an der Oberseite der Duplexeinheit jeweils einen Stabilisierungsstift, und ziehen Sie diesen fest. • Per aggiungere un'unità fronte/retro opzionale, rimuovere i quattro piedini di gomma dal fondo utilizzando un cacciavite a testa piatta. Posizionare l'unità fronte/retro sulla parte superiore dell'ultimo cassetto installato. Inserire e fissare un perno di stabilizzazione (3) in ciascun foro quadrato situato sulla parte superiore dell'unità fronte/retro, ai due angoli opposti. • Si desea instalar una unidad dúplex, extraiga las cuatro patas de goma de la parte inferior con un destornillador de punta plana. Coloque la unidad dúplex sobre el último alimentador instalado. En la parte superior de la unidad dúplex hay unos orificios cuadrados. Inserte y apriete dos piezas de sujeción estabilizadoras (3) en dos esquinas opuestas. 3)。 3 8
-
 1
1 -
2
-
 3
3 -
 4
4 -
 5
5 -
 6
6 -
 7
7 -
 8
8 -
 9
9 -
 10
10 -
 11
11 -
 12
12 -
 13
13
 |
 |
