Lexmark T630n Setting up the printer - Page 9
Remarque, Hinweis
 |
UPC - 734646532211
View all Lexmark T630n manuals
Add to My Manuals
Save this manual to your list of manuals |
Page 9 highlights
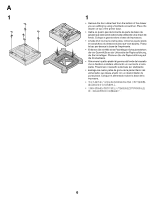
Note: If you installed two drawers, did not add a duplex unit, but used two screws (1) on the first drawer, use the two stabilizer posts (4) on the last drawer before adding the printer. Insert and tighten one stabilizer post in two opposite corners. Nota: Se tiver instalado duas gavetas, não tiver acrescentado uma unidade de frente e verso, mas tiver utilizado dois parafusos (1) na primeira gaveta, utilize as duas hastes estabilizadoras (4) na última gaveta antes de instalar a impressora. Insira e aperte uma haste estabilizadora em dois cantos opostos. Remarque : Si vous avez installé deux bacs, mais pas d'unité recto verso, et avez utilisé deux vis (1) pour le premier bac, insérez deux tiges de stabilisation (4) sur le dernier bac avant d'ajouter l'imprimante. Insérez et serrez une tige de stabilisation dans deux coins opposés. Hinweis: Wenn Sie zwei Papierzuführungen installiert, keine Duplexeinheit hinzugefügt, jedoch zwei Schrauben (1) für die erste Papierzuführung verwendet haben, verwenden Sie für die letzte Papierzuführung die zwei Stabilisierungsstifte (4), bevor Sie den Drucker hinzufügen. Setzen Sie jeweils einen Stabilisierungsstift in zwei gegenüberliegenden Ecken ein, und ziehen Sie diesen fest. Nota: Se sono stati installati due cassetti senza unità fronte/retro e sono state usate due viti (1) sul primo cassetto, usare i due perni di stabilizzazione (4) sull'ultimo cassetto prima di aggiungere la stampante. Inserire e fissare un perno di stabilizzazione nei due angoli opposti. Nota: si ha instalado dos alimentadores, no añadió una unidad dúplex y utilizó dos tornillos en el primer alimentador, utilice dos piezas de sujeción estabilizadoras (4) en el último alimentador antes de colocar la impresora. Introduzca y apriete dos piezas de sujeción estabilizadoras en dos esquinas opuestas. 1 4 1 4 5 5 • Remove the four rubber feet as shown using a flat-blade screwdriver. You may turn the printer on its back to do this. Place the printer on top of the last drawer or the duplex unit based on your configuration. • Retire os quatro pés de borracha, conforme indicado, utilizando uma chave de fenda. Você pode inclinar a impressora sobre sua parte posterior para fazer isso. Coloque a impressora sobre a última gaveta ou unidade de frente e verso, de acordo com a sua configuração. • A l'aide d'un tournevis à lame plate, retirez les quatre pieds en caoutchouc de la manière illustrée. A cet effet, vous pouvez coucher l'imprimante sur le dos. Posez-la ensuite par-dessus le dernier bac ou l'unité recto verso, selon la configuration. • Entfernen Sie die vier Gummifüße mit Hilfe eines FlachklingenSchraubendrehers (siehe Abbildung). Dazu können Sie den Drucker auf seine Rückseite stellen. Plazieren Sie den Drucker auf die zuletzt installierte Papierzuführung oder, je nach Ihrer Konfiguration, auf die Duplexeinheit. • Rimuovere i quattro piedini di gomma come illustrato nella figura tramite un cacciavite a testa piatta. Per effettuare questa operazione, è possibile capovolgere la stampante. Posizionare la stampante sulla parte superiore dell'ultimo cassetto o dell'unità fronte/retro in base alla configurazione. • Extraiga las cuatro patas de goma como se muestra en la ilustración con un destornillador de punta plana. Deberá apoyar la impresora sobre su parte posterior para realizar esta operación. Coloque la impresora sobre el último alimentador o la unidad dúplex, según su configuración. 9
-
 1
1 -
2
-
3
-
 4
4 -
 5
5 -
 6
6 -
 7
7 -
 8
8 -
 9
9 -
 10
10 -
 11
11 -
 12
12 -
 13
13
 |
 |
