Lexmark X5495 User's Guide - Page 72
Transferring photos, Transferring all photos or documents from a CD or removable storage device
 |
UPC - 734646058568
View all Lexmark X5495 manuals
Add to My Manuals
Save this manual to your list of manuals |
Page 72 highlights
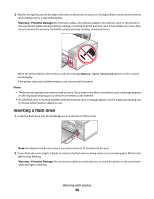
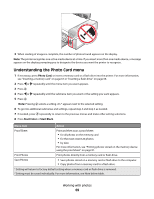
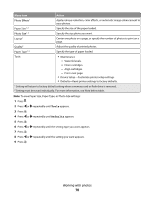
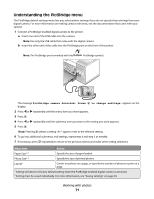
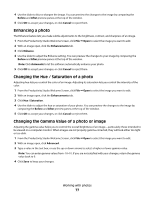
Menu Item Action Quality1 Adjust the quality of printed photos. Paper Type1, 2 Specify the type of paper loaded. Note: The printer is equipped with an automatic paper type sensing device. The Paper Type Sensor automatically detects the type of paper that has been loaded into the printer and adjusts the settings for you. 1 Setting will return to factory default setting when the PictBridge-enabled digital camera is removed. 2 Setting must be saved individually. For more information, see "Saving settings" on page 40. Transferring photos Transferring photos from a memory device to the computer using the control panel If the printer is connected directly to a computer, you can transfer photos to the computer from a memory card or flash drive. Note: You cannot transfer photos from a memory device to a computer through an external network adapter. 1 Insert a memory card or a flash drive that contains the images you want to transfer. For more information, see "Inserting a memory card" on page 67 or "Inserting a flash drive" on page 68. 2 Press or repeatedly until Save Photos appears. 3 Press . 4 If needed, press or repeatedly until Computer appears. 5 Follow the instructions on the computer screen. Transferring all photos or documents from a CD or removable storage device using the computer 1 Insert a CD or flash drive into the computer or a removable storage device (such as a memory card or digital camera) into the printer. The Lexmark Productivity Studio software launches automatically on your computer. 2 If you are using Windows Vista or Windows XP, a "What do you want Windows to do?" screen appears. Click Transfer Photos to your computer using the Lexmark Productivity Studio. If you are using Windows 2000: a From the desktop, double-click the Productivity Studio icon. b Click Transfer Photos. 3 Click Automatically save all photos to "My Pictures". 4 Remove the CD, flash drive, or memory card to view your transferred photos in the Library. Working with photos 72
-
 1
1 -
2
-
3
-
4
-
5
-
6
-
7
-
8
-
9
-
10
-
11
-
12
-
13
-
14
-
15
-
16
-
17
-
18
-
19
-
20
-
21
-
22
-
23
-
24
-
25
-
26
-
27
-
28
-
29
-
30
-
31
-
32
-
33
-
34
-
35
-
36
-
37
-
38
-
39
-
40
-
41
-
42
-
43
-
44
-
45
-
46
-
47
-
48
-
49
-
50
-
51
-
52
-
53
-
54
-
55
-
56
-
57
-
58
-
59
-
60
-
61
-
62
-
63
-
64
-
65
-
66
-
 67
67 -
 68
68 -
 69
69 -
 70
70 -
 71
71 -
 72
72 -
 73
73 -
 74
74 -
 75
75 -
 76
76 -
 77
77 -
78
-
79
-
80
-
81
-
82
-
83
-
84
-
85
-
86
-
87
-
88
-
89
-
90
-
91
-
92
-
93
-
94
-
95
-
96
-
97
-
98
-
99
-
100
-
101
-
102
-
103
-
104
-
105
-
106
-
107
-
108
-
109
-
110
-
111
-
112
-
113
-
114
-
115
-
116
-
117
-
118
-
119
-
120
-
121
-
122
-
123
-
124
-
125
-
126
-
127
-
128
-
129
-
130
-
131
-
132
-
133
-
134
-
135
-
136
-
137
-
138
-
139
-
140
-
141
-
142
-
143
-
144
-
145
-
146
-
147
-
148
-
149
-
150
-
151
-
152
-
153
-
154
-
155
-
156
-
157
-
158
-
159
-
160
-
161
-
162
-
163
-
164
-
165
-
166
-
167
-
168
-
169
-
170
-
171
-
172
-
173
-
174
-
175
-
176
-
177
-
178
-
179
-
180
-
181
-
182
-
183
-
184
-
185
-
186
-
187
-
188
-
189
-
190
-
191
-
192
-
193
-
194
-
195
-
196
-
197
-
198
-
199
-
200
-
201
-
202
 |
 |