Lexmark X5495 User's Guide - Page 82
Printing photos by number, Print Proof Sheet, Print Photos, Photo Number
 |
UPC - 734646058568
View all Lexmark X5495 manuals
Add to My Manuals
Save this manual to your list of manuals |
Page 82 highlights
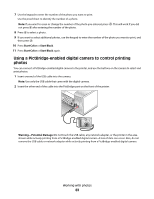
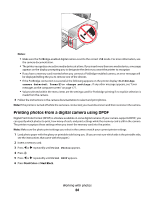
5 Press or repeatedly until Print Proof Sheet appears. 6 Press . 7 Press or to specify which category of photos you want to print. You can print a proof sheet: • For all photos on the memory card • For the 20 most recent photos, if there are 20 or more photos on the card • By date, if the photos on the card were taken on more than one date 8 Press . 9 Press again. One or more proof sheets print. 10 Follow the instructions on the proof sheet to select which photos to print, the number of copies, red-eye reduction, page layout, print options, color effects, and paper size. Note: When making selections, make sure you completely fill in the circles. 11 Load the proof sheet facedown on the scanner glass. 12 If needed, press or repeatedly until Scan Proof Sheet appears. 13 Press . 14 Press Start Color or Start Black to scan the proof sheet. 15 Load photo paper with the glossy or printable side facing you. (If you are not sure which side is the printable side, see the instructions that came with the paper.) Note: Make sure the paper matches the size you selected on the proof sheet. 16 Press Start Color or Start Black to print your photos. Printing photos by number You can print photos using the numbers assigned to them on a photo proof sheet. If you want to print photos by photo number, you must first print a proof sheet. For more information, see "Printing photos stored on the memory device using the proof sheet" on page 81. 1 Load photo paper with the glossy or printable side facing you. (If you are not sure which side is the printable side, see the instructions that came with the paper.) For more information, see "Loading paper" on page 50. 2 Insert a memory card or flash drive that contains the images you want to print. For more information, see "Inserting a memory card" on page 67 or "Inserting a flash drive" on page 68. 3 Press or repeatedly until Print Photos appears. 4 Press . 5 Press or repeatedly until Photo Number appears. 6 Press . Working with photos 82
-
 1
1 -
2
-
3
-
4
-
5
-
6
-
7
-
8
-
9
-
10
-
11
-
12
-
13
-
14
-
15
-
16
-
17
-
18
-
19
-
20
-
21
-
22
-
23
-
24
-
25
-
26
-
27
-
28
-
29
-
30
-
31
-
32
-
33
-
34
-
35
-
36
-
37
-
38
-
39
-
40
-
41
-
42
-
43
-
44
-
45
-
46
-
47
-
48
-
49
-
50
-
51
-
52
-
53
-
54
-
55
-
56
-
57
-
58
-
59
-
60
-
61
-
62
-
63
-
64
-
65
-
66
-
67
-
68
-
69
-
70
-
71
-
72
-
73
-
74
-
75
-
76
-
 77
77 -
 78
78 -
 79
79 -
 80
80 -
 81
81 -
 82
82 -
 83
83 -
 84
84 -
 85
85 -
 86
86 -
 87
87 -
88
-
89
-
90
-
91
-
92
-
93
-
94
-
95
-
96
-
97
-
98
-
99
-
100
-
101
-
102
-
103
-
104
-
105
-
106
-
107
-
108
-
109
-
110
-
111
-
112
-
113
-
114
-
115
-
116
-
117
-
118
-
119
-
120
-
121
-
122
-
123
-
124
-
125
-
126
-
127
-
128
-
129
-
130
-
131
-
132
-
133
-
134
-
135
-
136
-
137
-
138
-
139
-
140
-
141
-
142
-
143
-
144
-
145
-
146
-
147
-
148
-
149
-
150
-
151
-
152
-
153
-
154
-
155
-
156
-
157
-
158
-
159
-
160
-
161
-
162
-
163
-
164
-
165
-
166
-
167
-
168
-
169
-
170
-
171
-
172
-
173
-
174
-
175
-
176
-
177
-
178
-
179
-
180
-
181
-
182
-
183
-
184
-
185
-
186
-
187
-
188
-
189
-
190
-
191
-
192
-
193
-
194
-
195
-
196
-
197
-
198
-
199
-
200
-
201
-
202
 |
 |