Lexmark X6675 Fax Guide - Page 6
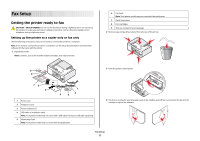
Understanding the parts of the printer, Use - paper feed
 |
View all Lexmark X6675 manuals
Add to My Manuals
Save this manual to your list of manuals |
Page 6 highlights
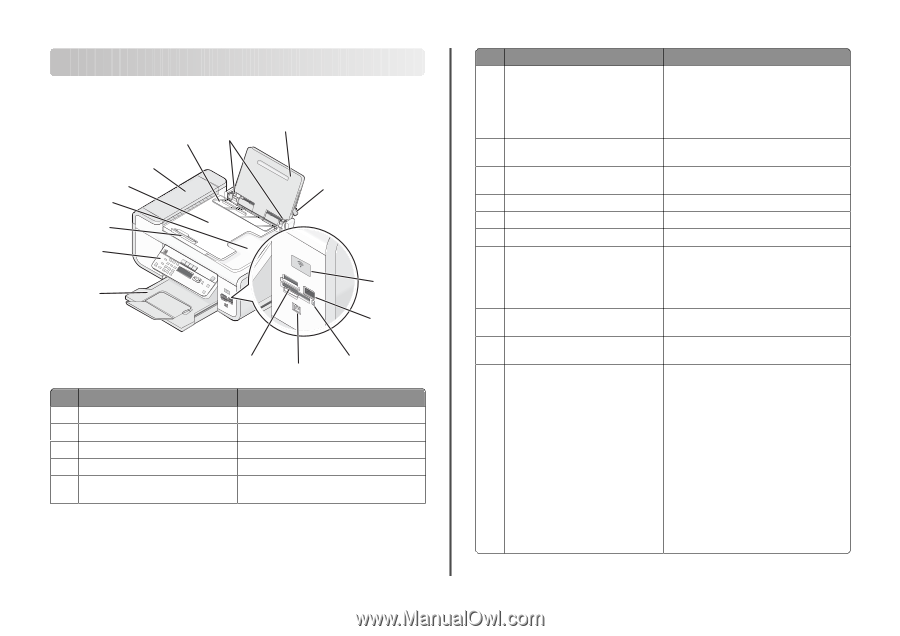
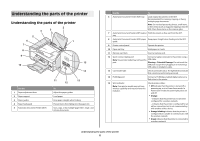
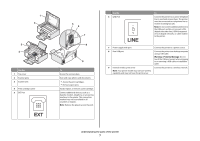
Understanding the parts of the printer Understanding the parts of the printer 2 4 3 5 6 1 7 8 9 10 WI F I PRINTING WI F I PRINTING 15 14 Use the 1 Paper adjustment lever 2 Paper support 3 Paper guides 4 Paper feed guard 5 Automatic Document Feeder (ADF) 11 13 12 To Adjust the paper guides. Load paper. Keep paper straight when feeding. Prevent items from falling into the paper slot. Scan, copy, or fax multiple-page letter-, legal-, and A4-size documents. Use the To 6 Automatic Document Feeder (ADF) tray Load original documents in the ADF. Recommended for scanning, copying, or faxing multiple-page documents. Note: Do not load postcards, photos, small items, or thin media (such as magazine clippings) into the ADF. Place these items on the scanner glass. 7 Automatic Document Feeder (ADF) output Hold documents as they exit from the ADF. tray 8 Automatic Document Feeder (ADF) paper Keep paper straight when feeding into the ADF. guide 9 Printer control panel Operate the printer. 10 Paper exit tray Hold paper as it exits. 11 Memory card slots Insert a memory card. 12 Quick Connect laptop port Connect a laptop computer to the printer using a Note: Your printer model may not have this USB cable. port. Warning-Potential Damage: Do not touch the USB port except when plugging in or removing a USB cable or installation cable. 13 Card reader light Check card reader status. The light blinks to indicate that a memory card is being accessed. 14 PictBridge port Connect a PictBridge-enabled digital camera or a flash drive to the printer. 15 Wi-Fi indicator Check wireless status: Note: Your printer model may not have wireless capability and may not have this indicator. • Off indicates that the printer is turned off, is powering up, or is in Power Saver mode. In Power Saver mode, the power light pulses on and off. • Orange - indicates that the printer has not yet been configured for a wireless network. - indicates that the printer is configured for an ad hoc connection, but is not communicating with another ad hoc device. • Orange blinking indicates that the printer is configured but is unable to communicate with the wireless network. • Green indicates that the printer is connected to a wireless network. Understanding the parts of the printer 6
-
 1
1 -
 2
2 -
 3
3 -
 4
4 -
 5
5 -
 6
6 -
 7
7 -
 8
8 -
 9
9 -
 10
10 -
 11
11 -
 12
12 -
13
-
14
-
15
-
16
-
17
-
18
-
19
-
20
-
21
-
22
-
23
-
24
-
25
-
26
-
27
-
28
-
29
-
30
-
31
-
32
-
33
-
34
 |
 |