Lexmark X83 User's Guide for Windows 98, Me, and 2000
Lexmark X83 - X 83 Color Inkjet Manual
 |
UPC - 734646595384
View all Lexmark X83 manuals
Add to My Manuals
Save this manual to your list of manuals |
Lexmark X83 manual content summary:
- Lexmark X83 | User's Guide for Windows 98, Me, and 2000 - Page 1
or disclosure by the Government is subject to restrictions as set forth in subparagraph (c)(1)(ii) of the Rights in Technical Data and Computer Software clause at DFARS 252.227-7013 and in applicable FAR provisions: Lexmark International, Inc., Lexington, KY 40550. www.lexmark.com Lexmark X83 - Lexmark X83 | User's Guide for Windows 98, Me, and 2000 - Page 2
Basics Copying Printing Scanning Troubleshooting Appendix Index Lexmark™ X83 Scan/Print/Copy Home Page Tips for using this guide • Click the categories on the left side of the page to navigate through this guide, section by section. • Click the left or right arrow in the lower right corner of the - Lexmark X83 | User's Guide for Windows 98, Me, and 2000 - Page 3
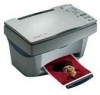
Basics Copying Printing Scanning Troubleshooting Appendix Index Basics 3 Basics Congratulations on the purchase of your Lexmark™ X83 Scan/Print/Copy. You can scan, print, and copy documents using the printer operator panel and the printer software. • Using the operator panel • Using the menus • - Lexmark X83 | User's Guide for Windows 98, Me, and 2000 - Page 4
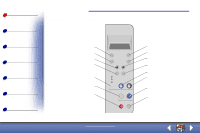
Basics Copying Printing Scanning Troubleshooting Appendix Index Using the operator panel 1 2 3 4 5 6 7 www.lexmark.com Lexmark X83 Basics 4 8 9 3 10 11 12 13 14 - Lexmark X83 | User's Guide for Windows 98, Me, and 2000 - Page 5
Printing Scanning Troubleshooting Appendix Index Basics 5 The following table corresponds to the graphic on the preceding page. # Press this button: 1 Number of Copies 2 Reduce/Enlarge 3 or 4 Menu 5 Copy Quality 6 Scan To 7 Cancel 8 Lighter/Darker 9 Paper Type 10 Select 11 - Lexmark X83 | User's Guide for Windows 98, Me, and 2000 - Page 6
Copying Printing Scanning Troubleshooting Appendix Index Basics 6 # Press this button: 13 Scan 14 Power When you want to: Press the Scan button after selecting a Scan To destination. Turn the printer on and off. the same page. Select 4, 9, or 16 images per page. www.lexmark.com Lexmark X83 - Lexmark X83 | User's Guide for Windows 98, Me, and 2000 - Page 7
Cartridges • Clean Cartridges • Self Test Copy Count Timeout • 2 min • OFF Reduce/Enlarge Timeout • 2 min • OFF www.lexmark.com Lexmark X83 Basics 7 Copy Source Type • Photo • Text • Line Drawing • Mixed Set Defaults Makes the current settings the default. Power Saver Timeout • Immediate • 10 - Lexmark X83 | User's Guide for Windows 98, Me, and 2000 - Page 8
Scanning Troubleshooting Appendix Index Basics 8 Using the Scan & Copy Control Program When the software is installed on your computer, you can use the Scan & Copy Control Program to customize scan, print, and copy jobs. To open the Scan & Copy Control Program: 1 Click Start Programs Lexmark X83 - Lexmark X83 | User's Guide for Windows 98, Me, and 2000 - Page 9
Basics Copying Printing Scanning Troubleshooting Appendix Index Basics 9 Select: Copy Fax Email Send to Application Scan are scanned. Set the scan frame position and size. Set Printer Properties or choose your fax driver. Change settings related to e-mail operations. www.lexmark.com Lexmark X83 - Lexmark X83 | User's Guide for Windows 98, Me, and 2000 - Page 10
the printer and install or replace cartridges. To open the Control Program, click Start Programs Lexmark X83 Print Control Program. Windows 98/Me Click this tab: Status Options When you want to: • Monitor the status of your print job. • Cancel your print job. Enable or disable various software - Lexmark X83 | User's Guide for Windows 98, Me, and 2000 - Page 11
this tab: Cartridges Windows 2000 Click this tab: Status Basics 11 When you want to: • View your ink levels. • Install or replace cartridges. • Clean the nozzles. • Print a test page. • Align cartridges for best quality. • View cartridge part numbers and order supplies directly from the Lexmark Web - Lexmark X83 | User's Guide for Windows 98, Me, and 2000 - Page 12
View your ink levels. • Align cartridges for best quality. • Clean the nozzles. • Print a test page. • View cartridge part numbers and order supplies directly from the Lexmark Web site. • Control how and when the Control Program displays. • Disable the printer shortcut. www.lexmark.com Lexmark X83 - Lexmark X83 | User's Guide for Windows 98, Me, and 2000 - Page 13
Basics Copying Printing Scanning Troubleshooting Appendix Index Basics 13 Loading the paper 1 Place the paper against the right side of the paper support with the print side facing you. Note: Do not force the paper into the printer. www.lexmark.com Lexmark X83 - Lexmark X83 | User's Guide for Windows 98, Me, and 2000 - Page 14
Basics Copying Printing Scanning Troubleshooting Appendix Index Basics 14 2 Squeeze the release tab and slide the paper guide to the right until it rests against the edge of the paper. www.lexmark.com Lexmark X83 - Lexmark X83 | User's Guide for Windows 98, Me, and 2000 - Page 15
• The print side is facing you. • The cards are loaded vertically against the right side of the paper support. • The paper guide rests against the edge of the cards. • The glossy or coated side is facing you. • The paper guide rests against the edge of the photo paper. www.lexmark.com Lexmark X83 - Lexmark X83 | User's Guide for Windows 98, Me, and 2000 - Page 16
in. to 17.0 in. • The paper guide rests against the edge of the paper. 25 iron-on transfers • You follow the loading instructions on the iron-on packaging. • The print side (blank side) is facing you. • The paper guide rests against the edge of the iron-on transfers. www.lexmark.com Lexmark X83 - Lexmark X83 | User's Guide for Windows 98, Me, and 2000 - Page 17
Printing Scanning Troubleshooting Appendix Index Replacing the cartridges The Lexmark X83 uses the following cartridges: Black Color High Yield Black High Yield Color 12A1970 15M0120 12A1975 15M0125 1 Make sure the printer is on. 2 Open the cartridge door. Basics 17 The cartridge carrier moves - Lexmark X83 | User's Guide for Windows 98, Me, and 2000 - Page 18
Pull the old cartridge toward you, and then lift it out. Store it in an air-tight container or dispose of it. 4 Install the new or replacement cartridge. a If you are installing a new cartridge, remove only the sticker and transparent tape on the bottom of the cartridge. www.lexmark.com Lexmark X83 - Lexmark X83 | User's Guide for Windows 98, Me, and 2000 - Page 19
Basics Copying Printing Scanning Troubleshooting Appendix Index b Insert the cartridge into the carrier. Basics 19 c Push back firmly on the cartridge until it snaps securely into place. SNAP SNAP Warning: Do not touch the gold contact area of the cartridge. www.lexmark.com Lexmark X83 - Lexmark X83 | User's Guide for Windows 98, Me, and 2000 - Page 20
can align cartridges using the operator panel or the Control Program. For help using the Control Program, see page 10. To use the operator panel: 1 Press Menu until Maintenance appears on the display. 2 Use or until Align Cartridges appears on the display. 3 Press Select. www.lexmark.com Lexmark X83 - Lexmark X83 | User's Guide for Windows 98, Me, and 2000 - Page 21
Basics Copying Printing Scanning Troubleshooting Appendix Index Basics 21 4 An alignment page prints with several patterns. A number appears under each pattern. The test a straight line. 6 Use or and scroll to the number you selected on the test page. 7 Press Select. www.lexmark.com Lexmark X83 - Lexmark X83 | User's Guide for Windows 98, Me, and 2000 - Page 22
's printer warranty does not cover repair of failures or damage caused by a refilled cartridge. Lexmark does not recommend use of refilled cartridges. Refilling cartridges can affect print quality and cause damage to the printer. For best results, use Lexmark supplies. www.lexmark.com Lexmark X83 - Lexmark X83 | User's Guide for Windows 98, Me, and 2000 - Page 23
Basics Copying Printing Scanning Troubleshooting Appendix Index Copying The following section includes information about: • Copying instructions • Customizing copy settings • Using special copy features • Creating projects www.lexmark.com Lexmark X83 Copying 23 - Lexmark X83 | User's Guide for Windows 98, Me, and 2000 - Page 24
. Copying 24 Using the computer: 1 Make sure the printer and the computer are turned on. 2 Open the top cover. 3 Place the document face down on the scanner bed in the bottom, right corner. 4 Close the top cover. 5 Click Start Programs Lexmark X83 Scan & Copy Control Program. 6 Select the number of - Lexmark X83 | User's Guide for Windows 98, Me, and 2000 - Page 25
Basics Copying Printing Scanning Troubleshooting Appendix Index Copying 25 Customizing copy settings You can make additional changes to your document before copying. 1 Click Start Programs Lexmark X83 Scan & Copy Control Program. 2 Click File Setup. 3 Select the Copy/Fax tab. 4 Customize the - Lexmark X83 | User's Guide for Windows 98, Me, and 2000 - Page 26
Printing Scanning Troubleshooting Appendix Index Copying 26 Using special copy features 1 Click Start Programs Lexmark X83 Scan & Copy Control Program. 2 From the Fit to Page area, scroll and select Poster, Clone, or Autofit. 3 Click the Paper Type/Print Quality button and select the Paper tab to - Lexmark X83 | User's Guide for Windows 98, Me, and 2000 - Page 27
Troubleshooting Appendix Index Copying 27 Clone from the operator panel Prints several copies of one image on the same page. Original 4 images 9 images 16 images Autofit You can also clone an image without using the computer. See page 31. Note: Windows so on. www.lexmark.com Lexmark X83 - Lexmark X83 | User's Guide for Windows 98, Me, and 2000 - Page 28
Color Copy or Black Copy. 1 Make sure the printer and the computer are turned on. 2 Open the top cover. 3 Place the document face down on the scanner bed in the bottom, right corner. 4 Close the top cover. 5 Click Start Programs Lexmark X83 Scan & Copy Control Program. 6 Select the color button - Lexmark X83 | User's Guide for Windows 98, Me, and 2000 - Page 29
Basics Copying Printing Scanning Troubleshooting Appendix Index Copying 29 Assembling posters 1 On each printed page, trim the white edges from two adjacent sides. edge). 3 Tape the back of the pages together. 4 To complete your poster, trim any remaining white edges. www.lexmark.com Lexmark X83 - Lexmark X83 | User's Guide for Windows 98, Me, and 2000 - Page 30
top cover. 5 Press Black Copy. 1 Make sure the printer and the computer are turned on. 2 Open the top cover. 3 Place the receipt face down on the scanner bed in the bottom, right corner. 4 Close the top cover. 5 Click Start Programs Lexmark X83 Scan & Copy Control Program. 6 Click Copy. Note: If - Lexmark X83 | User's Guide for Windows 98, Me, and 2000 - Page 31
8 Press Color Copy or Black Copy. 1 Make sure the printer and the computer are turned on. 2 Open the top cover. 3 Place the seed packet face down on the scanner bed in the bottom, right corner. 4 Close the top cover. 5 Click Start Programs Lexmark X83 Scan & Copy Control Program. 6 From the Fit to - Lexmark X83 | User's Guide for Windows 98, Me, and 2000 - Page 32
Color Copy or Black Copy. 1 Make sure the printer and the computer are turned on. 2 Open the top cover. 3 Place the pattern face down on the scanner bed in the bottom, right corner. 4 Close the top cover. 5 Click Start Programs Lexmark X83 Scan & Copy Control Program. 6 From the Reduce/Enlarge - Lexmark X83 | User's Guide for Windows 98, Me, and 2000 - Page 33
Color Copy. Using the computer: 1 Make sure the printer and the computer are turned on. 2 Open the top cover. 3 Place the photo face down on the scanner bed in the bottom, right corner. 4 Close the top cover. 5 Click Start Programs Lexmark X83 Scan & Copy Control Program. 6 From the Reduce/Enlarge - Lexmark X83 | User's Guide for Windows 98, Me, and 2000 - Page 34
. 1 Print your presentation on plain paper. 2 Load the transparencies in the printer. 3 Place your document face down on the scanner bed in the bottom, right corner. 4 Press Color Copy to make a transparency in color. Press Black Copy to make a transparency in black. www.lexmark.com Lexmark X83 - Lexmark X83 | User's Guide for Windows 98, Me, and 2000 - Page 35
Basics Copying Printing Scanning Troubleshooting Appendix Index Printing The following section includes information about: • Printing instructions • Customizing print settings • Creating projects www.lexmark.com Lexmark X83 Printing 35 - Lexmark X83 | User's Guide for Windows 98, Me, and 2000 - Page 36
Printing Scanning Troubleshooting Appendix Index Printing 36 Printing instructions 1 From the application File menu, select Print. 2 From the Print dialog box, click OK. If you are using Windows 98/Me, click Printer Properties to customize your print job. If you are using Windows 2000, click - Lexmark X83 | User's Guide for Windows 98, Me, and 2000 - Page 37
Basics Copying Printing Scanning Troubleshooting Appendix Index Printing 37 3 In the Printer Setup dialog box, click Properties, Options, or Setup (depending on the application.) Printer Properties for Windows 98/Me has four tabs: Job Finishing, Paper, Document/ Quality, and Advanced. Each tab has - Lexmark X83 | User's Guide for Windows 98, Me, and 2000 - Page 38
Printing Scanning Troubleshooting Appendix Index Printing 38 Click this tab: Document/Quality Advanced When you want to: Select • A color setting. • A type of paper. • A Note: Click the Help button on any tab in the Printer Properties to access the printer driver Help. www.lexmark.com Lexmark X83 - Lexmark X83 | User's Guide for Windows 98, Me, and 2000 - Page 39
, Color, and Features. Each tab has settings for operating the printer and its software. Click this tab: General Options When you want to: Select • A printer. • Which pages to print. • The number of copies. Print • Frames. • All linked documents. • A table of links. www.lexmark.com Lexmark X83 - Lexmark X83 | User's Guide for Windows 98, Me, and 2000 - Page 40
Basics Copying Printing Scanning Troubleshooting Appendix Index Click this tab: Page Setup Color When you want to: Select • A paper size. • A media type. • A print quality. • A paper orientation. • The Reverse Order Printing option. • The number of copies to print. • The Collate Copies option. - Lexmark X83 | User's Guide for Windows 98, Me, and 2000 - Page 41
Properties or Printing Preferences from Windows lets you apply the settings to all documents. 1 Select Start Settings Printers. 2 From the Printers folder, right-click the printer icon for the printer. 3 Select Properties or Printing Preferences from the sidebar menu. www.lexmark.com Lexmark X83 - Lexmark X83 | User's Guide for Windows 98, Me, and 2000 - Page 42
Copying Printing Scanning Troubleshooting Appendix Index Printing 42 Printer Properties for Windows 98/Me has seven tabs: Job Finishing, Paper, Document/ Quality, Advanced, General, Details, and Color Management. Each tab has settings for operating the printer and its software. Click this tab - Lexmark X83 | User's Guide for Windows 98, Me, and 2000 - Page 43
Basics Copying Printing Scanning Troubleshooting Appendix Index Click this tab: Document/Quality Advanced General Printing 43 When you want to: Select • A color setting. • A type of paper. • A print quality setting. • Web Smoothing to print clearer images from the Internet. • Allow pages to dry. • - Lexmark X83 | User's Guide for Windows 98, Me, and 2000 - Page 44
ports or drivers. • Select a printer driver. • Capture printer ports. • Set timeout settings. • Customize spool and port settings. Set color profiles for the printer. Note: Click the Help button on any tab in the Printer Properties to access the printer driver Help. www.lexmark.com Lexmark X83 - Lexmark X83 | User's Guide for Windows 98, Me, and 2000 - Page 45
Copying Printing Scanning Troubleshooting Appendix Index Printing 45 Printing Preferences for Windows 2000 has three tabs: Page Setup, Color, and Features. Each tab has settings for operating the printer and its software. Click this tab: Page Setup Color When you want to: Select • A paper size - Lexmark X83 | User's Guide for Windows 98, Me, and 2000 - Page 46
this tab: Features When you want to: Select • The Dry Time Delay option. • The Two-Sided Printing option. • The binding option. • The Print Instruction Sheet option. Note: Click the Help button on any tab in the Printer Preferences to access the printer driver Help. www.lexmark.com Lexmark X83 - Lexmark X83 | User's Guide for Windows 98, Me, and 2000 - Page 47
Printing Scanning Troubleshooting Appendix Index Printing 47 Customizing print settings for specialty paper When you install the software, the default settings are assigned to Printer Properties. Use the default settings for printing most documents on inkjet paper. To change printer settings for - Lexmark X83 | User's Guide for Windows 98, Me, and 2000 - Page 48
, remove each photo as it exits the printer and let it dry before stacking. From the Paper Type area, select Transparency. Select Normal Print Quality Note: When printing transparencies, remove each transparency as it exits the printer and let it dry before stacking. www.lexmark.com Lexmark X83 - Lexmark X83 | User's Guide for Windows 98, Me, and 2000 - Page 49
e To print paper reloading instructions, select the option on the screen that prints reloading instructions. f Click OK. 2 From the application File menu, select Print. 3 After the first side of your two-sided document prints, the software prompts you to reload the paper. www.lexmark.com Lexmark X83 - Lexmark X83 | User's Guide for Windows 98, Me, and 2000 - Page 50
page images on a single sheet of paper. 1 Customize Printer Properties for handouts. a Open Printer Properties. For help, see page 36. b Click the Paper tab to select the page orientation and document size. c Click the Job Finishing tab and select: - Handout www.lexmark.com Lexmark X83 Printing 50 - Lexmark X83 | User's Guide for Windows 98, Me, and 2000 - Page 51
Scanning Troubleshooting Appendix Index Printing 51 - Number of Prints - Print Page Borders, if desired d To print your handout on one side of the paper, click OK. To print your handout on both sides of the paper: 1 From the Job Finishing tab, select Normal. 2 Click OK. www.lexmark.com Lexmark X83 - Lexmark X83 | User's Guide for Windows 98, Me, and 2000 - Page 52
: A bundle is any number of sheets of paper folded together. When printing with a heavier paper stock, select a smaller number of Sheets per Bundle. g Select the option on the screen that prints reloading instructions. h Click OK. 2 Print, and then assemble your booklet. www.lexmark.com Lexmark X83 - Lexmark X83 | User's Guide for Windows 98, Me, and 2000 - Page 53
Troubleshooting Appendix Index Printing 53 a From the application File menu, select Print. b From the Print dialog box, click OK. The first side of your document prints. c After the first side of your booklet is finished printing, the software prompts you to reload the paper from the paper exit tray - Lexmark X83 | User's Guide for Windows 98, Me, and 2000 - Page 54
Basics Copying Printing Scanning Troubleshooting Appendix Index Printing 54 Customizing T-shirts 1 Load iron-on transfer paper with the blank side facing you. 2 Open the image editor program supplied with the printer. 3 Create or select the image of your choice (scanned photo, clip art, scanned - Lexmark X83 | User's Guide for Windows 98, Me, and 2000 - Page 55
Printing Scanning Troubleshooting Appendix Index Paper Type, and Print Quality for your document. 8 From the Paper tab, select the Paper Size and orientation for your document. 9 Click OK. 10 Click OK. Note: You may want to print your award or certificate on card stock. www.lexmark.com Lexmark X83 - Lexmark X83 | User's Guide for Windows 98, Me, and 2000 - Page 56
application File menu, select Print. 4 Select Properties. 5 From the Document Quality tab, select the Document Type, Paper Type, and Print Quality for your document. 6 From the Paper tab, select the Paper Size and orientation for your document. 7 Click OK. 8 Click OK. www.lexmark.com Lexmark X83 - Lexmark X83 | User's Guide for Windows 98, Me, and 2000 - Page 57
Scanning Troubleshooting Appendix Index Printing 57 Creating refrigerator magnets 1 Load magnetic paper. 2 Create or select the image of your choice (scanned photo, clip art, scanned images, or objects) in an image editor program. 3 From the application File menu, select Print. 4 Click the Printer - Lexmark X83 | User's Guide for Windows 98, Me, and 2000 - Page 58
Select Properties. 5 From the Document Quality tab, select the Document Type, Paper Type, and Print Quality for your document. 6 From the Paper tab, select the Paper Type and Paper Size for your document. 7 Click OK. 8 Click OK. 9 Cut the paper to fit into your CD case. www.lexmark.com Lexmark X83 - Lexmark X83 | User's Guide for Windows 98, Me, and 2000 - Page 59
Basics Copying Printing Scanning Troubleshooting Appendix Index Scanning The following section includes information about: • Scanning instructions • Customizing scan options • Using special scan features • Creating projects www.lexmark.com Lexmark X83 Scanning 59 - Lexmark X83 | User's Guide for Windows 98, Me, and 2000 - Page 60
the destination of your scan. 1 Make sure the printer and the computer are turned on. 2 Open the top cover. 3 Place the document face down on the scanner bed in the bottom, right corner. 4 Close the top cover. 5 Click: Start Programs Lexmark X83 Scan & Copy Control Program. 6 Click the button that - Lexmark X83 | User's Guide for Windows 98, Me, and 2000 - Page 61
Basics Copying Printing Scanning Troubleshooting Appendix Index Scanning 61 Customizing scan options Customize scan settings using the operator panel photo to a file • Scanning to Text/(OCR) • Scanning to an application • Scanning to the clipboard of your Windows system www.lexmark.com Lexmark X83 - Lexmark X83 | User's Guide for Windows 98, Me, and 2000 - Page 62
Troubleshooting Appendix Index Scanning 62 Scanning a photo to an e-mail 1 Open the top cover. 2 Place your photo face down on the scanner your photo face down on the scanner bed in the bottom, right corner. 3 Close the cover. 4 Click Start Programs Lexmark X83 Scan & Copy Control Program. - Lexmark X83 | User's Guide for Windows 98, Me, and 2000 - Page 63
document face down on the scanner bed in the bottom, right corner. 3 Close the cover. 4 Click Start Programs Lexmark X83 Scan & Copy Control Program. 5 Select the Text/(OCR) button. 6 Click the Scan button that matches the destination of your scan. 7 Select the software application you want to scan - Lexmark X83 | User's Guide for Windows 98, Me, and 2000 - Page 64
Basics Copying Printing Scanning Troubleshooting Appendix Index Scanning 64 Scanning to an application 1 Open the top cover. 2 Place your photo face down on the scanner bed in the bottom, right corner. 3 Close the cover. 4 Click Start Programs Lexmark X83 Scan & Copy Control Program. 5 Click the - Lexmark X83 | User's Guide for Windows 98, Me, and 2000 - Page 65
from a cookbook, magazine or other source. 3 Place your recipe face down on the scanner bed in the bottom, right corner. 4 From the Scan & Copy Control Program, select a size from the Fit to page area. 5 Customize the settings. 6 Click the Copy button. Scanning 65 www.lexmark.com Lexmark X83 - Lexmark X83 | User's Guide for Windows 98, Me, and 2000 - Page 66
application File menu, select Print. 5 Select Properties. 6 From the Document Quality tab, select the Document Type, Paper Type, and Print Quality for your document. 7 From the Paper tab, select the Paper Size and orientation for your document. 8 Click OK. 9 Click OK. www.lexmark.com Lexmark X83 - Lexmark X83 | User's Guide for Windows 98, Me, and 2000 - Page 67
Printing Scanning Troubleshooting Appendix Index Scanning 67 Printing a wedding program 1 Place a fresh flower or other object on the scanner bed. 2 Cover the flower with a sheet of paper. 3 Scan text tool to create a title for your page. 4 Print your scrapbook page. www.lexmark.com Lexmark X83 - Lexmark X83 | User's Guide for Windows 98, Me, and 2000 - Page 68
Troubleshooting Appendix Index Troubleshooting 68 Troubleshooting When the printer has a problem, first make sure: • The power supply is plugged into the printer and an electrical outlet. • The printer is turned on. • The sticker and transparent tape are removed from the bottom of the cartridge - Lexmark X83 | User's Guide for Windows 98, Me, and 2000 - Page 69
Troubleshooting 69 Document does not print • Make sure the printer is not being held or paused. • Make sure the cartridges are properly installed. For help, see page 18. • Use an undamaged USB cable. To check printer status: 1 Click Start Settings Printers. 2 Double-click the Lexmark X83 printer - Lexmark X83 | User's Guide for Windows 98, Me, and 2000 - Page 70
rests against the left edge of the paper and does not cause the paper to bow in the paper support. • The printer is on a flat, level surface. • You select the correct paper type and size in Printer Properties, Printing Preferences, or in the Scan & Copy Control Program. www.lexmark.com Lexmark X83 - Lexmark X83 | User's Guide for Windows 98, Me, and 2000 - Page 71
firmly on the paper to remove it. If you cannot reach the paper because it is too far into the printer a Open the cartridge door and pull the paper out. b Close the cartridge door. 3 Press the Power button to turn the printer on, and then send your document to print. www.lexmark.com Lexmark X83 - Lexmark X83 | User's Guide for Windows 98, Me, and 2000 - Page 72
75. Characters are missing or unexpected Make sure the scanner bed is clean. 1 Dampen a clean lint-free cloth. 2 Gently wipe the glass scanner bed. Note: Make sure all ink or corrective fluid on the document is dry before placing the document on the glass scanner bed. www.lexmark.com Lexmark X83 - Lexmark X83 | User's Guide for Windows 98, Me, and 2000 - Page 73
print (intermittent printing) • Make sure Enable Buffer Mode is selected on the Options tab of the Control Program. For help, see page 10. • Select Photo or Max Photo Quality on the Document/Quality tab of Printer Properties or Printing Preferences. For help, see page 36. www.lexmark.com Lexmark X83 - Lexmark X83 | User's Guide for Windows 98, Me, and 2000 - Page 74
, see page 10. • Use a different color setting. • Select Printer Properties or Printing Preferences Document/Quality Natural Color For help, see page 36. • Use a different brand of paper. Every paper brand accepts ink differently and prints with slight color variations. www.lexmark.com Lexmark X83 - Lexmark X83 | User's Guide for Windows 98, Me, and 2000 - Page 75
clean the nozzles. For help using the Control Program, see page 10. To use the operator panel: 1 Press Menu. 2 Press or and scroll until Maintenance appears on the display. 3 Press Select. 4 Press or and scroll until Clean Nozzles appears on the display. 5 Press Select. www.lexmark.com Lexmark X83 - Lexmark X83 | User's Guide for Windows 98, Me, and 2000 - Page 76
Basics Copying Printing Scanning Troubleshooting Appendix Index Troubleshooting 76 The printer feeds a sheet of paper and prints a nozzle test pattern similar to the one shown. Compare the the diagonal lines below the printed bars. Unbroken lines indicate clean nozzles. www.lexmark.com Lexmark X83 - Lexmark X83 | User's Guide for Windows 98, Me, and 2000 - Page 77
contacts. To wipe the cartridge nozzles and contacts: 1 Remove the cartridge from the printer. For help, see page 18. 2 Dampen a clean, lint-free cloth with water and gently wipe the gold nozzle area. Warning: Wipe the nozzles in one direction so the colors do not mix. www.lexmark.com Lexmark X83 - Lexmark X83 | User's Guide for Windows 98, Me, and 2000 - Page 78
To dissolve dried ink, hold the damp cloth against the nozzles for about three seconds. Gently blot and wipe dry. Let the gold-colored areas dry before you reinsert the cartridge into the printer. Reinstall the cartridge and repeat the nozzle test. For help, see page 75. www.lexmark.com Lexmark X83 - Lexmark X83 | User's Guide for Windows 98, Me, and 2000 - Page 79
77. • Clean the scanner bed. For help, see page 72. Document/Quality Photo or Max Envelopes do not feed properly If regular paper feeds without problems, make sure: • You load the envelopes correctly. For help, see page 15. • You use an envelope size supported by the printer and it is selected - Lexmark X83 | User's Guide for Windows 98, Me, and 2000 - Page 80
door and pull the paper out. b Close the cartridge door. 3 Press the Power button to turn the printer on, and then send your document to print. Ink Low message The cartridge is running out of ink. Purchase a new cartridge. For help replacing the cartridge, see page 17. www.lexmark.com Lexmark X83 - Lexmark X83 | User's Guide for Windows 98, Me, and 2000 - Page 81
. 3 Resend your document to print. Scanner Connection error 1 Disconnect the USB cable from the printer. 2 Reconnect the USB cable. 3 Turn the printer off. 4 Unplug the printer. 5 Plug the printer into an electrical outlet. 6 Turn the printer on. 7 Restart the computer. www.lexmark.com Lexmark X83 - Lexmark X83 | User's Guide for Windows 98, Me, and 2000 - Page 82
Copying Printing Scanning Troubleshooting Appendix Index Troubleshooting 82 Other error messages 1 Turn the printer off. 2 Wait a few seconds, and then turn the printer back on. 3 Resend your document to print. Note: You may not need to resend your document to print. www.lexmark.com Lexmark X83 - Lexmark X83 | User's Guide for Windows 98, Me, and 2000 - Page 83
Basics Copying Printing Scanning Troubleshooting Appendix Index Appendix The following section contains information about: • Statement of Limited Warranty • Electronic emission notices • Notices • Safety information • ENERGY STAR www.lexmark.com Lexmark X83 Appendix 83 - Lexmark X83 | User's Guide for Windows 98, Me, and 2000 - Page 84
Lexmark warrants that this product: • Is manufactured from new parts, or new and serviceable used parts, which perform like new parts • Is free from defects in material and workmanship • Conforms to Lexmark's official published specifications • Is in good working order www.lexmark.com Lexmark X83 - Lexmark X83 | User's Guide for Windows 98, Me, and 2000 - Page 85
. When warranty service involves the exchange of a product or part, the item replaced becomes the property of the Remarketer or Lexmark. The replacement may be a new or repaired item. The replacement item assumes the remaining warranty period of the original product. www.lexmark.com Lexmark X83 - Lexmark X83 | User's Guide for Windows 98, Me, and 2000 - Page 86
available for a fee. Extent of warranty We do not warrant uninterrupted or error-free operation of a product. Warranty service does not include repair of failures caused by: • Modification or attachments • Accidents or misuse • Unsuitable physical or operating environment www.lexmark.com Lexmark X83 - Lexmark X83 | User's Guide for Windows 98, Me, and 2000 - Page 87
Lexmark or a Lexmark authorized servicer • Operation of a product beyond the limit of its duty cycle • Failure to have installed a maintenance kit as specified (if applicable) • Use of printing media outside of Lexmark specifications • Use of other than Lexmark supplies (such as inkjet cartridges - Lexmark X83 | User's Guide for Windows 98, Me, and 2000 - Page 88
Troubleshooting Appendix Index Appendix 88 or tangible personal property for which Lexmark is legally liable. In no event will Lexmark of remedies also applies to any developer of materials supplied to Lexmark. Lexmark's and the developer's limitations of remedies are not .lexmark.com Lexmark X83 - Lexmark X83 | User's Guide for Windows 98, Me, and 2000 - Page 89
Printing Scanning Troubleshooting Appendix Index Appendix 89 Electronic emission notices Federal Communications Commission (FCC) compliance information statement The Lexmark ™ X83 Scan/Print/Copy has been tested and found to comply with the limits for a Class B digital device, pursuant to Part 15 - Lexmark X83 | User's Guide for Windows 98, Me, and 2000 - Page 90
Troubleshooting Appendix Index Appendix 90 • Connect the equipment into an outlet on a circuit different from that to which the receiver is connected. • Consult your point of purchase or service properly shielded and grounded USB cable such as Lexmark part number 12A2405. Use of a substitute cable - Lexmark X83 | User's Guide for Windows 98, Me, and 2000 - Page 91
Troubleshooting of the Member States relating to electromagnetic compatibility and safety of electrical equipment designed for Support, Lexmark International, S.A., Boigny, France. This product satisfies the Class B limits of EN 55022 and safety requirements of EN 60950. www.lexmark.com Lexmark X83 - Lexmark X83 | User's Guide for Windows 98, Me, and 2000 - Page 92
power supply provided with this product or a Lexmark replacement unit. • Connect the power cord to an electrical outlet that is near the product and easily accessible. • Refer service or repairs, other than those described in the manual, to a professional service person. www.lexmark.com Lexmark X83 - Lexmark X83 | User's Guide for Windows 98, Me, and 2000 - Page 93
. Companies participating in this program introduce personal computers, printers, monitors, or fax machines that power down when they are not being used. This feature will cut the energy used by up to 50 percent. Lexmark is proud to be a participant in this program. As an ENERGY STAR Partner - Lexmark X83 | User's Guide for Windows 98, Me, and 2000 - Page 94
I index cards loading setting recommendations Industry Canada Compliance Statement Ink Low message installing cartridges instructions copying printing scanning intermittent printing Internet printing Web Smoothing iron-on transfers loading setting recommendations www.lexmark.com Lexmark X83 - Lexmark X83 | User's Guide for Windows 98, Me, and 2000 - Page 95
photo paper loading problems setting recommendations postcards loading setting recommendations poster assembling printing print quality banding different colors smudged too dark troubleshooting wavy lines print settings customizing printing instructions posters www.lexmark.com Lexmark X83 - Lexmark X83 | User's Guide for Windows 98, Me, and 2000 - Page 96
pattern alignment transparencies loading problems setting recommendations troubleshooting doesn't print envelopes don't print paper feed problems print quality two-sided printing U United Kingdom Telecommunications Act 1984 www.lexmark.com Lexmark X83 Index 96 USB cable part number W Web Smoothing
-
 1
1 -
 2
2 -
 3
3 -
 4
4 -
 5
5 -
 6
6 -
 7
7 -
8
-
9
-
10
-
11
-
12
-
13
-
14
-
15
-
16
-
17
-
18
-
19
-
20
-
21
-
22
-
23
-
24
-
25
-
26
-
27
-
28
-
29
-
30
-
31
-
32
-
33
-
34
-
35
-
36
-
37
-
38
-
39
-
40
-
41
-
42
-
43
-
44
-
45
-
46
-
47
-
48
-
49
-
50
-
51
-
52
-
53
-
54
-
55
-
56
-
57
-
58
-
59
-
60
-
61
-
62
-
63
-
64
-
65
-
66
-
67
-
68
-
69
-
70
-
71
-
72
-
73
-
74
-
75
-
76
-
77
-
78
-
79
-
80
-
81
-
82
-
83
-
84
-
85
-
86
-
87
-
88
-
89
-
90
-
91
-
92
-
93
-
94
-
95
-
96
 |
 |

Copying
Printing
Scanning
Troubleshooting
Appendix
Basics
Index
www.lexmark.com
Lexmark X83
Edition Page
Edition: March 2001
The following paragraph does not apply to any country where such provisions are inconsistent with local
law:
LEXMARK INTERNATIONAL, INC., PROVIDES THIS PUBLICATION “AS IS” WITHOUT WARRANTY OF
ANY KIND, EITHER EXPRESS OR IMPLIED, INCLUDING, BUT NOT LIMITED TO, THE IMPLIED WARRANTIES
OF MERCHANTABILITY OR FITNESS FOR A PARTICULAR PURPOSE. Some states do not allow disclaimer of
express or implied warranties in certain transactions; therefore, this statement may not apply to you.
This publication could include technical inaccuracies or typographical errors. Changes are periodically made to
the information herein; these changes will be incorporated in later editions. Improvements or changes in the
products or the programs described may be made at any time.
Comments about this publication may be addressed to Lexmark International, Inc., Department F95/032-2, 740
West New Circle Road, Lexington, Kentucky 40550, U.S.A. In the United Kingdom and Eire, send to Lexmark
International Ltd., Marketing and Services Department, Westhorpe House, Westhorpe, Marlow Bucks SL7 3RQ.
Lexmark may use or distribute any of the information you supply in any way it believes appropriate without
incurring any obligation to you. You can purchase additional copies of publications related to this product by calling
1-800-553-9727. In the United Kingdom and Eire, call 0628-481500. In other countries, contact your point of
purchase.
References in this publication to products, programs, or services do not imply that the manufacturer intends to
make these available in all countries in which it operates. Any reference to a product, program, or service is not
intended to state or imply that only that product, program, or service may be used. Any functionally equivalent
product, program, or service that does not infringe any existing intellectual property right may be used instead.
Evaluation and verification of operation in conjunction with other products, programs, or services, except those
expressly designated by the manufacturer, are the user’s responsibility.
© Copyright 2001 Lexmark International, Inc.
All rights reserved.
UNITED STATES GOVERNMENT RESTRICTED RIGHTS
This software and documentation are provided with RESTRICTED RIGHTS. Use, duplication or disclosure by the
Government is subject to restrictions as set forth in subparagraph (c)(1)(ii) of the Rights in Technical Data and
Computer Software clause at DFARS 252.227-7013 and in applicable FAR provisions: Lexmark International, Inc.,
Lexington, KY 40550.