MSI Z77A User Guide - Page 80
Intel RAID, appears
 |
View all MSI Z77A manuals
Add to My Manuals
Save this manual to your list of manuals |
Page 80 highlights
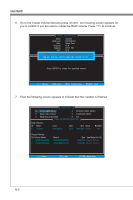
Intel RAID ■ Reset Disks to Non-RAID Select option 3 Reset Disks to Non-RAID and press to delete the RAID volume and remove any RAID structures from the drives. The following screen appears: [ MAIN MENU ] 1. Create RAID Volume 4. Recovery Volume Options 2. Delete RAID Volume [ RESET RAID DA4T.A ] Recovery Volume Options Resetting RAID disk w5il.l remEoxvite its RAID structures and revert [it DtoISKa /nVoOnL-RUAMIEDINdFisOkR. MATION ] RAID VolumesW:ARNING : Resetting a disk causes all data on the disk to be lost. None defined. (This does not apply to Recovery volumes) PhysicPaol rDt eDvircivees : Model Serial # Port D1eviceXMXoXdXe-lXXXXXXXXSerial # XXXXXXXXXXXXXX 1 X2XXX-XXXXXXXXX-XXXXXXXXXXXXXXXXXXXXXXXXXXXXXXXXXXXXXXX 2 XXXX-XXXXXXXX XXXXXXXXXXXXXX Size Status XSXiXze.XGTBypMe/eSmtabtuesr D(Visokl ID) XXXX.XXGXB.XGNBonM-ReAmIDberDDisiksk XXX.XGB Non-RAID Disk Select the disks that should be reset Previous/ Next [SPACE] - Selects [ENTER] - Selection Complete [ ↑↓] - Select [ESC] - Exit [ENTER] - Select Menu Use the key to select the disks and press key. A confirmation sentence will appear below, and then press key to accept the selection. Important • You will lose all data on the RAID drives and any internal RAID structures when you perform this operation. • Possible reasons to "Reset Disks to Non-RAID" could include issues such as incompatible RAID configurations or a failed volume or failed disk. B-8
-
 1
1 -
2
-
3
-
4
-
5
-
6
-
7
-
8
-
9
-
10
-
11
-
12
-
13
-
14
-
15
-
16
-
17
-
18
-
19
-
20
-
21
-
22
-
23
-
24
-
25
-
26
-
27
-
28
-
29
-
30
-
31
-
32
-
33
-
34
-
35
-
36
-
37
-
38
-
39
-
40
-
41
-
42
-
43
-
44
-
45
-
46
-
47
-
48
-
49
-
50
-
51
-
52
-
53
-
54
-
55
-
56
-
57
-
58
-
59
-
60
-
61
-
62
-
63
-
64
-
65
-
66
-
67
-
68
-
69
-
70
-
71
-
72
-
73
-
74
-
 75
75 -
 76
76 -
 77
77 -
 78
78 -
 79
79 -
 80
80 -
 81
81 -
 82
82 -
 83
83 -
 84
84 -
 85
85 -
86
-
87
-
88
 |
 |
