Makita RJ01W Technical Reference - Page 10
epair, 3] DISASSEMBLY/ASSEMBLY, 3] -4. Switch lever F complete
 |
View all Makita RJ01W manuals
Add to My Manuals
Save this manual to your list of manuals |
Page 10 highlights
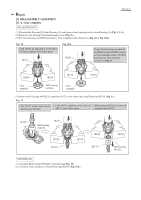
Repair [3] DISASSEMBLY/ASSEMBLY [3] -4. Switch lever F complete P 10/ 12 DISASSEMBLING (1) Disassemble Housing (R) (Fig. 2). (2) Remove Switch lever section from Housing (L) and disassemble it as drawn in Fig. 19. Fig. 19 1. Remove Switch lever unit; Switch lever F complete and Switch lever R. 2. Remove Link, and Switch lever R from Switch F complete. Link Switch lever F complete Switch lever R Pin 3 Note; Pay attention not to lose Pin 3 when removing Switch lever F complete and Switch lever R. Or, remove Pin 3 before disassembling Switch lever F complete. ASSEMBLING (1) Mount Link to Switch lever F complete, and Switch lever R to the Link. Assemble Switch lever unit to Housing (L). 1. Mount Link to Switch lever F complete, facing its triangle formed side to Switch lever R. 2. Mount Switch lever R to 4. Mount Switch lever unit and pass Pin 3 through the triangle formed end the hole of Link and Switch lever F complete to of Link. Housing (L). Switch lever R Pin 3 Link Switch lever F complete Link
-
 1
1 -
2
-
3
-
4
-
 5
5 -
 6
6 -
 7
7 -
 8
8 -
 9
9 -
 10
10 -
 11
11 -
 12
12
 |
 |
