Makita RJ01W Technical Reference - Page 9
] DISASSEMBLY/ASSEMBLY, 3] -3. Toolless blade holder Model JR100D cont., epair
 |
View all Makita RJ01W manuals
Add to My Manuals
Save this manual to your list of manuals |
Page 9 highlights
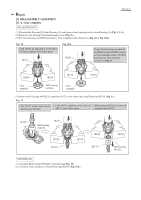
Repair [3] DISASSEMBLY/ASSEMBLY [3] -3. Toolless blade holder section (Model JR100D) (cont.) ASSEMBLING (1) Assemble Blade guide to Slider in case Blade guide is removed from Slider (Fig. 9). Fig. 17 8. Hold Gear housing with vise and grip Connecting sleeve with Water pump pliers over a cloth so as not to damage it. Turn Driving sleeve 90 degrees while pressing it down. Now, Protrusions in the Driving sleeve presisely match to Depressions on Connecting sleeve and groove for Retaining ring 16 on Guide sleeve comes into your sight as drawn in Fig. 18. 90° Driving sleeve Connecting sleeve P 9/ 12 Fig. 18 9. Mount the Retaining ring 16 as drawn below. Retaining ring 16 Groove for Retaining ring 16
-
 1
1 -
2
-
3
-
 4
4 -
 5
5 -
 6
6 -
 7
7 -
 8
8 -
 9
9 -
 10
10 -
 11
11 -
 12
12
 |
 |

[3] DISASSEMBLY/ASSEMBLY
[3] -3. Toolless blade holder section (Model JR100D) (cont.)
ASSEMBLING
(1) Assemble Blade guide to Slider in case Blade guide is removed from Slider (
Fig. 9
).
Fig. 17
8. Hold Gear housing with vise and grip Connecting sleeve
with Water pump pliers over a cloth so as not to damage it.
Turn
Driving sleeve
90 degrees
while pressing it down.
Now, Protrusions in the Driving sleeve presisely match to
Depressions on Connecting sleeve and groove for
Retaining ring 16 on Guide sleeve comes into your sight
as drawn in
Fig. 18
.
Connecting sleeve
Driving sleeve
Fig. 18
9. Mount the Retaining ring 16 as drawn below.
Groove for
Retaining ring 16
Retaining ring 16
90°
P
9
/ 1
2
R
epair