Makita RJ01W Technical Reference - Page 4
epair, 3] DISASSEMBLY/ASSEMBLY, 3] -1. Slider cont.
 |
View all Makita RJ01W manuals
Add to My Manuals
Save this manual to your list of manuals |
Page 4 highlights
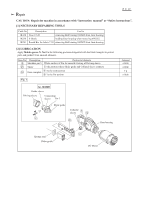
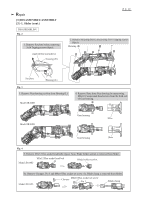
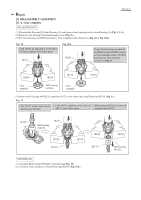
Repair [3] DISASSEMBLY/ASSEMBLY [3] -1. Slider (cont.) DISASSEMBLING Fig. 5 6. Remove Gear housing by unscrewing M4x14 Pan head screws (3pcs). Gear housing 7. Remove Plate by unscrewing M4x14 Pan head screws (2pcs). Plate P 4/ 12 8. Remove Slider, Slider guide and Sponge seal. Sponge seal Slider Slider guide ASSEMBLING (1) Assemble Slider guide and Sponge seal to Slider (Fig. 6). Fig. 6 1. Facing the protruded side to the Loop side, pass Slider guide through Slider. Loop side Slider protruded side of Slider guide 2. Pass Sponge seal through Slider. Sponge seal (2) Assemble the Slider to Gear housing cover (Fig. 7). Fig. 7 3. When assembling Slider to Gear housing cover, face its projection side to the thin rib side of Gear housing cover. Projection of Slider Slider 4. Fitting the projection of Slider guide and Sponge seal to the Grooves in Gear housing cover, assemble Slider to Gear housing cover. 5. Fix Plate to Gear housing cover with M4x14 Pan head screws Sponge seal Projection of Slider guide Gear housing cover Plate Thin rib Thick rib Groove for Slider Groove for Sponge guide fitting seal fitting
-
 1
1 -
 2
2 -
 3
3 -
 4
4 -
 5
5 -
 6
6 -
 7
7 -
 8
8 -
 9
9 -
 10
10 -
11
-
12
 |
 |
