McAfee IIP-S14C-NA-100I Product Guide - Page 21
Attaching cables to the I-1400 Sensor, Cabling the Console port, Cabling the Auxiliary port
 |
View all McAfee IIP-S14C-NA-100I manuals
Add to My Manuals
Save this manual to your list of manuals |
Page 21 highlights
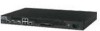
CHAPTER 4 Attaching cables to the I-1400 Sensor Follow the steps outlined in this chapter to connect cables to the various ports on your sensor. Cabling the Console port The Console port is used for setup and configuration of the sensor. 1 For console connections, plug the DB9 Console cable supplied by McAfee into the Console port (labeled Console on the sensor front panel). 2 Connect the other end of the Console port cable directly to a COM port of the PC or terminal server you will use to configure the sensor (for example, a PC running correctly configured Windows HyperTerminal software). You must connect directly to the console for initial configuration. Required settings for HyperTerminal are: Name Setting Baud rate Number of bits Parity Stop bits Flow Control 9600 8 None 1 None 3 Power on the sensor. Cabling the Auxiliary port The Auxiliary (Aux) port is used for modem access to the sensor for setup and configuration. You cannot use a modem the first time you configure a sensor. 1 For modem connections, plug a straight-through modem cable into the Auxiliary port (labeled Aux on the sensor front panel). 2 Connect a modem to the Aux port. 3 Connect a telephone line to the modem. Required settings for the Aux port are: 13
-
 1
1 -
2
-
3
-
4
-
5
-
6
-
7
-
8
-
9
-
10
-
11
-
12
-
13
-
14
-
15
-
 16
16 -
 17
17 -
 18
18 -
 19
19 -
 20
20 -
 21
21 -
 22
22 -
 23
23 -
 24
24 -
 25
25 -
 26
26 -
27
-
28
-
29
 |
 |
