Netgear FSM726 FSM726v2 Setup Manual - Page 26
Main Menu> Set-Up> IP Configuration, IP Assignment Mode
 |
UPC - 606449026856
View all Netgear FSM726 manuals
Add to My Manuals
Save this manual to your list of manuals |
Page 26 highlights
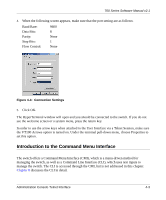
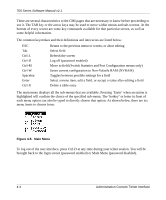
700 Series Software Manual v2.1 Figure 4-10: System Configuration Main Menu> Set-Up> IP Configuration This menu manages the IP related information of the system. IP Assignment Mode. You can manually enter IP-related information: • Bootstrap Protocol, which allows the switch to discover its own IP address from a BootP server on the network • DHCP, which allows the switch to accept DHCP broadcasts from a DHCP server and automatically configures IP related information The default setting is DHCP, to enable quick and easy set-up. However, since you need to know the IP address of your switch to remotely manage it and DHCP assignments can change, change the IP assignment mode from DHCP to manual after the switch has obtained its IP address. Figure 4-11: Set-up Manager: IP Configuration Note: In DHCP mode, if the switch fails to get a DHCP assignment, the switch defaults to 192.168.0.1 as its IP address. If you are in the manual mode and need to configure the IP information, enter a site-specific IP address, Gateway Address, and Network Mask (or subnet mask). Consult your network administrator for the information. Press Ctrl-W to save any changes to NVRAM. 4-8 Administration Console Telnet Interface
-
 1
1 -
2
-
3
-
4
-
5
-
6
-
7
-
8
-
9
-
10
-
11
-
12
-
13
-
14
-
15
-
16
-
17
-
18
-
19
-
20
-
 21
21 -
 22
22 -
 23
23 -
 24
24 -
 25
25 -
 26
26 -
 27
27 -
 28
28 -
 29
29 -
 30
30 -
 31
31 -
32
-
33
-
34
-
35
-
36
-
37
-
38
-
39
-
40
-
41
-
42
-
43
-
44
-
45
-
46
-
47
-
48
-
49
-
50
-
51
-
52
-
53
-
54
-
55
-
56
-
57
-
58
-
59
-
60
-
61
-
62
-
63
-
64
-
65
-
66
-
67
-
68
-
69
-
70
-
71
-
72
-
73
-
74
-
75
-
76
-
77
-
78
-
79
-
80
-
81
-
82
-
83
-
84
-
85
-
86
-
87
-
88
-
89
-
90
-
91
-
92
-
93
-
94
-
95
-
96
-
97
-
98
-
99
-
100
-
101
-
102
-
103
-
104
-
105
-
106
-
107
-
108
-
109
-
110
-
111
-
112
-
113
-
114
-
115
-
116
-
117
-
118
-
119
-
120
-
121
-
122
-
123
-
124
-
125
-
126
-
127
-
128
-
129
-
130
-
131
-
132
-
133
-
134
-
135
-
136
-
137
-
138
-
139
-
140
-
141
-
142
-
143
-
144
-
145
-
146
-
147
-
148
-
149
-
150
-
151
-
152
-
153
-
154
-
155
-
156
 |
 |
