Netgear FSM726 FSM726v2 Setup Manual - Page 27
Main Menu> Set-Up> Port Configuration, Name., On/Off., Admin field, State field, Rate/Duplex field
 |
UPC - 606449026856
View all Netgear FSM726 manuals
Add to My Manuals
Save this manual to your list of manuals |
Page 27 highlights
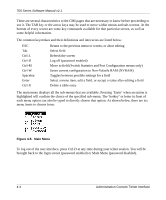
700 Series Software Manual v2.1 Main Menu> Set-Up> Port Configuration On this page, you can set up the port characteristics related to link operations. All of the parameters on this page are toggle settings. To change, or toggle, between options, press Ctrl-M to move the curser to the ports field and simply press the space bar when the appropriate option is highlighted. To modify ports 17 to 26, you must tab through ports 1 to 16. The comments field is available for you to enter a description of the port. Figure 4-12: Port Configuration Port. The port number on the switch. Name. The name of the port. This is a user-defined label. Link. Indicates if the port is Up or Down. On/Off. Indicates if the port is enabled or disabled by the Administrator. Admin field. Allows you to Enable or Disable the port. State field. The State field displays the Spanning Tree State of the port (Blocking, Listening, Learning, Forwarding, or Disabled). You can only observe the status of the ports; you cannot modify this field. The Spanning Tree Protocol controls this field. Rate/Duplex field. Indicates the speed and duplex for the port. The possible entries are Auto-negotiation (Auto); 10 Mbps half duplex (10M Half); 10 Mbps full duplex (10M Full); 100 Mbps half duplex (100M Half); or 100 Mbps full duplex (100M Full). Administration Console Telnet Interface 4-9
-
 1
1 -
2
-
3
-
4
-
5
-
6
-
7
-
8
-
9
-
10
-
11
-
12
-
13
-
14
-
15
-
16
-
17
-
18
-
19
-
20
-
21
-
 22
22 -
 23
23 -
 24
24 -
 25
25 -
 26
26 -
 27
27 -
 28
28 -
 29
29 -
 30
30 -
 31
31 -
 32
32 -
33
-
34
-
35
-
36
-
37
-
38
-
39
-
40
-
41
-
42
-
43
-
44
-
45
-
46
-
47
-
48
-
49
-
50
-
51
-
52
-
53
-
54
-
55
-
56
-
57
-
58
-
59
-
60
-
61
-
62
-
63
-
64
-
65
-
66
-
67
-
68
-
69
-
70
-
71
-
72
-
73
-
74
-
75
-
76
-
77
-
78
-
79
-
80
-
81
-
82
-
83
-
84
-
85
-
86
-
87
-
88
-
89
-
90
-
91
-
92
-
93
-
94
-
95
-
96
-
97
-
98
-
99
-
100
-
101
-
102
-
103
-
104
-
105
-
106
-
107
-
108
-
109
-
110
-
111
-
112
-
113
-
114
-
115
-
116
-
117
-
118
-
119
-
120
-
121
-
122
-
123
-
124
-
125
-
126
-
127
-
128
-
129
-
130
-
131
-
132
-
133
-
134
-
135
-
136
-
137
-
138
-
139
-
140
-
141
-
142
-
143
-
144
-
145
-
146
-
147
-
148
-
149
-
150
-
151
-
152
-
153
-
154
-
155
-
156
 |
 |
