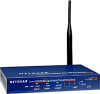
Netgear FWG114Pv2 FWG114Pv2 Reference Manual - Page 105
Printing from the Macintosh, From the Apple Extras folder, under Apple LaserWriter Software
 |
View all Netgear FWG114Pv2 manuals
Add to My Manuals
Save this manual to your list of manuals |
Page 105 highlights
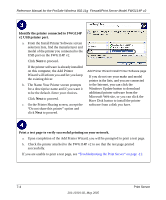
Reference Manual for the ProSafe Wireless 802.11g Firewall/Print Server Model FWG114P v2 Print a test page to verify successful printing on your network. a. Upon completion of the Add Printer Wizard, print a test page. - From the Windows Start menu, select Setup > Printers. - Highlight the printer you just added. - Right-click and the select Properties. The printer properties dialog box opens to the General tab page. - On the General tab page, click Print Test Page. b. Check the printer attached to the FWG114P v2 to see that the test page printed successfully. If you are unable to print a test page, see "Troubleshooting the Print Server" on page -12. Printing from the Macintosh Macintosh computers can connect to a TCP/IP network printer using the Line Printer Remote (LPR) protocol. LPR printing can be set up on any Macintosh that has Desktop Printing installed or available. Desktop Printing is supported on MacOS versions beginning from 8.1. LaserWriter8 version 8.5.1 or higher is also required. To configure the Macintosh to use the print server, follow these steps: 1. From the Apple Extras folder, under Apple LaserWriter Software, launch the Desktop Printing Utility. A new window titled New Desktop Printer appears. 2. Select LaserWriter 8 in the "With" drop-down menu. 3. Select Printer (LPR) and click OK. A new window called Untitled 1 will open. 4. If the PostScript Printer Description does not match your printer, click Change... and select your actual printer. If your printer model does not appear, click the Generic button. 5. Click OK to return to the Untitled 1 window. Print Server 7-9 201-10301-02, May 2005
-
 1
1 -
2
-
3
-
4
-
5
-
6
-
7
-
8
-
9
-
10
-
11
-
12
-
13
-
14
-
15
-
16
-
17
-
18
-
19
-
20
-
21
-
22
-
23
-
24
-
25
-
26
-
27
-
28
-
29
-
30
-
31
-
32
-
33
-
34
-
35
-
36
-
37
-
38
-
39
-
40
-
41
-
42
-
43
-
44
-
45
-
46
-
47
-
48
-
49
-
50
-
51
-
52
-
53
-
54
-
55
-
56
-
57
-
58
-
59
-
60
-
61
-
62
-
63
-
64
-
65
-
66
-
67
-
68
-
69
-
70
-
71
-
72
-
73
-
74
-
75
-
76
-
77
-
78
-
79
-
80
-
81
-
82
-
83
-
84
-
85
-
86
-
87
-
88
-
89
-
90
-
91
-
92
-
93
-
94
-
95
-
96
-
97
-
98
-
99
-
 100
100 -
 101
101 -
 102
102 -
 103
103 -
 104
104 -
 105
105 -
 106
106 -
 107
107 -
 108
108 -
 109
109 -
 110
110 -
111
-
112
-
113
-
114
-
115
-
116
-
117
-
118
-
119
-
120
-
121
-
122
-
123
-
124
-
125
-
126
-
127
-
128
-
129
-
130
-
131
-
132
-
133
-
134
-
135
-
136
-
137
-
138
-
139
-
140
-
141
-
142
-
143
-
144
-
145
-
146
-
147
-
148
-
149
-
150
-
151
-
152
-
153
-
154
-
155
-
156
-
157
-
158
-
159
-
160
-
161
-
162
-
163
-
164
-
165
-
166
-
167
-
168
-
169
-
170
-
171
-
172
-
173
-
174
-
175
-
176
-
177
-
178
-
179
-
180
-
181
-
182
-
183
-
184
-
185
-
186
-
187
-
188
-
189
-
190
-
191
-
192
-
193
-
194
-
195
-
196
-
197
-
198
-
199
-
200
-
201
-
202
-
203
-
204
-
205
-
206
-
207
-
208
-
209
-
210
-
211
-
212
-
213
-
214
-
215
-
216
-
217
-
218
-
219
-
220
-
221
-
222
-
223
-
224
-
225
-
226
-
227
-
228
-
229
-
230
-
231
-
232
-
233
-
234
-
235
-
236
-
237
-
238
-
239
-
240
-
241
-
242
-
243
-
244
-
245
-
246
-
247
-
248
-
249
-
250
-
251
-
252
-
253
-
254
-
255
-
256
-
257
-
258
-
259
-
260
-
261
-
262
-
263
-
264
-
265
-
266
-
267
-
268
-
269
-
270
-
271
-
272
-
273
-
274
-
275
-
276
-
277
-
278
-
279
-
280
-
281
-
282
-
283
-
284
-
285
-
286
-
287
-
288
-
289
-
290
-
291
-
292
-
293
-
294
-
295
-
296
 |
 |
