Netgear FWG114Pv2 FWG114Pv2 Reference Manual - Page 133
Using the, LAN IP Setup Options
 |
View all Netgear FWG114Pv2 manuals
Add to My Manuals
Save this manual to your list of manuals |
Page 133 highlights
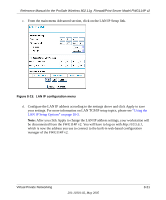
Reference Manual for the ProSafe Wireless 802.11g Firewall/Print Server Model FWG114P v2 c. From the main menu Advanced section, click on the LAN IP Setup link. Figure 8-13: LAN IP configuration menu d. Configure the LAN IP address according to the settings above and click Apply to save your settings. For more information on LAN TCP/IP setup topics, please see "Using the LAN IP Setup Options" on page 10-5. Note: After you click Apply to change the LAN IP address settings, your workstation will be disconnected from the FWG114P v2. You will have to log on with http://10.5.6.1, which is now the address you use to connect to the built-in web-based configuration manager of the FWG114P v2. Virtual Private Networking 201-10301-02, May 2005 8-21
-
 1
1 -
2
-
3
-
4
-
5
-
6
-
7
-
8
-
9
-
10
-
11
-
12
-
13
-
14
-
15
-
16
-
17
-
18
-
19
-
20
-
21
-
22
-
23
-
24
-
25
-
26
-
27
-
28
-
29
-
30
-
31
-
32
-
33
-
34
-
35
-
36
-
37
-
38
-
39
-
40
-
41
-
42
-
43
-
44
-
45
-
46
-
47
-
48
-
49
-
50
-
51
-
52
-
53
-
54
-
55
-
56
-
57
-
58
-
59
-
60
-
61
-
62
-
63
-
64
-
65
-
66
-
67
-
68
-
69
-
70
-
71
-
72
-
73
-
74
-
75
-
76
-
77
-
78
-
79
-
80
-
81
-
82
-
83
-
84
-
85
-
86
-
87
-
88
-
89
-
90
-
91
-
92
-
93
-
94
-
95
-
96
-
97
-
98
-
99
-
100
-
101
-
102
-
103
-
104
-
105
-
106
-
107
-
108
-
109
-
110
-
111
-
112
-
113
-
114
-
115
-
116
-
117
-
118
-
119
-
120
-
121
-
122
-
123
-
124
-
125
-
126
-
127
-
 128
128 -
 129
129 -
 130
130 -
 131
131 -
 132
132 -
 133
133 -
 134
134 -
 135
135 -
 136
136 -
 137
137 -
 138
138 -
139
-
140
-
141
-
142
-
143
-
144
-
145
-
146
-
147
-
148
-
149
-
150
-
151
-
152
-
153
-
154
-
155
-
156
-
157
-
158
-
159
-
160
-
161
-
162
-
163
-
164
-
165
-
166
-
167
-
168
-
169
-
170
-
171
-
172
-
173
-
174
-
175
-
176
-
177
-
178
-
179
-
180
-
181
-
182
-
183
-
184
-
185
-
186
-
187
-
188
-
189
-
190
-
191
-
192
-
193
-
194
-
195
-
196
-
197
-
198
-
199
-
200
-
201
-
202
-
203
-
204
-
205
-
206
-
207
-
208
-
209
-
210
-
211
-
212
-
213
-
214
-
215
-
216
-
217
-
218
-
219
-
220
-
221
-
222
-
223
-
224
-
225
-
226
-
227
-
228
-
229
-
230
-
231
-
232
-
233
-
234
-
235
-
236
-
237
-
238
-
239
-
240
-
241
-
242
-
243
-
244
-
245
-
246
-
247
-
248
-
249
-
250
-
251
-
252
-
253
-
254
-
255
-
256
-
257
-
258
-
259
-
260
-
261
-
262
-
263
-
264
-
265
-
266
-
267
-
268
-
269
-
270
-
271
-
272
-
273
-
274
-
275
-
276
-
277
-
278
-
279
-
280
-
281
-
282
-
283
-
284
-
285
-
286
-
287
-
288
-
289
-
290
-
291
-
292
-
293
-
294
-
295
-
296
 |
 |

Reference Manual for the ProSafe Wireless 802.11g
Firewall/Print Server Model FWG114P v2
Virtual Private Networking
8-21
201-10301-02, May 2005
c.
From the main menu Advanced section, click on the LAN IP Setup link.
Figure 8-13:
LAN IP configuration menu
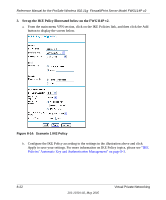
d.
Configure the LAN IP address according to the settings above and click Apply to save
your settings. For more information on LAN TCP/IP setup topics, please see
“Using the
LAN IP Setup Options” on page 10-5
.
Note:
After you click Apply to change the LAN IP address settings, your workstation will
be disconnected from the FWG114P v2. You will have to log on with
which is now the address you use to connect to the built-in web-based configuration
manager of the FWG114P v2.