Netgear ME103 ME103 Reference Manual - Page 26
Install the ME103 802.11b ProSafe Wireless Access Point
 |
UPC - 606449026375
View all Netgear ME103 manuals
Add to My Manuals
Save this manual to your list of manuals |
Page 26 highlights
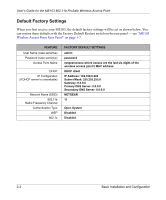
User's Guide for the ME103 802.11b ProSafe Wireless Access Point Install the ME103 802.11b ProSafe Wireless Access Point Before installing the ME103 802.11b ProSafe Wireless Access Point, you should make sure that your Ethernet network is up and working. You'll be connecting the access point to the Ethernet network so that computers with 802.11b or 802.11g wireless adapters will be able to communicate with computers on the Ethernet network. In order for this to work correctly, please verify that you have met all of the system requirements, shown on page 4. 1 SET UP THE ME103 ACCESS POINT a. Unpack the box and verify the contents. b. Identify a flat surface where you will put the wireless access point. For best results, follow the "Observe Placement and Range Guidelines" on page 2-1. The best location is elevated, such as wall mounted or on the top of a cubicle, at the center of your wireless coverage area, and within line of sight of all the mobile devices. Tip: If you plan to mount the ME103 on a wall or in an elevated location, set up and test you configuration before permanently installing it. c. Lift the antenna on either side so that they are vertical. Note: Consult the antenna positioning and configuration information at Understanding Advanced Wireless Settings and "Antenna Installation" on page 4-15. d. Connect the Ethernet cable (A) from your ME103 Access Point to a LAN port on your Cable/DSL router. Note: By default, ME103 is set to be a DHCP client. If your network uses static IP addresses, you will need to change this setting. Please see to the User's Guide for the ME103 802.11b ProSafe Wireless Access Point on the Model ME103 GearBox CD. 2-5 Basic Installation and Configuration
-
 1
1 -
2
-
3
-
4
-
5
-
6
-
7
-
8
-
9
-
10
-
11
-
12
-
13
-
14
-
15
-
16
-
17
-
18
-
19
-
20
-
 21
21 -
 22
22 -
 23
23 -
 24
24 -
 25
25 -
 26
26 -
 27
27 -
 28
28 -
 29
29 -
 30
30 -
 31
31 -
32
-
33
-
34
-
35
-
36
-
37
-
38
-
39
-
40
-
41
-
42
-
43
-
44
-
45
-
46
-
47
-
48
-
49
-
50
-
51
-
52
-
53
-
54
-
55
-
56
-
57
-
58
-
59
-
60
-
61
-
62
-
63
-
64
-
65
-
66
-
67
-
68
-
69
-
70
-
71
-
72
-
73
-
74
-
75
-
76
-
77
-
78
-
79
-
80
-
81
-
82
-
83
-
84
-
85
-
86
-
87
-
88
-
89
-
90
-
91
-
92
-
93
-
94
-
95
-
96
-
97
-
98
-
99
-
100
-
101
-
102
-
103
-
104
-
105
-
106
-
107
-
108
-
109
-
110
-
111
-
112
-
113
-
114
-
115
-
116
-
117
-
118
-
119
-
120
-
121
-
122
 |
 |