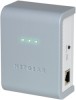
Netgear XAV101v1 XAV101v1 User Manual - Page 27
Returning to the Default Network Encryption Key, Setting Up Your Custom Network Encryption Key
 |
View all Netgear XAV101v1 manuals
Add to My Manuals
Save this manual to your list of manuals |
Page 27 highlights
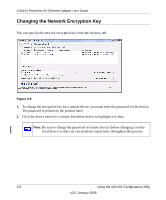
XAV101 Powerline AV Ethernet Adapter User Guide Returning to the Default Network Encryption Key Follow these steps: 1. Plug the new device into an AC power outlet. 2. Start the XAV101 Configuration Utility and wait for the utility to detect the devices in your Powerline network. Check that all the devices in the established network are displayed on the Main tab. Note: Before you can reset a remote device, you must enter its password. The password is printed on the product label. 3. On the Security tab, select each check box next to the Device Name column to select every device. 4. Click Use Default (Public Network). The Apply the Encryption Key setting field changes to the default, HomePlugAV. 5. Click Set Selected Devices. Setting Up Your Custom Network Encryption Key When all the devices are set to the default network encryption key and are plugged in, they are listed on the Main tab. Follow these steps to set up a custom network encryption key for all the Powerline devices: 1. On the Main tab, click Scan. Wait for the new device to be listed. The new device can be identified by its MAC address. Note: Before you can change the encryption key for a remote device, you must enter its password. The password is printed on the product label. 2. On the Security tab, select each check box next to the Device Name column to select every device. 3. Type your network encryption key in the Apply the Encryption Key setting field. 4. Click Set Selected Devices. The utility displays a message indicating that the operation was successful. Using the XAV101 Configuration Utility v2.0, January 2009 2-11
-
 1
1 -
2
-
3
-
4
-
5
-
6
-
7
-
8
-
9
-
10
-
11
-
12
-
13
-
14
-
15
-
16
-
17
-
18
-
19
-
20
-
21
-
 22
22 -
 23
23 -
 24
24 -
 25
25 -
 26
26 -
 27
27 -
 28
28 -
 29
29 -
 30
30 -
 31
31 -
 32
32 -
33
-
34
-
35
-
36
 |
 |
