Nokia IP350 Installation Guide - Page 32
Using a Console Connection to Perform the Initial Configuration - console port setting
 |
View all Nokia IP350 manuals
Add to My Manuals
Save this manual to your list of manuals |
Page 32 highlights
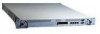
3 Performing the Initial Configuration Using a Console Connection to Perform the Initial Configuration If you do not use DHCP to perform the initial configuration of your 60s and 100s appliance, you must use a serial console connection (cable included). After you perform the initial configuration, the console connection is no longer required. You can use any standard VT100-compatible terminal with an RS-232 data terminal equipment (DTE) interface or terminal-emulation program configured with the following settings for the console: „ 9600 bps „ 8 data bits „ No parity „ 1 stop bit To connect to the console 1. Connect the supplied null-modem cable (console cable) to the console port on the front panel of the 60s and 100s appliance. Use only the DB9 port on the front panel labeled Console; the serial (AUX) port is an auxiliary modem port. If you connect the console port to a data communications equipment (DCE) device, use a straight-through cable. 60s 00487 Console port For cable pin assignments for the console connection, see "Built-in Console Port" on page 21. 32 Nokia 60s and 100s Installation Guide
-
 1
1 -
2
-
3
-
4
-
5
-
6
-
7
-
8
-
9
-
10
-
11
-
12
-
13
-
14
-
15
-
16
-
17
-
18
-
19
-
20
-
21
-
22
-
23
-
24
-
25
-
26
-
 27
27 -
 28
28 -
 29
29 -
 30
30 -
 31
31 -
 32
32 -
 33
33 -
 34
34 -
 35
35 -
 36
36 -
 37
37 -
38
-
39
-
40
-
41
-
42
-
43
-
44
-
45
-
46
-
47
-
48
-
49
-
50
-
51
-
52
-
53
-
54
-
55
-
56
-
57
-
58
-
59
-
60
-
61
-
62
-
63
-
64
-
65
-
66
-
67
-
68
-
69
-
70
-
71
-
72
-
73
-
74
-
75
-
76
-
77
-
78
-
79
-
80
-
81
-
82
-
83
-
84
-
85
-
86
-
87
-
88
-
89
-
90
-
91
-
92
-
93
-
94
-
95
-
96
-
97
-
98
-
99
-
100
-
101
-
102
-
103
-
104
-
105
-
106
-
107
-
108
-
109
-
110
-
111
 |
 |
