Oki B431dn B411 B431 User Guide - Eng - Page 89
Defining overlays, Close X, Projects, Start, Printing Preferences, Overlay
 |
View all Oki B431dn manuals
Add to My Manuals
Save this manual to your list of manuals |
Page 89 highlights
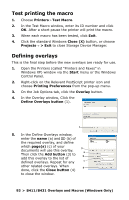
3. When each overlay has been tested, click Exit. 4. Click the standard Windows Close (X) button, or choose Projects > Exit to close Storage Device Manager. Defining overlays This is the final step before the new overlays are ready for use. 1. Open the Printers (called "Printers and Faxes" in Windows XP) window via the Start menu or the Windows Control Panel. 2. Right-click on the Relevant PostScript printer icon and choose Printing Preferences from the pop-up menu. 3. On the Overlay tab, click the New button. 4. In the Define Overlays window, enter a suitable name (2) for this 2 overlay and choose which 3 page(s) (3) of your documents will use this overlay. 4 5. Enter the name of the overlay 5 file (4) exactly as it appeared in the Storage Device Manager project window. Remember that this name is case sensitive. If you forgot to note the overlay names when you created them, you can find them using Storage Device Manager to view the project file, or the printer's Information Menu to print a file list and identify them from there. 6. Click Add (5) to add this overlay into the defined overlays list. 7. Click OK to close the Define Overlay window. The new overlay now appears in the Defined Overlays list in the printer properties window. 8. Repeat the above procedure if you wish to define more overlays. 9. When done, click OK to close the printer properties window. 89 > B411/B431 Overlays and Macros (Windows Only)
-
 1
1 -
2
-
3
-
4
-
5
-
6
-
7
-
8
-
9
-
10
-
11
-
12
-
13
-
14
-
15
-
16
-
17
-
18
-
19
-
20
-
21
-
22
-
23
-
24
-
25
-
26
-
27
-
28
-
29
-
30
-
31
-
32
-
33
-
34
-
35
-
36
-
37
-
38
-
39
-
40
-
41
-
42
-
43
-
44
-
45
-
46
-
47
-
48
-
49
-
50
-
51
-
52
-
53
-
54
-
55
-
56
-
57
-
58
-
59
-
60
-
61
-
62
-
63
-
64
-
65
-
66
-
67
-
68
-
69
-
70
-
71
-
72
-
73
-
74
-
75
-
76
-
77
-
78
-
79
-
80
-
81
-
82
-
83
-
 84
84 -
 85
85 -
 86
86 -
 87
87 -
 88
88 -
 89
89 -
 90
90 -
 91
91 -
 92
92 -
 93
93 -
 94
94 -
95
-
96
-
97
-
98
-
99
-
100
-
101
-
102
-
103
-
104
-
105
-
106
-
107
-
108
-
109
-
110
-
111
-
112
-
113
-
114
-
115
-
116
-
117
-
118
-
119
-
120
-
121
-
122
-
123
-
124
-
125
-
126
-
127
-
128
-
129
-
130
-
131
-
132
-
133
-
134
-
135
-
136
-
137
-
138
 |
 |
