Olympus T-100 T-100 Instruction Manual (English) - Page 30
Menus for Playback, Editing, and Printing Functions, Playing back pictures automatically, SLIDESHOW]
 |
UPC - 050332172791
View all Olympus T-100 manuals
Add to My Manuals
Save this manual to your list of manuals |
Page 30 highlights
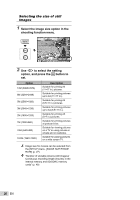
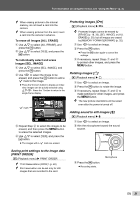
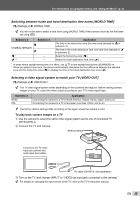
Menus for Playback, Editing, and Printing Functions Playing back pictures automatically [SLIDESHOW] SLIDESHOW To start a slideshow After pressing the H button, the slideshow starts. To stop the slideshow, press the H button or the m button. Changing the image size [Q] EDIT X Q Submenu 2 8 640 × 480 9 320 × 240 Application This saves a high-resolution image as a separate image with a smaller size for use in e-mail attachments and other applications. Single-frame advance/rewind: During a slideshow, press I to advance one frame or press H to rewind one frame. The sound recorded when shooting cannot be played back during slideshow. To listen to the sound, connect to a TV or PC. Retouching images [PERFECT FIX] PERFECT FIX Depending on the picture, the editing may not be effective. The retouching process may lower the image resolution. 1 Use HI to select an image. 2 Use FG to select the size, and press the H button. Cropping images [P] EDIT X P 1 Use HI to select an image, and press the H button. 2 Use the zoom buttons to select the size of the cropping frame, and use FGHI to move the frame. Submenu 1 ALL LIGHTING FIX REDEYE FIX Application [LIGHTING FIX] and [REDEYE FIX] are applied together. Only sections darkened by backlighting and dim lighting are brightened. Eyes that are reddened by the flash are corrected. 1 Use FG to select a correction method, and press the H button. 2 Use HI to select an image for retouching, and press the H button. ● The retouched image is saved as a separate image. Cropping frame SET OK 3 Press the H button. ● The edited image will be saved as a separate image. Erasing images [ERASE] ERASE Submenu 1 ALL ERASE SEL. IMAGE ERASE CANCEL Application All images in the internal memory or card will be erased. Images are individually selected and erased. Deletes the image displayed. Cancels erasing. 30 EN
-
 1
1 -
2
-
3
-
4
-
5
-
6
-
7
-
8
-
9
-
10
-
11
-
12
-
13
-
14
-
15
-
16
-
17
-
18
-
19
-
20
-
21
-
22
-
23
-
24
-
 25
25 -
 26
26 -
 27
27 -
 28
28 -
 29
29 -
 30
30 -
 31
31 -
 32
32 -
 33
33 -
 34
34 -
 35
35 -
36
-
37
-
38
-
39
-
40
-
41
-
42
-
43
-
44
-
45
-
46
-
47
-
48
-
49
-
50
-
51
-
52
-
53
-
54
-
55
-
56
-
57
-
58
-
59
-
60
-
61
 |
 |