Optoma EH7700 User Guide - Page 11
Installation, Connecting the Projector, Install the Projection Lens
 |
View all Optoma EH7700 manuals
Add to My Manuals
Save this manual to your list of manuals |
Page 11 highlights
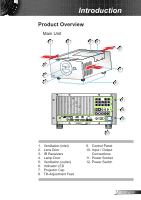
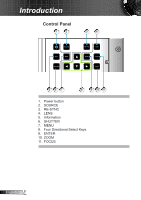
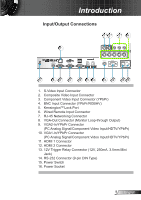
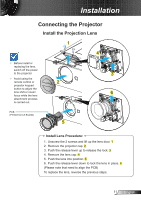
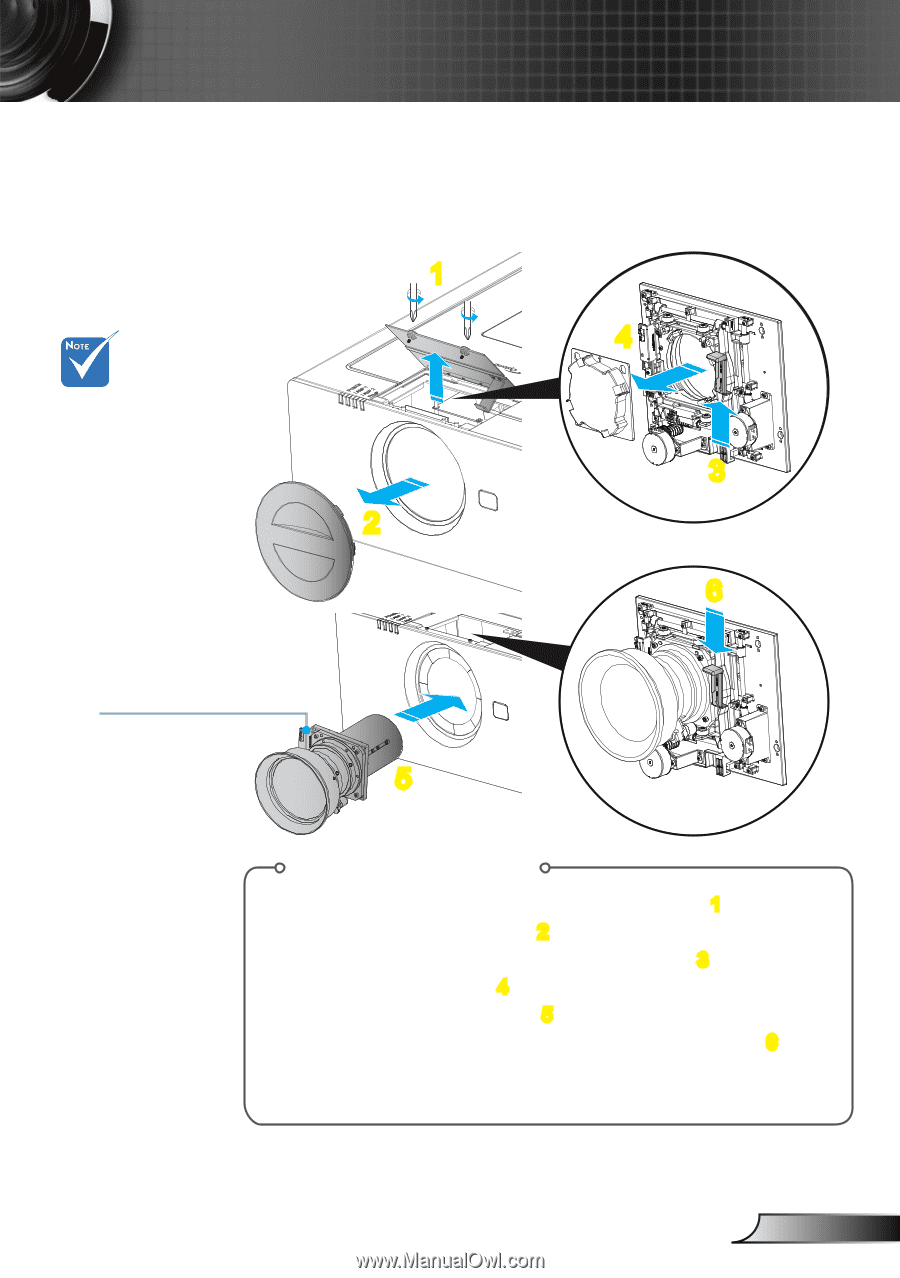
Installation Connecting the Projector Install the Projection Lens 1 4 Before install or replacing the lens, switch off the power to the projector 3 Avoid using the remote control or 2 projector keypad button to adjust the lens shift or zoom/ 6 focus while the lens attachment process is carried out. PCB (Printed Circuit Boards) 5 Install Lens Procedure: 1. Unscrew the 2 screws and lift up the lens door. 1 2. Remove the projector cap. 2 3. Push the release lever up to release the lock. 3 4. Remove the lens cap. 4 5. Push the lens into position. 5 6. Push the release lever down to lock the lens in place. 6 (Please note that need to align the PCB) To replace the lens, reverse the previous steps. 11 English
-
 1
1 -
2
-
3
-
4
-
5
-
 6
6 -
 7
7 -
 8
8 -
 9
9 -
 10
10 -
 11
11 -
 12
12 -
 13
13 -
 14
14 -
 15
15 -
 16
16 -
17
-
18
-
19
-
20
-
21
-
22
-
23
-
24
-
25
-
26
-
27
-
28
-
29
-
30
-
31
-
32
-
33
-
34
-
35
-
36
-
37
-
38
-
39
-
40
-
41
-
42
-
43
-
44
-
45
-
46
-
47
-
48
-
49
-
50
-
51
-
52
-
53
-
54
-
55
-
56
-
57
-
58
-
59
-
60
-
61
-
62
-
63
-
64
-
65
-
66
-
67
-
68
-
69
-
70
-
71
-
72
-
73
-
74
-
75
-
76
-
77
-
78
-
79
-
80
-
81
 |
 |
11
English
Installation
Connecting the Projector
Install the Projection Lens
1
2
5
Before install or
replacing the lens,
switch off the power
to the projector
Avoid using the
remote control or
projector keypad
button to adjust the
lens shift or zoom/
focus while the lens
attachment process
is carried out.
Install Lens Procedure:
1.
Unscrew the 2 screws and lift up the lens door.
1
2. Remove the projector cap.
2
3. Push the release lever up to release the lock.
3
4. Remove the lens cap.
4
5. Push the lens into position.
5
6. Push the release lever down to lock the lens in place.
6
(Please note that need to align the PCB)
To replace the lens, reverse the previous steps.
3
4
6
PCB
(Printed Circuit Boards)