Panasonic AGMX70 AGMX70 User Guide - Page 6
Parts and their functions
 |
View all Panasonic AGMX70 manuals
Add to My Manuals
Save this manual to your list of manuals |
Page 6 highlights
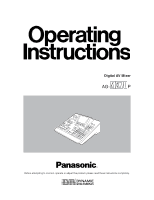
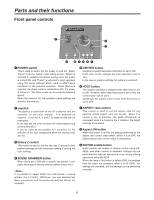
Parts and their functions Front panel controls 1 POWER ON X /Y Pb / Pr OFF ASPECT Z EDITOR H V ON SCENE HOLD CENTER GRABBER 2 3 Modify PATTERN 9 8 76 5 4 1 POWER switch This is used to switch the AC power on and off. Select "Power" from the "Setup" initial setting screen: "Reset" is selected to establish the default setting when the power is turned ON, and "Preset" is selected to start operation using the same settings which were in effect upon conclusion of the previous operation. When [Demo] is selected, the demo mode is established after the power is turned on. The demo mode can be exited by selecting [Enter]. When the power is off, the operation panel settings are stored in the memory. 5 CENTER button Centering is performed when this button is set to ON. In the case of color settings, the color saturation is set to zero. In the case of position settings, the pattern is centered. 6 HOLD button The joystick operation is stopped when this button is set to ON. However, even when this button is set to ON, the center button can be used. Updating to the joystick value occurs when this button is set to OFF. 2 Joystick The joystick is used both as the XY positioner and the controller for the color settings. It is switched as required. It can set X, Y and Z for patterns that can be positioned. It can also set the color corrector UV white balance and chroma saturation. It can be used as the position X/Y controller for the selection of the blue background when the chroma keys are set. 3 Rotary Z control This control is used to set the key size Z during the key position settings and the luminance setting Y among the color settings. 4 SCENE GRABBER button When this is set to ON with a specific key pattern, it can paste the image in the key onto the pattern and move it. It is possible to select either the multi-strobe or scene grabber (but not both). Whichever one was selected last takes precedence, and the previously selected effects are canceled. 7 ASPECT ratio control This control is used to set the aspect ratio for key patterns whose aspect ratio can be set. When it is turned in the H direction, the width (horizontal) is increased; when it is turned in the V direction, the height (vertical) is increased. 8 Aspect ON button When this button is at ON, the setting performed by the aspect ratio control takes effect. When it is at OFF, the default aspect ratio (center value) is established. 9 EDITOR enable button Editor enable can enable or disable control using RS422A, and when control is disabled, settings can be performed by manual operations even during editing operations using RS-422A. When the lamp of this button is lighted (ON), the settings from the editor are accepted; when it is off (OFF), the settings are canceled, and the settings can be performed manually. 6
-
 1
1 -
 2
2 -
 3
3 -
 4
4 -
 5
5 -
 6
6 -
 7
7 -
 8
8 -
 9
9 -
 10
10 -
 11
11 -
 12
12 -
13
-
14
-
15
-
16
-
17
-
18
-
19
-
20
-
21
-
22
-
23
-
24
-
25
-
26
-
27
-
28
-
29
-
30
-
31
-
32
-
33
-
34
-
35
-
36
-
37
-
38
-
39
-
40
-
41
-
42
-
43
-
44
-
45
-
46
-
47
-
48
-
49
-
50
-
51
-
52
-
53
-
54
-
55
-
56
-
57
-
58
-
59
-
60
-
61
-
62
-
63
-
64
-
65
-
66
-
67
-
68
-
69
-
70
-
71
-
72
-
73
-
74
-
75
-
76
-
77
-
78
-
79
-
80
-
81
-
82
-
83
-
84
-
85
-
86
-
87
-
88
-
89
-
90
-
91
-
92
-
93
-
94
-
95
-
96
-
97
-
98
-
99
-
100
 |
 |
