Panasonic KX-TG9321T Operating Instructions - Page 21
Copying phonebook entries, Chain dial
 |
View all Panasonic KX-TG9321T manuals
Add to My Manuals
Save this manual to your list of manuals |
Page 21 highlights
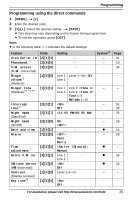
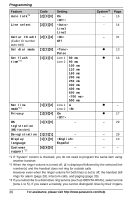
3 {V}/{^}: "Erase all" i {SELECT} 4 {V}/{^}: "Yes" i {SELECT} 5 {V}/{^}: "Yes" i {SELECT} 6 {OFF} Chain dial This feature allows you to dial phone numbers in the phonebook while you are on a call. This feature can be used, for example, to dial a calling card access number or bank account PIN that you have stored in the phonebook, without having to dial manually. 1 During an outside call, press {MENU}. 2 {V}/{^}: "Phonebook" i {SELECT} 3 {V}/{^}: Select the desired entry. 4 Press {CALL} to dial the number. Note: L When storing a calling card access number and your PIN in the phonebook as one phonebook entry, press {PAUSE} to add pauses after the number and PIN as necessary (page 15). L If you have rotary/pulse service, you need to press {*} (TONE) before pressing {MENU} in step 1 to change the dialing mode temporarily to tone. When adding entries to the phonebook, we recommend adding {*} (TONE) to the beginning of phone numbers you wish to chain dial (page 19). Phonebook Copying phonebook entries You can copy phonebook entries between 2 handsets.*1 *1 Panasonic compatible handset Important: L Groups (including their names and ringer tones) are not copied. Copied entries are automatically assigned to group 1. L Entries copied from one handset to another are stored without overwriting any previously stored entries even in the case when name and phone number are same. Before editing such entries, erase unnecessary entries in order to edit the information properly. Copying an entry 1 {MENU} i {#}{2}{8}{0} 2 {V}/{^}: Select the desired entry. i {MENU} 3 {V}/{^}: "Copy to handset" i {SELECT} 4 Enter the handset number you want to copy to. L When an entry has been copied, "Completed" is displayed. L To continue copying another entry: {V}/{^}: "Yes" i {SELECT} i Find the desired entry (page 20). i {SEND} 5 {OFF} Copying all entries 1 {MENU} i {#}{2}{8}{0} i {MENU} 2 {V}/{^}: "Copy all to HS" i {SELECT} For assistance, please visit http://www.panasonic.com/help 21
-
 1
1 -
2
-
3
-
4
-
5
-
6
-
7
-
8
-
9
-
10
-
11
-
12
-
13
-
14
-
15
-
 16
16 -
 17
17 -
 18
18 -
 19
19 -
 20
20 -
 21
21 -
 22
22 -
 23
23 -
 24
24 -
 25
25 -
 26
26 -
27
-
28
-
29
-
30
-
31
-
32
-
33
-
34
-
35
-
36
-
37
-
38
-
39
-
40
-
41
-
42
-
43
-
44
-
45
-
46
-
47
-
48
-
49
-
50
-
51
-
52
-
53
-
54
-
55
-
56
 |
 |