Panasonic P2 Handheld Camcorder Advance Operating Instructions - Page 12
Checking the shot videos (REC CHECK), P2 card access lamps, Protecting against a possible erasure
 |
View all Panasonic P2 Handheld Camcorder manuals
Add to My Manuals
Save this manual to your list of manuals |
Page 12 highlights
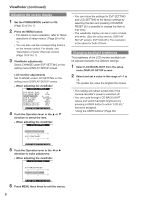
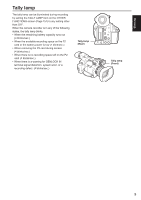
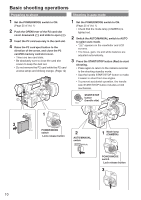
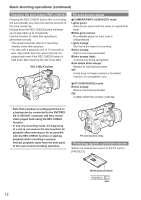
Basic shooting operations (continued) Checking the shot videos (REC CHECK) Pressing the REC CHECK button after a recording will automatically play back the last two seconds of the most recent clip. Holding down the REC CHECK button will allow you to play back up to 10 seconds. Use this function to check that recording is performed normally. • The camera-recorder returns to recording standby mode after playback. • For clips with a playback time of 10 seconds or less, clips earlier than the current clip are not played back even if the REC CHECK button is held down after returning the clip to the start. REC CHECK button P2 card access lamps ■ CAMERA/PB/PC (USB HOST) mode Lights green: Data can be saved onto the cards or loaded from them. Blinks green (slow): No available space on card, card is writeprotected. Lights orange: Slot that is the object of recording. Blinks orange: Data is now being accessed. Blinks orange (fast): A card is now being recognized. Both lamps blink orange: Ejection of card during access. Off: Cards have not been inserted or formatted. Insertion of incompatible card. ■ PC (USB DEVICE) mode Blinks orange: Data is now being accessed. Off: A status other than access underway. • Note that a backup recording performed on a backup device connected to the DVCPRO/ DV or SDI OUT connector will also record video played back using the REC CHECK function. • In one-clip recording mode, the beginning of a clip is not used as the start position for playback after returning as far as possible with the REC CHECK function or starting playback while recording is paused. Instead, playback starts from the start point of the most recent recording operation. P2 card access lamp Protecting against a possible erasure Switch the write-protect switch of the P2 card to [PROTECT]. Write-protect switch PROTECT 12
-
 1
1 -
2
-
3
-
4
-
5
-
6
-
 7
7 -
 8
8 -
 9
9 -
 10
10 -
 11
11 -
 12
12 -
 13
13 -
 14
14 -
 15
15 -
 16
16 -
 17
17 -
18
-
19
-
20
-
21
-
22
-
23
-
24
-
25
-
26
-
27
-
28
-
29
-
30
-
31
-
32
-
33
-
34
-
35
-
36
-
37
-
38
-
39
-
40
-
41
-
42
-
43
-
44
-
45
-
46
-
47
-
48
-
49
-
50
-
51
-
52
-
53
-
54
-
55
-
56
-
57
-
58
-
59
-
60
-
61
-
62
-
63
-
64
-
65
-
66
-
67
-
68
-
69
-
70
-
71
-
72
-
73
-
74
-
75
-
76
-
77
-
78
-
79
-
80
-
81
-
82
-
83
-
84
-
85
-
86
-
87
-
88
-
89
-
90
-
91
-
92
-
93
-
94
-
95
-
96
-
97
-
98
-
99
-
100
-
101
-
102
-
103
-
104
-
105
-
106
-
107
-
108
-
109
-
110
-
111
-
112
-
113
-
114
-
115
-
116
-
117
-
118
-
119
-
120
-
121
-
122
-
123
-
124
-
125
-
126
-
127
-
128
-
129
-
130
-
131
-
132
-
133
-
134
-
135
-
136
-
137
-
138
-
139
-
140
-
141
-
142
-
143
-
144
-
145
-
146
-
147
-
148
-
149
-
150
-
151
-
152
-
153
-
154
-
155
-
156
-
157
-
158
-
159
-
160
-
161
-
162
-
163
-
164
-
165
-
166
-
167
-
168
-
169
-
170
 |
 |
