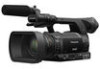
Panasonic P2 Handheld Camcorder Advance Operating Instructions - Page 8
Adjusting the screen display, Changing backlight brightness
 |
View all Panasonic P2 Handheld Camcorder manuals
Add to My Manuals
Save this manual to your list of manuals |
Page 8 highlights
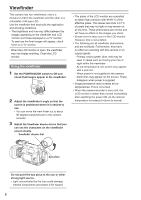
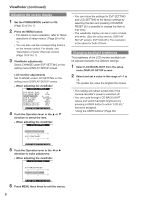
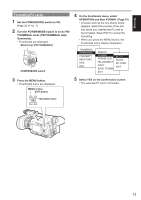
Viewfinder (continued) Adjusting the screen display 1 Set the POWER/MODE switch to ON. (Page 25 of Vol. 1) 2 Press the MENU button. • For details on menu operation, refer to "Basic operations of setup menus" (Page 28 of Vol. 1). • You can also use the corresponding buttons on the remote control. For details, see "Description of parts" (Remote control). (Page 19 of Vol. 1) 3 Viewfinder adjustments Select CHANGE under EVF SETTING on the setting menu DISPLAY SETUP screen. LCD monitor adjustments Set CHANGE under LCD SETTING on the setting menu DISPLAY SETUP screen. • When adjusting the viewfinder DISPLAY SETUP EVF PEAK LEVEL EVF PEAK FREQ EVF SETTING EVF B. LIGHT EVF COLOR EVF MODE ZEBRA1 DETECT ZEBRA2 DETECT 0 LOW >>> NORMAL ON AUTO 100% 85% PUSH MENU TO RETURN 4 Push the Operation lever in the or direction to select the item. • When adjusting the viewfinder EVF SETTING • You can return the settings for EVF SETTING and LCD SETTING to the factory settings by selecting the item and pressing COUNTER RESET (if it is possible to change the item at that time). • The viewfinder display can be in color or black and white. (See the setup menus, DISPLAY SETUP screen, EVF COLOR.) The resolution is the same for both of them. Changing backlight brightness The brightness of the LCD monitor backlight can be adjusted between five different settings. 1 Select LCD BACKLIGHT from the setup menu DISPLAY SETUP screen. 2 Select and set a value in the range of +1 to -3. The greater the value the brighter the screen. • This setting will remain saved even if the camera-recorder's power is switched off. • You can cycle through LCD BACKLIGHT values and switch backlight brightness by pressing a USER button to which "LCD B.L" has been assigned. "Using the USER buttons" (Page 39) EVF BRIGHTNESS EVF CONTRAST PUSH MENU TO RETURN 5 Push the Operation lever in the or direction to make adjustment. • When adjusting the viewfinder EVF SETTING EVF BRIGHTNESS EVF CONTRAST PUSH MENU TO RETURN 6 Press MENU three times to exit the menus. 8
-
 1
1 -
2
-
 3
3 -
 4
4 -
 5
5 -
 6
6 -
 7
7 -
 8
8 -
 9
9 -
 10
10 -
 11
11 -
 12
12 -
 13
13 -
14
-
15
-
16
-
17
-
18
-
19
-
20
-
21
-
22
-
23
-
24
-
25
-
26
-
27
-
28
-
29
-
30
-
31
-
32
-
33
-
34
-
35
-
36
-
37
-
38
-
39
-
40
-
41
-
42
-
43
-
44
-
45
-
46
-
47
-
48
-
49
-
50
-
51
-
52
-
53
-
54
-
55
-
56
-
57
-
58
-
59
-
60
-
61
-
62
-
63
-
64
-
65
-
66
-
67
-
68
-
69
-
70
-
71
-
72
-
73
-
74
-
75
-
76
-
77
-
78
-
79
-
80
-
81
-
82
-
83
-
84
-
85
-
86
-
87
-
88
-
89
-
90
-
91
-
92
-
93
-
94
-
95
-
96
-
97
-
98
-
99
-
100
-
101
-
102
-
103
-
104
-
105
-
106
-
107
-
108
-
109
-
110
-
111
-
112
-
113
-
114
-
115
-
116
-
117
-
118
-
119
-
120
-
121
-
122
-
123
-
124
-
125
-
126
-
127
-
128
-
129
-
130
-
131
-
132
-
133
-
134
-
135
-
136
-
137
-
138
-
139
-
140
-
141
-
142
-
143
-
144
-
145
-
146
-
147
-
148
-
149
-
150
-
151
-
152
-
153
-
154
-
155
-
156
-
157
-
158
-
159
-
160
-
161
-
162
-
163
-
164
-
165
-
166
-
167
-
168
-
169
-
170
 |
 |
