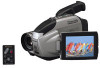
Panasonic PVL751 PVL751 User Guide
Panasonic PVL751 - VHS-C CAMCORDER Manual
 |
View all Panasonic PVL751 manuals
Add to My Manuals
Save this manual to your list of manuals |
Panasonic PVL751 manual content summary:
- Panasonic PVL751 | PVL751 User Guide - Page 1
Instructions Model No. PV-L751 Please read these instructions carefully before attempting to operate this product. Please save this manual. Guía para rápida consulta en español está incluida. For assistance, please call : 1-800-211-PANA(7262) or send e-mail to : consumerproducts@panasonic - Panasonic PVL751 | PVL751 User Guide - Page 2
Panasonic manual as your convenient Camcorder information source. Date of Purchase Dealer Purchased From Dealer Address Dealer Phone pc. VHS PlayPak 1 pc. 8-Function Remote (PV-P1/VYMW0009) and (VSQW0038) with one CR2025 one battery. (page 51) 1 pc. Digital PhotoShot Disk for Windows 95/98/ Me - Panasonic PVL751 | PVL751 User Guide - Page 3
DO NOT REMOVE COVER (OR BACK) NO USER-SERVICEABLE PARTS INSIDE REFER SERVICING TO QUALIFIED SERVICE PERSONNEL This symbol warns the user that uninsulated Therefore, it should be read carefully in order to avoid any problems. The above markings are located on the appliance's bottom cover. FCC - Panasonic PVL751 | PVL751 User Guide - Page 4
a bookcase or rack unless proper ventilation is provided or the manufacturer's instructions have been adhered to. 10. Power Sources - This video unit information with respect to proper grounding of the mast and supporting structure, grounding of the lead-in wire to an : [email protected] - Panasonic PVL751 | PVL751 User Guide - Page 5
normally by following the operating instructions. Adjust only those controls that are covered by the operating instructions, as an improper adjustment of Do not attempt to disassemble this unit. There are no user serviceable parts inside. Unplug your Camcorder from the power supply before cleaning. - Panasonic PVL751 | PVL751 User Guide - Page 6
Electronic Image Stabilization (E.I.S 29 Still/Strobe/Wide 30 Security Mode 31 Intelligent Titler (Auto/Manual Title, Phrase Title) .. 32~33 Digital Still Camera 34 • CompactFlash Card Insertion/Removal 34 • Recording 35 • Using the Light 36 • Playback 36 • Displayed Directry/Image Number - Panasonic PVL751 | PVL751 User Guide - Page 7
source. ITS TAPES PLAY IYNESY,OITU,RS VCR VHS! 26× LENS / 300× D.ZOOM DIGITAL STABILIZATION FULL-SIZE HEAD SYSTEM AUTO/PHRASE TITLER FAR UP FOCUS DOWN NEAR DISPLAY MENU 2, 3, 4 PHOTO VCR OFF CAMERA 1 1 Set POWER to CAMERA. 2 Press MENU for MENU mode. Press UP v or DOWN w to select SELF DEMO - Panasonic PVL751 | PVL751 User Guide - Page 8
Guide : • Remove the Protection Film before use. Camera Recording When the LCD monitor is open, the 2 Set POWER to CAMERA. 3 Press RECORD/PAUSE PHOTO VCR OFF CAMERA to start recording. (see above). 2 Set POWER to VCR. PHOTO VCR OFF CAMERA 3 Press REWIND/SEARCH to rewind tape. 4 Press PLAY to - Panasonic PVL751 | PVL751 User Guide - Page 9
Supplying Power Getting Started Charging the Battery Pack Charge Battery Pack fully before use. 23 PACKBATTERY POWER Lamp 1 CHARGE Lamp A BATTERY PACK B (Top View) 1 Plug in AC Adaptor. POWER Lamp lights. 2 Insert Battery. A Align left side of Battery with left edge of AC Adaptor. B Press - Panasonic PVL751 | PVL751 User Guide - Page 10
VJSS0070) in an area which has special AC outlets. Car Battery Cord (optional) Cigarette Lighter Plug 1 Connect PV-C16 Car Battery Cord (optional) to Camcorder DC IN. 2 A Start engine first. B Plug Car , please call : 1-800-211-PANA(7262) or send e-mail to : [email protected] - Panasonic PVL751 | PVL751 User Guide - Page 11
Getting Started Cassette Information Cassette Insertion/Removal 1 3 2 4 5 1 Turn Tape Wheel in direction of arrow until there is no slack. 2 Attach Battery (page 9). 3 Slide TAPE EJECT to open door. 4 Insert cassette as shown. 5 Press here to close door. • To remove the cassette, slide the TAPE - Panasonic PVL751 | PVL751 User Guide - Page 12
POWER to CAMERA or VCR. 1 Press MENU for MENU mode. The CAMERA or VCR MENU CAMERA) Screen 1 - - - MENU - - - PAGE 1/2 2 PROGRAMMED REC T I TLE ; AUTO/MANUAL 2 TITLE (pages 32, 33). AUTO/MANUAL : 16 items PHRASE : 10 items 3 DIGITAL FADE : TYPE 7 types COLOR 8 colors DIGITAL FILTER - Panasonic PVL751 | PVL751 User Guide - Page 13
. Before you begin... • Connect Camcorder to power source. • Set POWER to CAMERA or VCR. FAR UP FOCUS DOWN NEAR DISPLAY MENU 1 Press MENU for MENU - - - MENU - - - PAGE 1/2 PROGRAMMED REC T I TLE ; AUTO/MANUAL SHUTTER ; AUTO STAND-BY RELEASE ; OFF CLOCK SET w SELECT : PUSH w/v KEY - Panasonic PVL751 | PVL751 User Guide - Page 14
or gain up to 2 minutes per month. • When traveling outside the listed time zones, set clock to local time manually. • To adjust or set clock, see "Setting Date and Time" bottom of page. 3b Auto Daylight Saving Time call : 1-800-211-PANA(7262) or send e-mail to : [email protected] - Panasonic PVL751 | PVL751 User Guide - Page 15
CAMERA. LIGHT ON OFF AUTO Set LIGHT to AUTO. Light turns on/off automatically according to lighting conditions. Or, set LIGHT to ON/OFF manually carefully remove bulb. • Take unit to service center if you need assistance. 3 Replace PART NO. VLLW0015) supplied by Panasonic to reduce risk of fire. - Panasonic PVL751 | PVL751 User Guide - Page 16
. • To hear sound while recording, connect earphone (M3 type: not supplied) to PHONE jack. Earphone volume cannot be changed while in CAMERA mode. second to change tape speed to SP/SLP (page 11). 5 Press RECORD call : 1-800-211-PANA(7262) or send e-mail to : [email protected] - Panasonic PVL751 | PVL751 User Guide - Page 17
-by mode, press RECORD/PAUSE two times to resume recording. OFF : From Stand-by mode, set POWER to OFF, then to CAMERA. Press RECORD/ PAUSE to record. 4 Press MENU to exit. Manual Easy Editing For proper continuity when taping from Stop mode or after attaching a new Battery. A Set POWER to VCR - Panasonic PVL751 | PVL751 User Guide - Page 18
11). • Set POWER to CAMERA. FAR UP FOCUS DOWN NEAR DISPLAY MENU 1, 2, 3 REC TIME : 4 PHOTO VCR OFF CAMERA *1 Record 5 seconds each - - MENU - - - PAGE 1/2 PROGRAMMED REC T I TLE ; AUTO/MANUAL SHUTTER ; AUTO STAND-BY RELEASE ; OFF CLOCK SET w SELECT : PUSH w/v @panasonic.com - Panasonic PVL751 | PVL751 User Guide - Page 19
off to conserve battery power. If recording is resumed within 30 minutes, press REC/PAUSE once. If over 30 minutes, set POWER to OFF, then CAMERA, then press REC/PAUSE. 19 - Panasonic PVL751 | PVL751 User Guide - Page 20
type: not supplied) is connected to PHONE jack, speaker is muted. (earphone) jack PHOTO VCR OFF CAMERA 2 Tracking Control Special Effects Quick Visual recording for optimum picture quality. Manual Tracking Some recordings require manual adjustment to reduce noise. Press @panasonic.com - Panasonic PVL751 | PVL751 User Guide - Page 21
To Audio To Video In In Audio/Video Cable (Supplied) 1 Set POWER to: VCR © view playback. CAMERA © view picture as it is recorded. 2 Turn TV ON and set to LINE INPUT. See TV owner's manual. 3 Begin playback or recording. CATV System Installer This reminder is provided to call the CATV system - Panasonic PVL751 | PVL751 User Guide - Page 22
connections (see left). • Turn both units on. • Set VCR input signal to LINE. Please see VCR owner's manual. • Set Camcorder POWER to VCR. PLAY Source (Playing) Camcorder REW FF + STOP 1 Insert a pre-recorded tape call : 1-800-211-PANA(7262) or send e-mail to : [email protected] - Panasonic PVL751 | PVL751 User Guide - Page 23
one of four speeds ranging from slow (16 seconds) to fast (2 seconds). Before you begin... • Connect Camcorder to power source. • Set POWER to CAMERA. Zoom In ("T") 2X 8X WT Zoom Out ("W") • Zoom slowly: Lightly press "T" (telephoto) or "W" (wide angle) POWER ZOOM button. • Zoom quickly: Apply - Panasonic PVL751 | PVL751 User Guide - Page 24
power source. • Set POWER to CAMERA. Auto Focus Camcorder automatically focuses on subject even during zooming. Auto Focus is on when "MF" is not displayed in EVF or LCD monitor. Press MANUAL FOCUS to remove "MF" in please call : 1-800-211-PANA(7262) or send e-mail to : [email protected] - Panasonic PVL751 | PVL751 User Guide - Page 25
shutter speed is auto-adjusted from 1/60 to 1/350 according to subject brightness. • AUTO mode is selected each time POWER is set to CAMERA. Manual Selection The faster the shutter speed, the more light is needed for proper picture and color quality. High Speed Shutter indication flashes if light - Panasonic PVL751 | PVL751 User Guide - Page 26
CAMERA Fade In Before you begin... • Connect Camcorder to power source. • Set POWER to CAMERA. 1 Slide DIGITAL . - - - VIDEO EFFECTS - - - AUTO FADE DIGITAL FADE DIGITAL FILTER SELECT : PUSH w/v KEY SET : PUSH DISPLAY KEY Auto Fade will not function during Digital again so "FADE" disappears in - Panasonic PVL751 | PVL751 User Guide - Page 27
Wipe mode or Picture in Picture Wipe Title. Before you begin... • Connect Camcorder to power source. • Set POWER to CAMERA. 1 Slide DIGITAL SELECT to FADE. 2 Press MENU for MENU mode. Press UP v or DOWN w to select VIDEO EFFECTS . w PAGE 2/2 D I SPLAY ; ON SELF DEMO ; OFF SECURITY ; OFF - Panasonic PVL751 | PVL751 User Guide - Page 28
5 colors to entire picture, like a color filter. Before you begin... • Connect Camcorder to power source. • Set POWER to CAMERA. 2, 3, 4, 5 FAR UP FOCUS DOWN NEAR DISPLAY MENU 1 1 Slide DIGITAL SELECT to FADE. 2 Press MENU for MENU mode. Press UP v or DOWN w to select VIDEO EFFECTS . w PAGE - Panasonic PVL751 | PVL751 User Guide - Page 29
(E.I.S.) Helps stabilize picture when recording in Before you begin... unstable situations. • Connect Camcorder to power source. • Set POWER to CAMERA. 1 2, 3 EIS 1 Slide DIGITAL SELECT to EIS. 2 Press EIS to display "EIS" in the EVF or LCD monitor. • Image becomes slightly enlarged and - Panasonic PVL751 | PVL751 User Guide - Page 30
Wide 12 Before you begin... • Connect Camcorder to power source. • Set POWER to CAMERA. 1 Slide DIGITAL SELECT to STILL/ STROBE. 2 Press STILL/STROBE repeatedly for desired function as described below assistance, please call : 1-800-211-PANA(7262) or send e-mail to : [email protected] - Panasonic PVL751 | PVL751 User Guide - Page 31
to power source. Use AC Adaptor for longer recordings. • Insert cassette with record tab (page 11). • Set POWER to CAMERA. • Securely position and aim Camcorder. 1 Slide DIGITAL SELECT to EIS. 2 Press MENU for MENU mode. Press UP v or DOWN w to select SECURITY . w PAGE 2/2 D I SPLAY ; ON SELF - Panasonic PVL751 | PVL751 User Guide - Page 32
PUSH MENU KEY 2 Press DISPLAY to select AUTO/ MANUAL. 3 Press MENU to exit. MANUAL FOCUS TITLE 4 To record the title, press RECORD/ PAUSE. 4 PHOTO VCR OFF CAMERA 5 Press TITLE while recording to remove 5 title. call : 1-800-211-PANA(7262) or send e-mail to : [email protected] - Panasonic PVL751 | PVL751 User Guide - Page 33
Camcorder to power source. • Insert cassette with record tab (page 11). • Set POWER to CAMERA. FAR UP FOCUS DOWN NEAR DISPLAY MENU 1 • A, B, C MANUAL FOCUS TITLE 3 PHOTO VCR OFF CAMERA 2, 4 D EVF or LCD Monitor Phrase Title Display (no indication) BEAUTIFUL BRAVO! CHEERS! CONGRATULATIONS - Panasonic PVL751 | PVL751 User Guide - Page 34
the CompactFlash Card • Except for some special features, this card is compatible with other Panasonic brand products, like Digital Camera (PV-DC2590, PV-DC2090). • Panasonic only guarantees compatibility with Panasonic brand cards and those bearing the SanDisk logo. • This Camcorder can capture - Panasonic PVL751 | PVL751 User Guide - Page 35
REC FOCUS DOWN PHOTO NEAR DISPLAY MENU 3, 4 Digital Still Camera Before you begin... • Connect Camcorder to power source REC. 060 FINE PHOTO Special Features POWER REC Power Lamp 5 PHOTO VCR OFF CAMERA 2 Note: • Please note that the included 8 MB CompactFlash Card already contains - Panasonic PVL751 | PVL751 User Guide - Page 36
Digital Still Camera Before you begin... • Connect Camcorder to seconds, the image is captured, then the light goes out. Or, set LIGHT to ON/OFF manually. (See page 15 for further details.) Playback 1 2 PLAY REC PHOTO 3, 4 1 Press LCD 7262) or send e-mail to : [email protected] - Panasonic PVL751 | PVL751 User Guide - Page 37
Displayed Directory/Image Number FAR UP PLAY REC FOCUS DOWN PHOTO NEAR DISPLAY MENU 1,2 Digital Still Camera Before you begin... • Connect Camcorder to power source. • Insert the CompactFlash Card (page 34). • Set POWER to PHOTO. 1 Repeat steps 1 and 2 on page 36 to - Panasonic PVL751 | PVL751 User Guide - Page 38
Digital Still Camera Before you begin... • Connect Camcorder to power source. • Insert the CompactFlash Card (page 34). • Set POWER to PHOTO. Slide PICTURE" appears on-screen after deletion. 38 For assistance, please call : 1-800-211-PANA(7262) or send e-mail to : [email protected] - Panasonic PVL751 | PVL751 User Guide - Page 39
1 MODE P - P Still image SP P20 Multi image playback page number STILL DEL PLAY REW FF + STOP 2 3 PHOTO VCR OFF CAMERA ( P - P = Picture in Picture ) 1 Set DIGITAL SELECT to DIGITAL WIPE. • A still image captured on the CF card and the Multi image playback page number is displayed on the right - Panasonic PVL751 | PVL751 User Guide - Page 40
Wipe mode is selected, the following functions are not available: Security Mode, Auto Fade, Digital Fade, Digital Filter, Digital Zoom, Digital E.I.S., Still/Strobe/Wide. (Current Recording) 40 For assistance, please call : 1-800-211-PANA(7262) or send e-mail to : [email protected] - Panasonic PVL751 | PVL751 User Guide - Page 41
CompactFlash Card (page 34). • Set POWER to CAMERA. 1 Set DIGITAL SELECT to DIGITAL WIPE. 2 Press + (FF) or - ( REW) to select still image to be used. Please see page 39 for further details. 3 Start recording (page 16). Special Features Panasonic - Panasonic PVL751 | PVL751 User Guide - Page 42
Refer to PC or Windows manual to identify which COM port PC (Personal Computer) and start up Windows. 2 Insert Digital PhotoShot disk (Windows 95/98/Me) into a floppy "A", use appropriate letter. 5 Follow instructions as they appear on PC screen until www.panasonic.com/video. 42 For - Panasonic PVL751 | PVL751 User Guide - Page 43
). • Turn your PC on. • Set Camcorder POWER to PHOTO. Running the Software (Windows 95/98/Me) 1 Select Programs/ Panasonic/Palmcorder/ Digital PhotoShot from the Start menu. 2 "Digital PhotoShot" is opened. Note: • COM Port and Baudrate are automatically selected. Refer to Help for information about - Panasonic PVL751 | PVL751 User Guide - Page 44
your PC for Picture in Picture Wipe Title and Digital Wipe by transferring them to the Camcorder using the Digital PhotoShot Software. 1 Repeat steps 1 and 2 to VGA size. 4 Click on "File," then select "Data out to camera," then select Fine or Normal mode. • Your PC image data is transferred to - Panasonic PVL751 | PVL751 User Guide - Page 45
under a new file name while preserving the original file. • Data in from CAMERA To display a dialog box listing all images in the CF Card memory along with To print the currently active image. • Exit To quit the "Digital PhotoShot" application. 2 Image • Image Adjustment To modify the captured - Panasonic PVL751 | PVL751 User Guide - Page 46
CF card, the images will be displayed properly on PHOTO mode. 46 For assistance, please call : 1-800-211-PANA(7262) or send e-mail to : [email protected] - Panasonic PVL751 | PVL751 User Guide - Page 47
REC 12:00:00AM JAN 1 2001 JAN 1 2001 Display-Off Mode No Indication, except Intelligent Titler (pages 32, 33), will be displayed. A Set POWER to CAMERA or VCR. B Press MENU for MENU mode. Press UP v or DOWN w to select DISPLAY. C Press DISPLAY to select OFF. Press MENU to exit. D Press DISPLAY - Panasonic PVL751 | PVL751 User Guide - Page 48
CAMERA/VCR mode 12 3 45 6 7, 8 9 10, 11, 12 13 14 300X E I S D.ZOOM 1 0:20 SLP 1 10000 REC STILL MF CHECK TAPE W I D E 12:00 :00AM JAN 1 2000 FADE SHR RED 15 16 17 18 19 20 21, 22 1 Zoom Magnification level (pages 23, 29). 8 Digital Camera (page 23). 17 Manual Focus (page 24). - Panasonic PVL751 | PVL751 User Guide - Page 49
captured when "COMPLETED" disappears. PLEASE WAIT: Displayed when image is selected from Multi Image Playback screen. Note: Do not change POWER setting to CAMERA or change recording mode while "PLEASE WAIT" is displayed. 5 Recording Mode • POWER is set to PHOTO. 9 NO CF CARD 6 Multi Image Playback - Panasonic PVL751 | PVL751 User Guide - Page 50
scratch the glass surfaces. 3 Replace the EVF Eyepiece and the screw. 50 For assistance, please call : 1-800-211-PANA(7262) or send e-mail to : [email protected] - Panasonic PVL751 | PVL751 User Guide - Page 51
Clock/Remote Battery The clock and remote batteries are pre-installed. Follow the steps below if replacement becomes necessary. WARNING: Replace battery with Panasonic PART NO. VSBW0004 (CR2025) only. Use of another battery may present a risk of fire or explosion. Caution: Battery may explode if - Panasonic PVL751 | PVL751 User Guide - Page 52
Accessory System For ordering instructions, see the Accessory Order Form page. • The listed standard battery use times are based on continuous recording using this Palmcorder. Accessory # Figure Description Price PV-A17 AC Adaptor with DC Power Cable (Charging of the Nickel Cadmium Battery - Panasonic PVL751 | PVL751 User Guide - Page 53
Phone #: Day ( ) Night ( ) TO OBTAIN ANY OF OUR OMNIMOVIE/PALMCORDER ACCESSORIES YOU CAN DO ANY OF THE FOLLOWING: VISIT YOUR LOCAL PANASONIC DEALER OR CALL PANASONIC'S ACCESSORY ORDER LINE AT 1-800-332-5368 [6 AM-5 PM M-F, 6 AM-10:30 AM SAT, PACIFIC TIME] OR MAIL THIS ORDER TO: PANASONIC SERVICES - Panasonic PVL751 | PVL751 User Guide - Page 54
are approximate. Designs and specifications are subject to change without notice. 54 For assistance, please call : 1-800-211-PANA(7262) or send e-mail to : [email protected] - Panasonic PVL751 | PVL751 User Guide - Page 55
Service If a problem arises, you may be able to correct it yourself. See Symptom and Correction list below. Symptom Correction No picture in EVF or LCD monitor ... • Connect Power Source. (pp. 9, 10) • Set POWER to VCR or CAMERA 20) "Panasonic ITS TAPES PLAY IN YOUR • Set POWER to CAMERA, then - Panasonic PVL751 | PVL751 User Guide - Page 56
have a problem. Do not remove the battery (if attached) and write down the displayed number on below. Then, take the camcorder to a service center for completed form and your Proof of Purchase along with your unit to: Panasonic Services Company 1705 N. Randall Road Elgin, IL. 60123-7847 Attn: - Panasonic PVL751 | PVL751 User Guide - Page 57
period, you may contact your dealer or Servicenter. If the problem is not handled to your satisfaction, then write to the Consumer Affairs Department at the Panasonic Consumer Electronics Company address above. SERVICE CALLS WHICH DO NOT INVOLVE DEFECTIVE MATERIALS OR WORKMANSHIP AS DETERMINED - Panasonic PVL751 | PVL751 User Guide - Page 58
-84th Avenue South Kent, WA 98032 HAWAII 99-859 Iwaiwa Street Aiea, Hawaii 96701 Phone (808) 488-1996 Fax (808) 486-4369 Service in Puerto Rico Matsushita Electric of Puerto Rico, Inc. Panasonic Sales Company/ Factory Servicenter: Ave. 65 de Infantería. Km. 9.5 San Gabriel Industrial Park Carolina - Panasonic PVL751 | PVL751 User Guide - Page 59
Spanish Quick Use Guide/Guía Para Uso Rápido Antes de comenzar... • Inserte un casete con Abralo completamente y ajuste el ángulo (vea arriba). 2 Ajuste POWER a VCR. PHOTO VCR OFF CAMERA 3 Presione REWIND/SEARCH para rebobinar la cinta. 4 Presione PLAY para comenzar la reproducción. 5 Presione - Panasonic PVL751 | PVL751 User Guide - Page 60
Digital E.I.S 29 Digital PhotoShot Disk ......... 42 DIGITAL SELECT Switch 26~31, 39, 41 Digital Still Camera ........ 34~41 Digital Wipe Mode 40 Digital 57, 58 M MANUAL FOCUS Button ..... 24 MENU Button 12 Connector 42 PCMCIA Adaptor 46 PHONE (earphone) jack 16, Request for Service Notice ..
-
 1
1 -
 2
2 -
 3
3 -
 4
4 -
 5
5 -
 6
6 -
 7
7 -
8
-
9
-
10
-
11
-
12
-
13
-
14
-
15
-
16
-
17
-
18
-
19
-
20
-
21
-
22
-
23
-
24
-
25
-
26
-
27
-
28
-
29
-
30
-
31
-
32
-
33
-
34
-
35
-
36
-
37
-
38
-
39
-
40
-
41
-
42
-
43
-
44
-
45
-
46
-
47
-
48
-
49
-
50
-
51
-
52
-
53
-
54
-
55
-
56
-
57
-
58
-
59
-
60
 |
 |
Basic Operation
Special Features
For Your Information
Getting Started
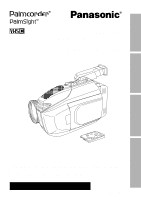
Camcorder
Operating Instructions
Please read these instructions carefully before attempting to operate this product.
Please save this manual.
Guía para rápida consulta en español está incluida.
Model No.
LSQT0359A
For assistance, please call : 1-800-211-PANA(7262) or
send e-mail to : [email protected]
PV-L751