Panasonic PVL751 PVL751 User Guide - Page 16
Camera Recording (basic, Stand-by, Programmed Recording
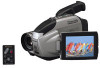 |
View all Panasonic PVL751 manuals
Add to My Manuals
Save this manual to your list of manuals |
Page 16 highlights
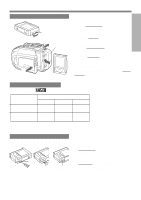
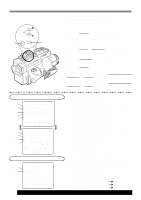
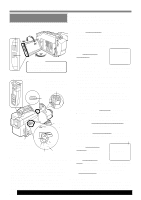
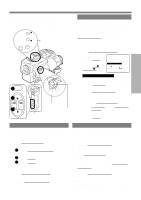
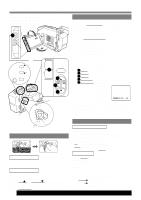
Camera Recording Recording via EVF or LCD Monitor View recording scene on EVF or LCD (Liquid Crystal Display) monitor. 3 Before you begin... • Connect Camcorder to power source. • Insert cassette with record tab (page 11). 1 Press LCD-OPEN to unlock the LCD monitor. Swing LCD monitor fully open and adjust viewing angle. • If you want to record using EVF, close and lock LCD monitor. BRIGHT 1 2 Set POWER to CAMERA. PAUSE LCD-OPEN CAUTION : Rotating partially open LCD monitor may block cassette door and damage Camcorder body. 3 VISION ADJUSTMENT SPEED Built-in Twin Capsule 2-Way Microphone System 4 Lens Cover opens. Power Lamp lights. • Be sure POWER EVF or LCD Monitor is fully turned to (Record/Pause mode) CAMERA position. • EVF or LCD monitor turns on/off by the POWER switch. • EVF shuts off when LCD monitor is opened and turns back on when LCD is closed. • Both EVF and LCD monitor turn on when LCD is at 180° (see above left). This allows both you and the subject to SP/SLP view the recording. 3 LCD : Turn BRIGHT control to monitor adjust LCD monitor brightness level. EVF : Look into EVF and adjust POWER REC Power Lamp VISION ADJUSTMENT to your eyesight. 4 Hold down TAPE SPEED for about 1 5 PHONE (earphone) jack Note: PHOTO VCR OFF CAMERA 62 • When Camcorder is aimed at excessively bright objects, or bright lights, a vertical bar may appear in the picture. This is normal for the CCD pick-up. Try to avoid this when possible. • Using LCD monitor reduces battery operation time. Return LCD monitor to locked position when not in use. • To hear sound while recording, connect earphone (M3 type: not supplied) to PHONE jack. Earphone volume cannot be changed while in CAMERA mode. second to change tape speed to SP/SLP (page 11). 5 Press RECORD/ Tape speed SP PAUSE to start or pause recording. RECORD 6 Set POWER to OFF when finished. EVF or LCD Monitor (Record mode) • To remove the cassette, slide the TAPE EJECT switch (page 11). WARNING: • Do not leave the camcorder with the EVF aimed directly at the sun. This may cause damage to the internal parts of the EVF. 16 For assistance, please call : 1-800-211-PANA(7262) or send e-mail to : [email protected]
-
 1
1 -
2
-
3
-
4
-
5
-
6
-
7
-
8
-
9
-
10
-
 11
11 -
 12
12 -
 13
13 -
 14
14 -
 15
15 -
 16
16 -
 17
17 -
 18
18 -
 19
19 -
 20
20 -
 21
21 -
22
-
23
-
24
-
25
-
26
-
27
-
28
-
29
-
30
-
31
-
32
-
33
-
34
-
35
-
36
-
37
-
38
-
39
-
40
-
41
-
42
-
43
-
44
-
45
-
46
-
47
-
48
-
49
-
50
-
51
-
52
-
53
-
54
-
55
-
56
-
57
-
58
-
59
-
60
 |
 |
