Panasonic TH-65PF12EK User Manual - Page 39
Customizing the Input labels, Selecting the On-Screen Menu Language
 |
View all Panasonic TH-65PF12EK manuals
Add to My Manuals
Save this manual to your list of manuals |
Page 39 highlights
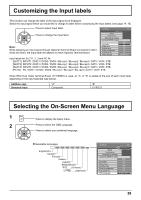
Customizing the Input labels This function can change the label of the Input signal to be displayed. Select the input signal which you would like to change its label before customizing the Input labels. (see page 14, 16) Press to select Input label. Setup 1/2 Press to change the Input label. Note: While selecting an Input signal through Optional Terminal Board connected to Slot1, Slot2 and Slot3, the Input label will depend on each Optional Terminal Board. Signal Screensaver Extended life settings Component/RGB-in select RGB Input label PC Power save Off Standby save Off Power management Off Auto power off OSD Language Off English (UK) Input labels for SLOT1, 2, 3 and PC IN: [SLOT1] INPUT1 / DVD1 / DVD2 / DVD3 / Blu-ray1 / Blu-ray2 / Blu-ray3 / CATV / VCR / STB [SLOT2] INPUT2 / DVD1 / DVD2 / DVD3 / Blu-ray1 / Blu-ray2 / Blu-ray3 / CATV / VCR / STB [SLOT3] INPUT3 / DVD1 / DVD2 / DVD3 / Blu-ray1 / Blu-ray2 / Blu-ray3 / CATV / VCR / STB [PC IN] PC / DVD1 / DVD2 / DVD3 / Blu-ray1 / Blu-ray2 / Blu-ray3 / CATV / VCR / STB When BNC Dual Video Terminal Board (TY-FB9BD) is used, an "A" or "B" is added at the end of each input label, depending on the input selected (see below). Addition sign Selected Input "A" Composite "B" S VIDEO Selecting the On-Screen Menu Language 1 Press to display the Setup menu. 2 Press to select the OSD Language. Press to select your preferred language. Selectable languages English(UK) Deutsch Français Italiano Español ENGLISH(US) .......(Chinese) .......(Japanese) Setup 1/2 Signal Screensaver Extended life settings Component/RGB-in select RGB Input label PC Power save Off Standby save Power management Auto power off OSD Language Off Off Off English (UK) 39
-
 1
1 -
2
-
3
-
4
-
5
-
6
-
7
-
8
-
9
-
10
-
11
-
12
-
13
-
14
-
15
-
16
-
17
-
18
-
19
-
20
-
21
-
22
-
23
-
24
-
25
-
26
-
27
-
28
-
29
-
30
-
31
-
32
-
33
-
 34
34 -
 35
35 -
 36
36 -
 37
37 -
 38
38 -
 39
39 -
 40
40 -
 41
41 -
 42
42 -
 43
43 -
 44
44 -
45
-
46
-
47
-
48
-
49
-
50
-
51
-
52
-
53
-
54
-
55
-
56
-
57
-
58
-
59
-
60
-
61
-
62
-
63
-
64
 |
 |
